Upgrade your Beta project to enable powerful platform features and automation, dramatically reducing your administrative effort
This article applies to Pro, Teams, and Legacy editions.
Configuring your Delta settings
To convert a Beta project into a Delta, enable Ted in your Project, and review your Delta Readiness Checklist:
- Click Management at the top menu
- Hover over Project configuration
- Click Delta settings
- Click See my Delta checklist
- Confirm you have no red warning markers
- Click Active Delta
Wait… what’s a “Delta” Project?
Delta is a product testing methodology that the Centercode platform supports directly. This means that first-class features and functionality are built with Delta processes and configurations in mind. Delta Projects leverage Activities and Features to collect targeted feedback with clear Intent. To encourage and concentrate tester engagement, they’re collaborative Projects run across Phases. Using these and many other signals, the Centercode platform builds automated dashboards while Ted drives consistent participation, giving you valuable time back in your day to focus on perfecting your products.
The remainder of this article guides you to resolving any conflicts or issues when converting your Beta project to a Delta.
Requirements to convert a Beta to a Delta
If you’ve just tried to convert your Beta to a Delta, you likely ran into one or more warnings - misconfigurations or requirements not yet met. This guide will discuss what must be completed before you can leverage all the efficiencies and benefits of a Delta project, including Dashboards, Ted, and more.
Your Project must have particular settings configured to meet the minimum requirements for Delta Testing and to enable Ted. Your Project’s Delta Readiness Checklist will indicate whether or not your configuration is in an ideal state and fully met (pass - green), acceptable but not ideal (warning - orange), or unacceptably unmet (failure - red). Orange indicates that your project may see compromised results from distracted or confused testers, siloed feedback, and other possible impacts, but you may still proceed with converting to a Delta. Due to lacking critical signals used by the platform, only unmet (red) configurations will prevent you from running a Delta project, utilizing Dashboards, and enabling Ted.
This is your Project’s Delta (and therefore Ted) Readiness Checklist:
- Configured Product Settings
- Five or Fewer Feedback Types
- Issues, Ideas, and Praise Feedback Intents
- Feedback Status Intents
- Feature Element Added to Feedback Types
- Feedback Collaboration Enabled
- No Feedback Without a Feature
- No active Custom Participant Surveys
- No Active Tasks
Configured Product Settings
Product Settings steer Ted's behavior as he seeks to engage your testers. These details also help recommend an ideal number of testers and are accessible in program level reporting. The passing status (green) is shown if your Product Settings are completely filled out, while the orange warning is shown if your settings have any fields with “Other” selected.
To set Product Settings within your Project:
- Click Management at the top menu
- Hover over Project configuration
- Click Basic project settings
- Complete the Product Settings page
Learn more about Configuring Detailed Project Settings.
Five or fewer Feedback Types
Delta Tests are intended to have three clearly-understood Feedback Types - Issues, Ideas, and Praise. Two additional custom feedback types will be included on Dashboards (5 in total). The passing status (green) is shown if your project has five or fewer Feedback Types. The warning status (orange) is shown otherwise.
Note: You’re able to utilize more than five Feedback Types in a Delta project, but only the first five will be included in Dashboards.
To archive unnecessary Feedback Types within your Project:
- Click Management at the top menu
- Hover over Project configuration
- Click Feedback types
- Hover over a non-core Feedback Type
- Click Archive and confirm
- Repeat steps 4 and 5 until you have 5 or fewer Feedback Types
Learn more about How to Archive Unused Resources (like extra Feedback Types).
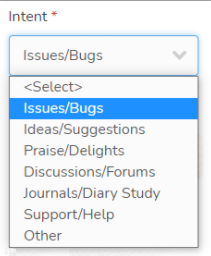
Issue, Idea, and Praise Feedback Intents
Intent refers to the purpose of your Feedback Types, regardless of any custom or unique naming. For example, Centercode’s Delta Template refers to bugs / defects / problems as Issues and feature requests / enhancement requests as Ideas. This homogenization of feedback data enables powerful platform features that rely on having set Feedback Type Intents (e.g. Feedback Type Dashboards)
A properly configured Delta Project requires three key Intents - Issues, Ideas, and Praise. In order to convert your Beta into Delta, your Issues, Ideas, and Praise Feedback Types must have their intents set. The passing status (green) is shown if your Project has these three Feedback Intents. Otherwise, you’ll encounter the failure message (red).
To set Feedback Intent within your Project:
- Click Management at the top menu
- Hover over Project Configuration and click Feedback
- Hover over your Feedback Type, click the Modify pencil
- Click Basic feedback properties
- Under Intent, select an appropriate dropdown selection
- Click Submit
- Repeat steps 3 through 6 until all Feedback Types have Intent configured
Feedback status intents
In addition to ensuring you have all your Feedback Type bases covered by identifying the intent of each type, a Delta project can provide insight into its effect on your product by signaling which feedback has been fixed or implemented. This is done by telling the system the intent of your feedback statuses.
For example, you may send qualified feedback to your engineers and flagging feedback as “Open - Under Review.” This intent signals the system to incorporate that information into your Feedback Dashboards, Product Impact, and more. Alternately, the "Resolved - Exclude" intent can be applied for improperly submitted feedback -- excluded feedback is not incorporated into those outputs.
The Centercode platform offers many Status Intents for the various use cases. A Delta project requires that your core Feedback Types have have Open - New, Resolved - Exclude, and Resolved - Verified intents set. If you don't have these set, you'll encounter the error message "You have Feedback Status Intents missing!"
To set the Feedback Status Intent for a Feedback Type:
- Click Management at the top menu
- Hover over Project Configuration and click Feedback
- Hover over your Feedback Type, click the Modify pencil

- Click Statuses
- Under the Intent column, select the appropriate option for each Status in your Feedback Type's workflow
- Click Submit
Learn more about Declaring the Intent of your Feedback Statuses.
Feature element added to Feedback Types
To convert a Beta to a Delta, each piece of feedback in the Beta will ultimately be associated with a Feature. This allows Delta Dashboards and Ted to automatically organize your collected feedback. In order to identify the affected Feature, you’ll need a Feature Element on your Feedback Forms. If your feedback types don’t have a Feature Element, you’ll see a failure message (red).
Note: To accomplish this requirement, you’ll need an Engagement Phase, Features associated with the Phase, and then a Feature Element on your Feedback Form.
- Information on creating an Engagement Phase.
- Creating a Feature in your Engagement Phase.
- Steps to add a Feature Element to your Feedback Types are below:
To set your Feature Element within your Project's Feedback Types:
- Click Management at the top menu
- Hover over Project Configuration and click Feedback
- Click into your Feedback Type
- Click Create a form element
- Set the Element Type to Feature
- Feature will be defaulted if one has not been added to your Form
- Complete all desired fields
- Click Submit
Learn more about Organizing Tester Engagement using Features.
Feedback collaboration enabled
Collaboration is the interaction between your Participants through various Centercode features like Comments, Voting, and Predictive Match. Delta tests use these features to nurture engagement, prioritize feedback, and much more - far greater value than the individual settings by themselves.
To enable Collaboration, you must set your Feedback to be Public by default, as well as grant the appropriate Feedback Roles to your Participants. Without Collaboration enabled, you’ll get a readiness-check that results in a failure message (red).
To enable Public Feedback within your Project:
- Click Management at the top menu
- Hover over Project Configuration and click Feedback
- Hover over your Feedback Type, click the Modify pencil
- Click Feedback collaboration settings
- Scroll down and toggle on Set all feedback public by default
- Click Submit
To set appropriate Feedback Roles within your Project:
- Click Management at the top menu
- Hover over Project Configuration and click Feedback
- Hover over your Feedback Type, click the Modify pencil
- Click Feedback roles
- Dropdown User role and select Participants
- Ensure that the correct Participant teams have the following Roles enabled:
- Access Predictive Match
- Vote For Feedback
- Submit Feedback
- View Replies
- Post Replies
- Access Public Feedback
- Access Submitted Feedback
The defaults above will enable effective collaboration within your project. That said, Collaboration has plenty of customization options. Learn more about Configuring Feedback Collaboration.
No Feedback without Features
Once your Feedback Types have a Feature Element, your existing Feedback must each be associated with your product’s Features. This ensures your feedback is properly organized and prioritized, and tells the Dashboards, Ted, and other automated functions exactly what to do with that feedback. If you have any Feedback lacking a required Feature, you’ll see a failure message (red).
There are two ways to fix your Feedback - update it individually (if you only have a few to fix), or update your Feedback in bulk. Here’s how to do it in bulk from within your Project:
- Click Feedback in the navigation bar
- Click into the Feedback Type of the feedback tickets you wish to update
- If you immediately see feedback, that means you’re viewing the Simple List. If so, Click the Switch to Advanced View button at the top of your page.
- Select the desired Filter you wish to use (No Filter will mass modify ALL your Feedback)
- From the Action drop-down menu, select Mass Feedback Modify
- Click the Perform Action button at the bottom of the page.
- Adjust any of the settings as desired
- In order to mass-edit the Feature field, select the Feature element’s name in the list of options, then choose the Feature you want to apply to ALL Feedback in the chosen Filter
- Click on the Submit button at the bottom of the page to confirm
- Review the results and Click on the Confirm macro button
- Repeat steps 1-9 until all Feedback in all Feedback Types have a Feature selected
Learn more about Updating Feedback in Bulk.
No custom participant-facing Surveys
Surveys often create data silos that are inactionable and redundant to other forms of feedback. As such, a Delta-enabled project automatically generates specific surveys to collect user satisfaction and direct participants to provide rich, actionable feedback in the form of Issues, Ideas, and Praise.
While you can still run a Delta Project with a few custom surveys like applicant-facing Qualification Surveys, many custom surveys will detract from the efficiency and value of your Delta project. As such, we recommend that you Archive or remove any Participant-facing surveys. You’ll see a pass message (green) if you have no active participant-facing surveys, and will see a warning message (orange) if any are still active but can still proceed if those Surveys are absolutely necessary.
To archive your Surveys within your Project:
- Click Management
- Click Surveys
- Hover over your active Surveys
- Click Archive and Confirm
- Repeat steps 3 & 4 until all active Surveys are archived
No active Tasks
Delta Projects don't leverage legacy Tasks, as Ted automatically generates activities that are tied in to Features, Phases, Satisfaction, and Feedback. Using Tasks in addition to the Ted generated activities can confuse testers and fragment your feedback. If you have any active Tasks in your project, you’ll receive a warning message (orange) but can still proceed if those Tasks are absolutely necessary.
To archive your Tasks within your Project:
- Click Management at the top menu
- Click Tasks
- Hover over your active Tasks
- Click Archive and Confirm
- Repeat steps 3 & 4 until all active Tasks are archived
No active Legacy Forums
Legacy Forums have been replaced by the Centercode’s collaborative feedback engine and have no place in a true Delta project. If you have any Legacy Forums enabled, you’ll see a Warning message (orange) but can still proceed if those Forums are absolutely necessary.
To archive your Legacy Forums within your Project:
- Click Management at the top menu
- Click Forums
- Hover over your active Forums and Forum Groups
- Click Archive and Confirm
- Repeat steps 3 & 4 until all active Tasks are archived
Centercode encourages using Feedback for actionable, empowered forum experiences to prevent data silos and tester confusion. Learn how to Use Feedback Types to offer a Forum-like Experience.
Notes
- To activate Ted, you need to score a green (good to go) or yellow (good enough) result for all the items listed below. For the best results in your Delta test, we highly recommend going for green!