This article applies to Pro, Team, and Legacy editions.
A true Delta test leverages the power of tester collaboration and Ted encourages testers to interact with one another within Feedback. In addition to Issues, Ideas, and Praise, a Discussions Feedback Type is commonly used to capture tester conversations and encourage persistent interaction. If you need to expand or separate your Discussions, creating a Feedback Forum can be a viable option.
What are Feedback Forums? Why use them?
Centercode’s standard user forums are executed through Feedback Types similar to Issues, Ideas, and Praise. By utilizing Feedback-based Forums (Feedback Forums) you have access to:
- Access to robust reporting data
- Increased participant engagement
- An increased sense of community in your program
- An outlet for your testers to talk amongst themselves without violating NDA
Centercode’s Delta Templates are configured with Discussions, a single Feedback Forum already configured and enabled, so ideally you’ll leverage the resources we’ve provided. However, if you’re looking to reap the benefits of collaboration in your custom Beta test or are converting an existing Beta test into a Delta, follow the instructions below to create and configure your own Feedback Forum.
Creating a Feedback Forum
In this scenario, we’ll be creating a Feedback Forum to mirror what’s available in Centercode’s Delta Template. This will allow you to create a Feedback Forum into your existing project, but if you are looking to start a new project, please consider using Centercode’s Delta Template.
From your Project Homepage:
- Click Management at the top menu
- Hover over Project configuration and click Feedback
- Click Create a feedback type
- Enter a name for the Feedback Type
- Select Discussions/Forums for the Intent of the Feedback Type
- Make any adjustments to the auto-populated fields based on name
Once you’ve finished with the Basic Settings, click Next to set your Feedback Collaboration Settings.
Enable feedback collaboration
Now that you’ve set your Feedback Type’s Basic Settings, you’re now prompted to set your Feedback Collaboration Settings. Feedback Collaboration basically encourages testers to not only submit their own feedback, but also contribute to feedback from other testers.
Please note that these settings are pre-populated and don't generally need to be changed. It’s recommended to leave numeric values unchanged unless you have a strong understanding of the platform. In this scenario of creating a Feedback Forum, please leave all settings unchanged and toggle “Set All Feedback Public by Default”.
Please refer to the Feedback Collaboration article for in-depth information and various scenario considerations.
Once you’ve customized your Feedback Collaboration Settings and toggled on “Set All Feedback Public by Default”, click Next to configure your Feedback Roles.
Feedback roles
Feedback Roles are a static set of named Access Roles, available per Feedback Type, that allow Project Managers to provide granular control over accessing Feedback within their Projects. These Roles only pertain to Feedback, usually including Issues, Ideas, Discussions, etc.
- Project Managers should have full access over the entire feedback type as shown here.
- Internal Teams should have access focusing on viewing, updating, and moderating feedback as shown here.
- Participants should have access to comments and to submit and view public feedback as shown here.
Statuses
Statuses define feedback life-cycles. For a Feedback Forum, it’s recommended that Open and Locked statuses are available, with Locked having the Archive checkbox. The Archive checkbox grants Statuses the effect of locking feedback, where collaboration is no longer available. The Intent dropdown refers to the significance of the status in relation to your test. For example, off-topic of inappropriately placed feedback would prompt your internal triage team to mark the feedback as Locked.
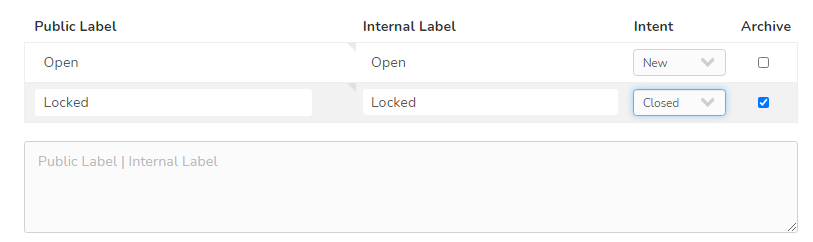
Once you’ve added your Open, Locked, and other Statuses, click Next to continue to the Workflow setup.
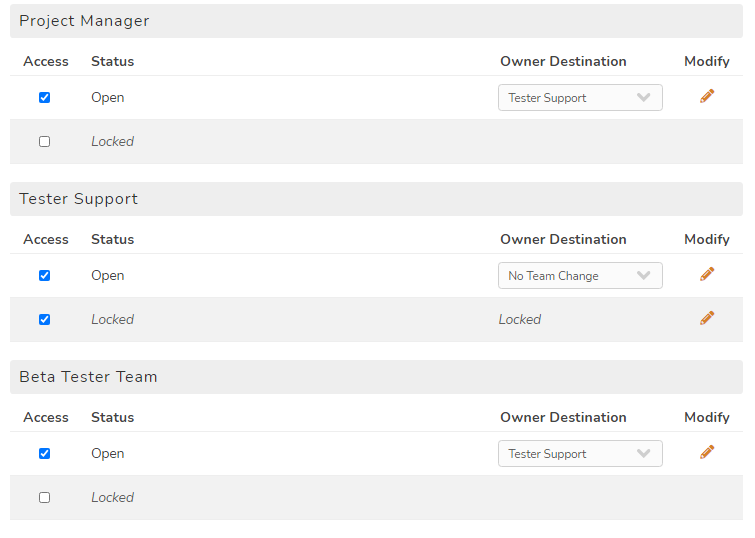
Workflow
Workflow dictates how each team can modify and submit feedback. Ownership Destination refers to the team responsible for that feedback based on its Status and the team that moved it to that stage in its lifecycle.
The options here for Feedback Forums will be intentionally flat, as shown below. This configuration allows your Tester Support team to close down inappropriate or off-topic threads as necessary. For administrative control, Owner Destination should be set to your Support team that will be moderating the discussions. You can read more about Workflow here.
Once you’ve set your Workflow similar to the above recommendation, click Next to customize your Feedback Form.
Feedback Form
The Feedback Form refers to what can be filled out when submitting a Feedback Forum post. New Feedback Types start with Title and Description. You can click the Modify pencil below each element to edit the names of those fields (eg: Topic & Body), or add more elements as necessary by clicking Create a form element at the top of your page. It’s recommended that you create a Feature Form Element (dropdown selection) to provide participants with topics relevant to your test and a File attachment Form Element.
To learn more about the various Form Elements you can use to customize your form, click here.
Once you’ve added all the form elements for your Feedback Form, click Publish at the bottom of your page. Your new Forum will now be accessible under the Feedback dropdown menu.
Creating and Grouping Multiple Forums
Feedback Type Groups facilitate separate Feedback Types to be grouped together and shown in a more traditional forum style. This allows for multiple Forums, perhaps to facilitate different Team access or focus on different experiences. The below example groups together off-topic Feedback Forums.
From your Project Homepage:
- Click Management at the top menu
- Hover over Project configuration and click Feedback
- Click Create a feedback type group
- Set a Name, Title, and optional description of your Feedback Type Group
- Click Submit to save your Feedback Type Group
Once your Feedback Type Group is created, you can modify the Basic Settings of any Feedback Types to set them to your new Group.
From Feedback Type Management:
- Hover over a Feedback Type and click the Modify pencil
- Under Group, select your Feedback type group
- Click Submit
- Repeat as often as needed for desired Feedback Types