This article applies to Team and Legacy editions.
Access to resources within Centercode, whether surveys or software downloads, feedback, or notices, is controlled by the combination of Teams and Roles. Teams allow you to organize and grant access to specific groups of users within your community and projects. Roles specifically designate the access and responsibilities provided to each respective team and therefore to the users within those teams.
Together, teams and roles set access on a broad level, affecting multiple users. In order to provide the right level of access, you may need to adjust your users' teams multiple times throughout the duration of a project. There are many different ways to adjust and control a user's team assignment, from when users are onboarded to on-the-fly corrections. This article will cover the various methods of initiating and adjusting a user account's team assignment.
Table of Contents
- Accessing Teams and Roles
- Understanding Teams
- Creating Teams
- Understanding Roles
- Understanding Access
- Troubleshooting
Accessing Teams and Roles
For community level teams and roles:
- Click the Community logo in the top left of the navigation menu
- Click Community management
- Select Team or Roles
For project level teams and roles:
- Click Management in the navigation menu
- Click Users
- Select Teams or Roles
Understanding Teams
Team Management Overview
Create teams to granularly control access to forms, resources, and feedback. Alternatively, use teams to group users with similar characteristics, like demographic and technical segmentations, in order to have greater organization for reporting purposes or to customize content for specific groups.
For example, an iOS team might have a slightly different activity and related survey to complete than an Android team, due to the differences in operating systems. Teams allow you to easily ensure that the right people have access to the right activities and correct surveys.
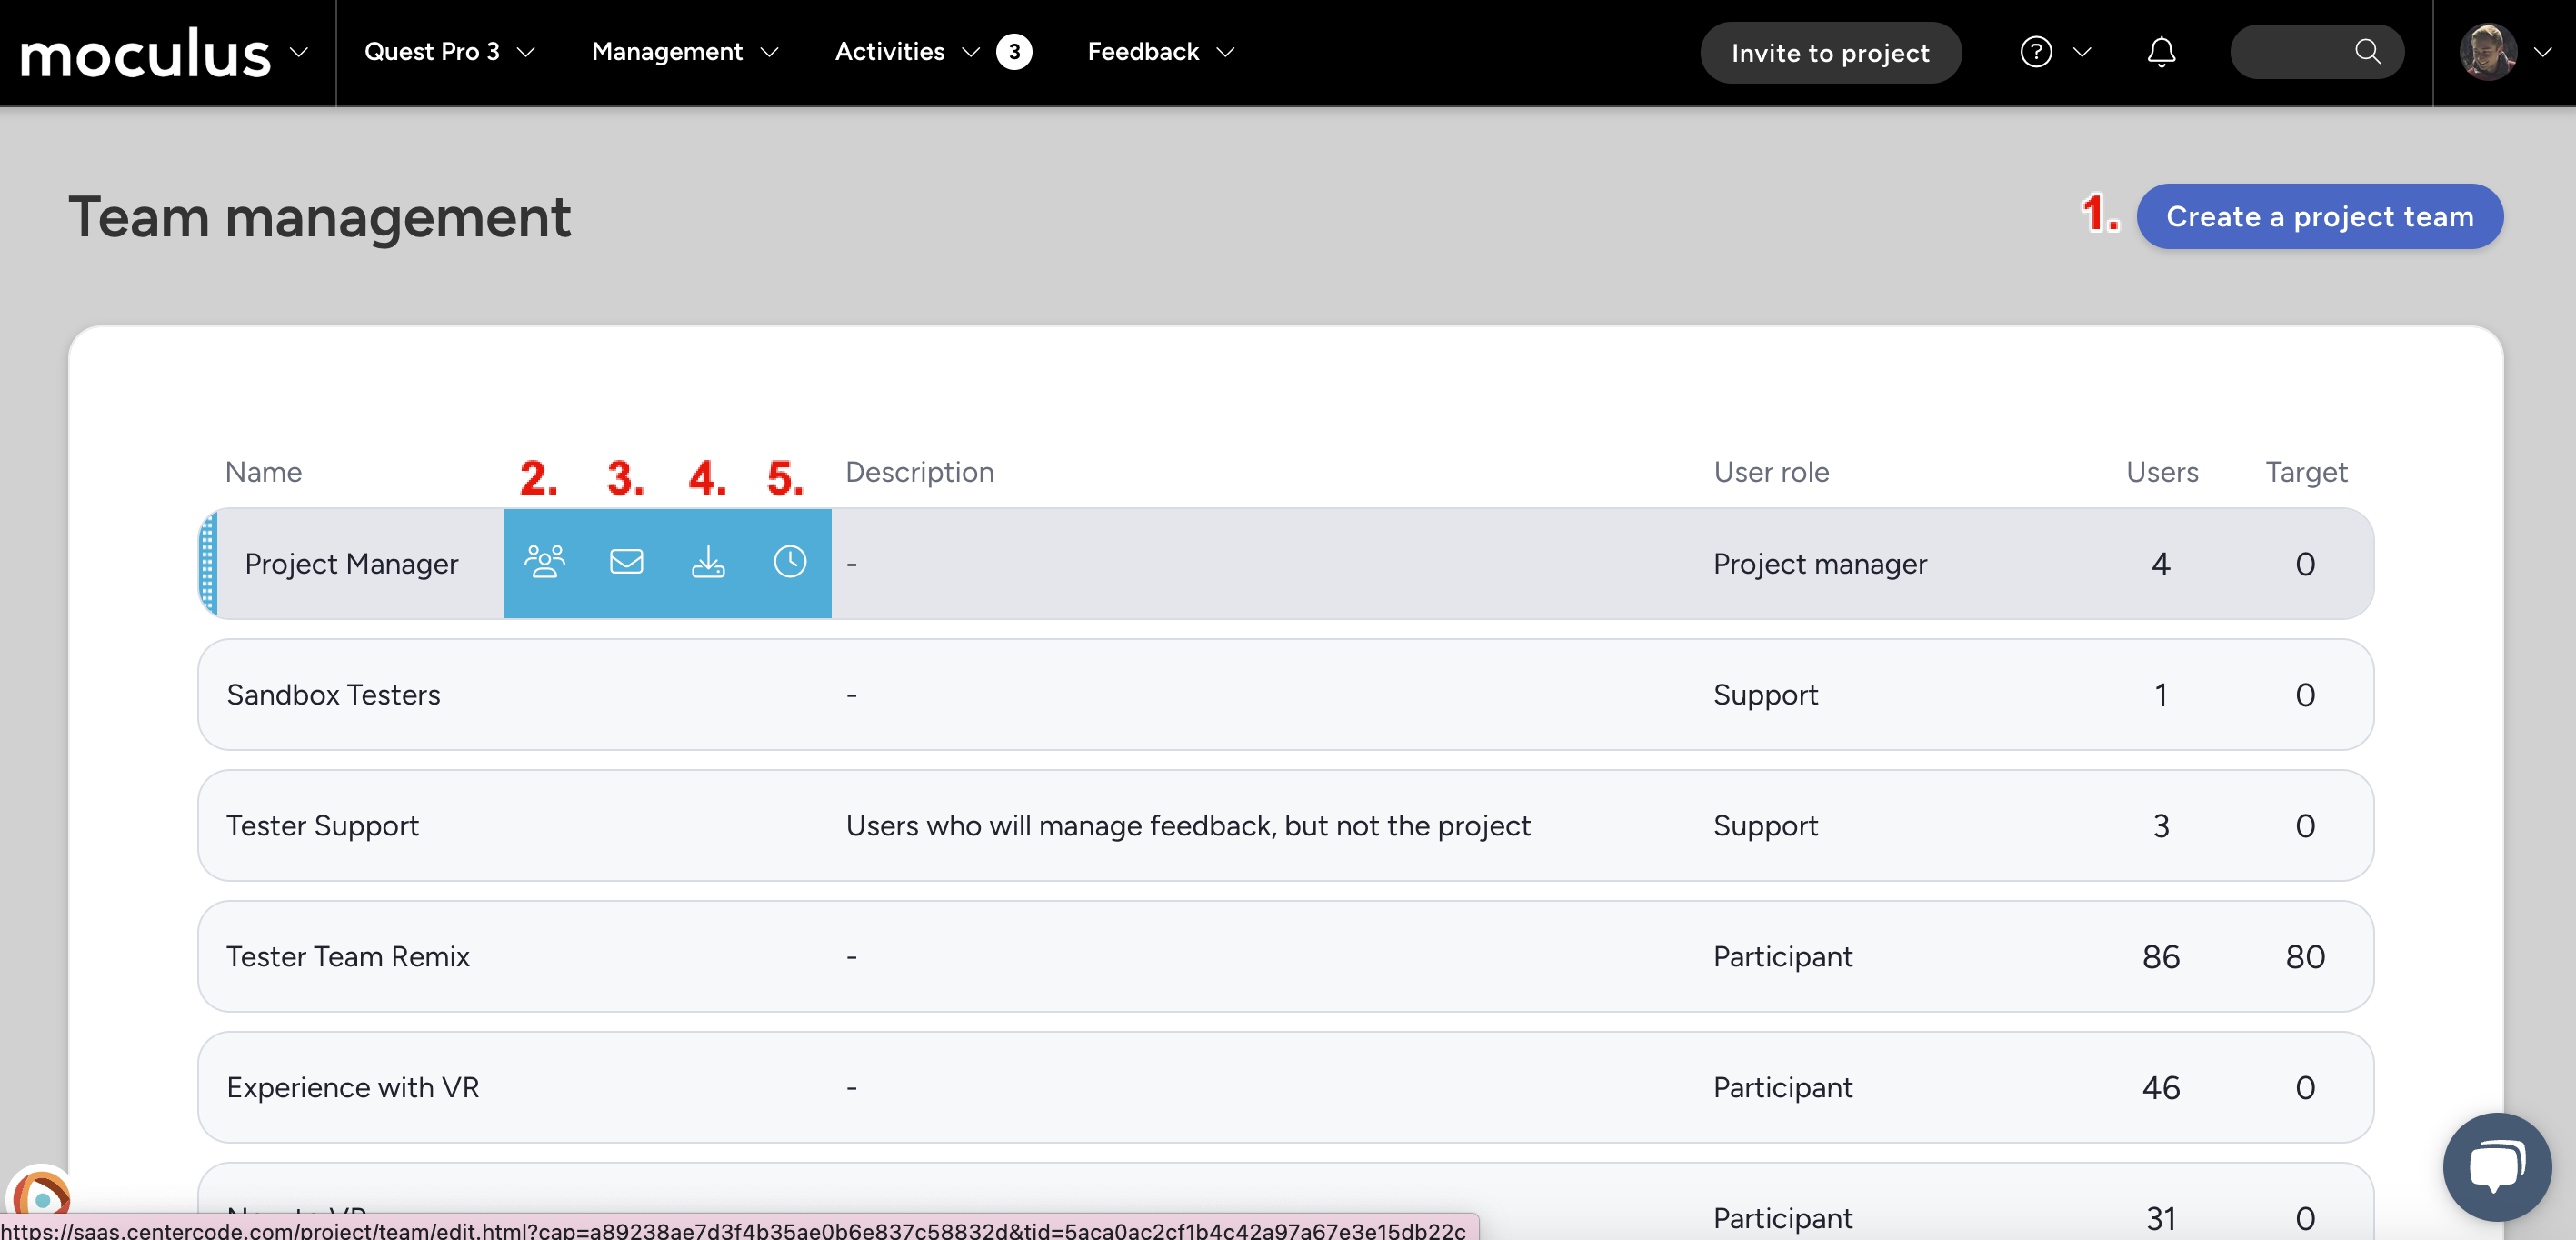
Create a project team:Configure key details about your new team.View users: Shows the current team user list.Email: Allows you to email all users on the team.Import users: This tool lets you add existing users to additional teams based on their email address.View log: An activity log that shows when users were added and removed from the team.
Creating Teams
After clicking the Create a [scope] team button, you'll navigate to the Create a team interface. Here, you can create a new team from scratch in order to organize your users or granularly control their access.
Create a Team Options:
Team name: What you would like to name your team.Team description: Description of the team (internal only).User role: Identifies which user role this team will belong to such as Administrator, Project Creator, or Member at the Community level and Project Manager, Support, Participant, or Applicant at the project level. This selection determines the team's possible access.
NOTE: Once a team has been created its user role CANNOT be changed, so be sure you are setting this correctly!Copy access from: Allows you to select an existing community or project team to copy their existing access.Target users: If applicable, enter a specific target team member amount (internal only).Feedback impact factor: This allows you to add or reduce priority for feedback submitted by certain teams in your project. Consider VIPs (+) or low-tier customers (-).
Learn more: How Do I Use Feedback Impact Score?Access cross-project label: Labels are unifying labels created by community admins and used to identify similar resources across projects that may not use the same vocabulary for cross-project reporting purposes.
Learn more: Reporting across all projectsTeam members: Allows you to select and remove available users (standard or search view available).
💡 Ted Tips:
-
Use demographic or technical segmentations as teams for granular access control and to slice and dice your reports
-
Always assign minimal necessary roles—follow the principle of least privilege
-
Use "Copy Access From" when creating new teams to streamline setup
-
Test user access using a test account to confirm expected behavior before launch
Understanding Roles
Static Roles define baseline permissions at both the community and project levels. These set blanket rights for your teams to access your portal and resources. Here are the available static roles and their functions:
Dynamic Roles are necessary within Project Feedback Types. These set access for feedback your teams can view and submit. Here are the available dynamic roles and their functions:
Teams + Roles = Access
Recruiting
Every account in Centercode starts on one or more teams. Recruitments, found within Recruiting, provide this structure. As any account joins your portal through a recruitment, it’s added to the team(s) selected. From there, everything else is controlled through assigning roles to those teams. You can then leverage those accounts or those teams for access control or even as a means for reassignment to specific groups for segmentation purposes.
In a nutshell, access is granted when a user is placed on a team, and that team is assigned one or more roles which provide access to resources and tools in Centercode. You can visualize it like this:
👥 User → 👥 Team → 🔐 Role → ✅ Resource/Tool Access
Ad hoc team adjustment
As a common practice after an application process, where users are screened based on their Application Survey responses, managers often turn to ad hoc team adjustments to fine-tune their end-users' access to various resources. This is done in a few ways:
- Individually from the User Card
- Individually from any user summary page
- In bulk via user management
- In bulk and automated via Notice Macros
Controlling access individually via the User Card
The single quickest way to adjust a user's teams is by using the User Card - an interactive hover panel that displays key information and functions. After finding the user anywhere in the site (user lists, dashboards, feedback lists or ticket views, etc.), click their avatar to open the user card.
Just click into the Team(s) field on the card, add or remove Teams, and confirm your changes.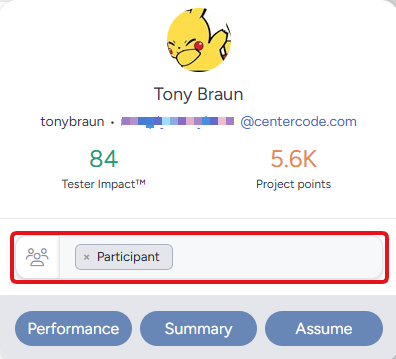
Controlling access individually via User Summary
User summaries provide you with a comprehensive summary of your users’ data and in-site activities, which can be drilled into for details. If you know precisely which users whose teams you need to adjust, accessing their user summaries directly is the easiest and most straightforward method. It allows you to have full knowledge of a user to pinpoint and customize their experience.
Controlling Access (in bulk) via User Management
The Community/Project Users tool allows you to access user data gathered by the system, update user teams in bulk, create new teams on-the-fly, and remove users from their previous teams. Having an Automated Notice Macro is handy for segmenting and defining your users, but it’s fine to adjust teams manually. A common use is after application survey responses have been reviewed, place qualified Applicants in bulk to become Participants via the Project users tool.
Controlling Access via (in bulk) Automated Notice Macro
Team segmentation using Automated Notice Macros is a bit more complex. It requires that you've configured a macro to properly adjusts the users' teams. To create the user macro to accomplish your goals (adjust team, email the user, notify the manager, or any combination of options), first check out this article . Be sure to test the process before going live with it.
Troubleshooting

When a user isn't permitted to access a given page, they'll encounter an error like the one shown above. This typically means they were directed to a page (ex: via link in an email) that they don't have access to. Here are common solutions:
- If your users can’t see their projects on your community homepage, they’re likely lacking the access project role from within that project.
- If your testers are unable to access your Release / Content / Survey / etc, those resources are likely missing the appropriate team access within the resource’s basic settings or have an expiration date set that has passed.
Why are testers reporting a "The page you are attempting to access is unavailable" error?
If your users report that they're seeing the "access is unavailable" message, this indicates that they are attempting to access a link provided to them that their account doesn't have the appropriate access rights to, or simply had their Team access changed during their current session. Verify their access to the resource giving the error (you may need to ask the tester to provide the link) and ensure their Teams and User Roles are set correctly.
Do administrative Teams come with default access?
When you create new resources like Custom Surveys, you will notice that administrative teams do not start with access to all administrative permissions. For example, Results and Moderate roles on Custom Surveys are disabled for all teams by default.
By not copying permissions or automatically adding access in this way, we ensure that access to administrative functions (like ones that provide access to user data) is intentional. Further, this enables you to create your ideal PM-Lite and Support teams with exactly the access they need.
I can't find the role I am looking for!
Centercode roles exist in multiple areas of the platform, so you'll want to be sure you're looking in the right spot!
- Community role management
Accessed via Community Menu > Community Management > Roles
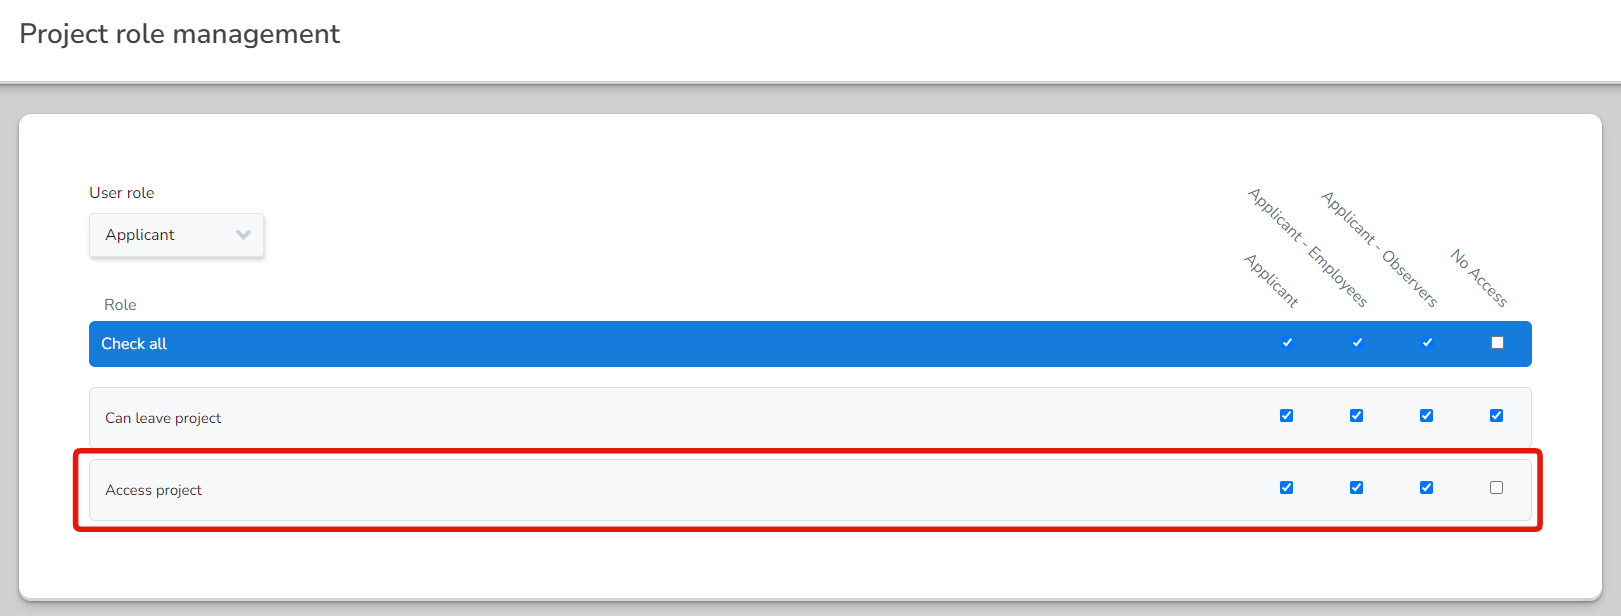
These roles let you control various community level roles, such as the ability to create and view community reports, create projects, and control whether members have the ability to opt out of the community, etc - Project role management
Accessed via Management > Users > Roles
These roles let you control various project level roles, such as the ability to create and view project reports, create project resources, and control whether members can access the project - Feedback roles
Accessed via Management > Project configuration > Feedback Types > Select a feedback type > Roles
Feedback roles control users/teams feedback permissions on a PER FEEDBACK TYPE basis, you'll need to configure these for each feedback type. These settings control what types of tickets users are able to see, if they have submit access, etc.