Sending Centercode feedback to external systems via Webhook. Connect to issue trackers, custom endpoints, Salesforce, and more using Webhooks.
This article applies to Team and Legacy editions.
Note that while Centercode’s integration features are intended to be approachable by a Customer Validation Professional, you might need to enlist help from an internal technical resource and refer to our vocabulary and troubleshooting documentation .
Through Enhanced Integrations, Centercode offers functionality enabling Centercode to seamlessly send feedback data to your external systems through API integration.
The principles included in this guide apply to triggering a Feedback or User Webhook Macro within Centercode to any API-capable endpoint.
In this example, we're sending Centercode feedback data to your Slack workspace, but you're able to substitute other third party systems, such as Salesforce. Note that we offer a first-class Slack integration, but a fully custom connection is possible, as well. This can be used as a means of issue escalation and reduces the risk of important issues falling through the cracks.
If you’re looking for the ability to make bulk Centercode data available to systems like Tableau, Domo, or MS Power BI to take advantage of their reporting power, see our Data Packages article.
In this guide, you will:
- Enable Webhooks in your third-party system (e.g.: Slack)
- Create a POST Webhook Macro in Centercode
In order to configure both sides of this integration, you will need:
- Access to an existing API Key or Community Manager access to create a new one
- Project Manager access in the project of your choice (or your project template)
- A Slack Administrator account or assistance from your Slack Administrator
Setting your external system to listen for Centercode
1. Set your third party system (Slack) to accept incoming webhooks
To start, you’ll need to configure your third-party system to accept incoming webhooks. Webhooks are how external systems (like Centercode) send data to other systems. Enabling webhooks provides a path for Centercode to interact with your system (ex: Salesforce, Confluence, etc.) for a predetermined purpose - to send data.
Please note enabling Webhooks may likely require global administrator access within your system.
To get started in Slack:
- Sign into your Slack API
- Click Create new app
- Create a name and select Slack workspace
- Configure your Basic Information for your app
- Activate Incoming Webhook.
- Copy / Save your Webhook URL (needed in Section 3 below)
Preparing to send data to your external system
2. Creating an API Key
The first step in any API integration is to ensure that you have an API Key available within your Centercode Community. While this integration doesn’t use an API key, your integration features won’t be visible unless one is available.
If necessary, create a Community API Key by following steps outlined here.
3. Creating a Feedback Macro
Macros allow you to create a single instruction that includes a set of actions to complete a desired task. In this example, we’re creating a Feedback Macro to send Issue data into your Slack workspace.
From the Project Home:
- Click the desired Feedback Type (in the Feedback menu in the navigation bar)
- If necessary, click the Switch to Advanced View button (top right corner)
- Click Feedback resources
- Create a new Macro or modify an existing Macro
- Click Trigger webhooks
At this point, technical help may be necessary - please work with a developer (and/or Centercode)
- Click Web Request to select POST
- Enter the Webhook URL provided by Slack in Section 1, Step 6 above
- Add headers (discussed in Notes below), if required
- Select JSON
- Add your JSON body (detailed below)
- Add Dynamic Tags, if desired (detailed below)
- Complete any additional, optional fields
- If you want your Feedback Macro to display on the left-hand menu while viewing feedback, enable Show in Feedback Management & select the Teams you wish to use your Feedback Macro. It will display to the user who Checks Out feedback.
- Click Submit
Headers for authentication
Headers allow you to define additional static values sent with each request. Not all API calls require headers to be defined. A common use for headers it to provide authorization for your Webhook by adding your access key to your header and specify how you want returned values to be formatted.
Authorization header example:
Authorization: 2nt6cs2EyDmZ5fhNNV6cvAIP
Return value formatting example:
Content-Type: application/json
The JSON body
The JSON Body field determines what will be sent from Centercode to your external system. Requirements are determined by your external system. This example is specific to Slack and its specific customized JSON usage. Please feel free to build upon the basic “text” requirement to include important feedback data:
{
"text": "This is the text that will be sent to your Slack”
}
Here’s a more advanced example of Slack’s formatting. Text within ((double-parentheses)) are Centercode’s dynamic tags. Refer this Slack API documentation for further advanced formatting help.
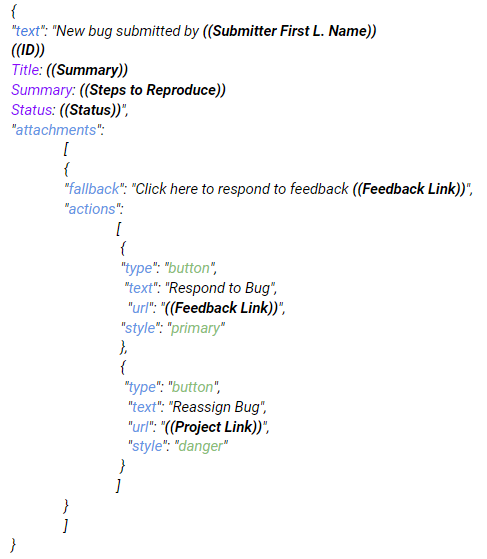
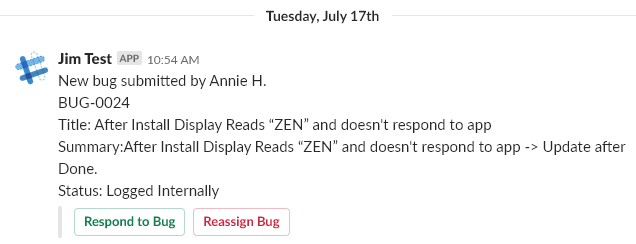
The code above results in the Slack post below:
Using your new webhook
Once your Webhook Macro is configured, you may use it to send feedback data to your external system at any time.
4. Using your webhook
Like any Feedback Macro within Centercode, you can use your Macro manually (individually or in bulk), via automation on ticket submission or modify, or on an automated schedule (click here).
Bulk Manual Trigger
To trigger manually, start at the Project Homepage:
- Click the desired Feedback Type (in the Feedback menu in the navigation bar)
- Create a Filter to target specific feedback categories, statuses, etc. if desired
- Under Action, select your Webhook Macro
- Click Perform Action
You’ve just sent your data to your third-party system
Troubleshooting your webhook
If you find that your Webhook failed or that data isn’t updated as expected, you’ll want to review the Webhook’s logs to troubleshoot any issues.
From User Management:
- Click User resources
- Hover over your Macro and click Macro webhook log
- Hover over a username and click Macro webhook log
Status codes are covered in this article:
Understanding Integration Terms & Troubleshooting