Page Actions
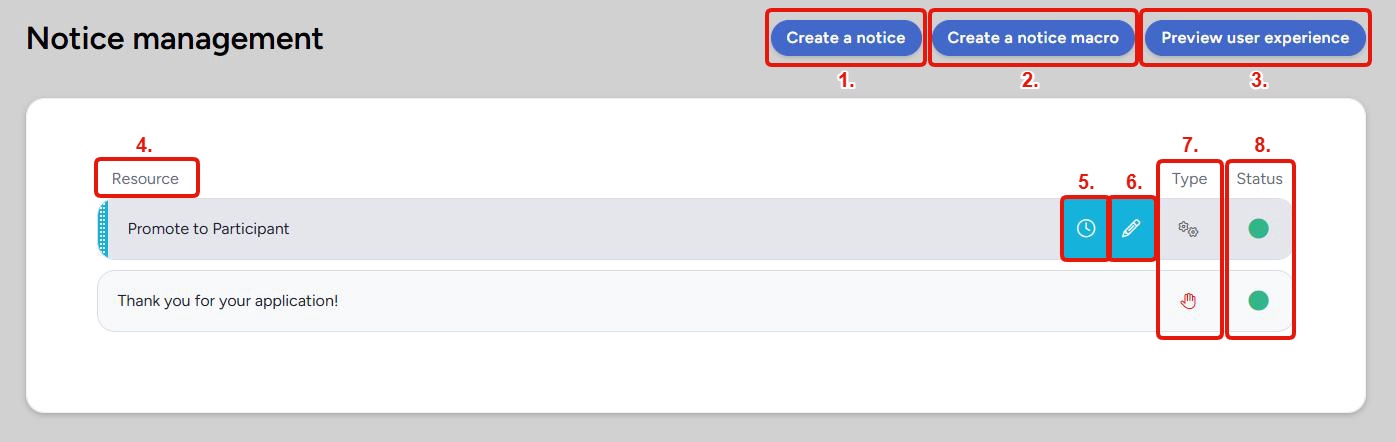
1. Create a Notice: Opens the notice creation page, where you configure a resource as a notice and define which teams it applies to. Notices present users with a resource (a survey, agreement, content page, or similar) that they must view or complete before continuing into the community or project. For a full breakdown of notice types and when to use them, see Centercode Basics: Notices.
2. Create a Notice Macro: Opens the notice macro creation page. A notice macro is an automated action that runs when a user reaches a specific point in the notice chain. Unlike a standard macro that you trigger manually, a notice macro fires automatically as part of the notice process. Use notice macros to segment users into teams, send email, apply ranks, and more based on how users move through the chain. See Notice Macros for a guide to setting them up.
3. Preview User Experience: Launches a simulation of the notice chain as a user would see it. Use this to verify that your notices appear in the right order, display correctly, and behave as expected before users encounter them. See User Experience Preview Overview for more on how the preview works.
Notice List
The table below the action buttons lists every resource currently configured as a notice. Each row represents one notice in the chain.
4. Resource:The name of the resource set as a notice. This is the survey, agreement, content page, or notice macro that users will encounter at this point in the chain. Click the resource name to view it.
5. Notice Log: (clock icon)Opens the notice log for that resource, showing every user the notice has been run against and when. From the log you can clear the notice history entirely or remove individual users, which allows those users to encounter the notice again the next time they reach it in the chain. This is useful for re-presenting NDAs after an update or resetting a survey for a specific user.
6. Modify: Opens the modify page for that notice, where you can update its settings, team access, or linked resource.
7. Type: Indicates the kind of notice this row represents. Different notice types serve different purposes in the chain. For a breakdown of each type and its typical use cases, see Centercode Basics: Notices.
8. Status: Shows whether the notice is currently active and accessible to the teams it's assigned to. A green indicator means the notice is live. For more on how resource access is configured and what affects a notice's status, see How do I control access to resources?
💡 Ted Tip: I recommend using Preview User Experience any time you add or reorder a notice. The chain can behave unexpectedly if a blocking notice appears before a user has completed an earlier step, and previewing takes only a moment to catch that before your users do.
Notes
- Notices run in the order they appear in the list. If you need to reorder them, see Centercode Basics: Notices
- Clearing the notice log for a user resets their completion status for that notice. The next time they reach it in the chain, they'll be prompted to complete it again.
- Notice macros appear in the list alongside standard notices. The Type column distinguishes them from resource-based notices.
- For help troubleshooting users who aren't seeing their notices, see Notices FAQ.