- What does this integration do?
- Configuring app store settings
- Setting up the integration within Centercode
- Enabling app store account information collection
- Collecting app store account information via notices
- Segmenting your users
- Setting up an app store release type
- Adding releases to your feedback forms
- Reporting using release as a criteria
What does this integration do?
Centercode's integration with TestFlight and Google Play has two main modes of operation, Membership syncing, and Build monitoring.
Membership syncing
When you configure a Centercode release type for TestFlight automation, you select a Centercode team and map it to a TestFlight external testing group.
Once that is set up, Centercode continuously syncs the members of its team to your group on a recurring basis (currently, every 5 minutes). This grants the Centercode testers beta access to any builds assigned to that group. Centercode only supports external testing groups.
Build monitoring
The other main operation of Centercode's integration is monitoring your external testing groups for new builds. You can configure your Centercode release type such that whenever a new build is detected, a corresponding Centercode release is automatically created (in a draft or published state). Your admins can also receive an automatic email notification when a release is created. You are also able to trigger this functionality via manual release creation, if you don't want to fully automate your releases.
Connecting Centercode to Your App Host
The first step in this process will be configuring Google Play or TestFlight to connect to Centercode, and collecting the tokens required to complete the connection between Centercode and your app host.
Configuring your app store settings and acquiring tokens
This process is fairly technical, and requires that you have admin access to your chosen app store. The following guides provide step by step instructions on how to configure TestFlight and Google Play for connection with Centercode.
Setting up the Integration in Centercode
The next still will be using the token(s) you just gathered to connect Centercode with your app store of choice.
- Navigate to the upper left Community menu
- Select Community configuration
- Click Integrations center
- Click the TestFlight or Google Play integration
If this is the first time you’re setting up either integration you’ll be taken directly to the integration setup page, if you’ve previously setup the integration you’ll be taken to a summary page with the option to review your existing authentication tokens and the ability to add new tokens.
Connecting Centercode to TestFlight
You will be presented with a few different fields to fill out:
Name: This name is only used within Centercode to provide clarity on which integration is being usedKey ID: This information is generated in the Team Keys section of the App Store Connect settingsIssuer ID: This information is generated in the Team Keys section of the App Store Connect settingsPrivate key (.p8): This information is generated in the Team Keys section of the App Store Connect settings
Once you have entered all of this information, use the Test configuration button to verify if the integration is able to connect properly. If everything is working properly, click Submit!
Connecting Centercode to Google Play
You will be presented with a few different fields to fill out:
Name: This name is only used within Centercode to provide clarity on which integration is being usedService key (.json): This information is generated in the Service accounts section of the Google Cloud Console settings
Note: after submitting this page this information will not be displayed on future edits
Once you have entered all of this information, use the Test configuration button to verify if the integration is able to connect properly. If everything is working properly, click Submit!
Editing or removing authentication tokens
Important: removing the integration will immediately cut off access to the external app store. If you’re currently using the integration within a project we recommend archiving or turning off app store automation for the relevant release types first and waiting 10 minutes before removing the authentication tokens. This will ensure any testers are removed from accessing beta builds in your external systems before the API connection is cut.
Enabling and Collecting App Store Account Information
Enabling app store account information
App store integrations require your testers' account information in order to grant access to beta apps. In order to gather this information you need to enable their collection via the user account settings page within Community configuration.
- Navigate to the upper left Community menu
- Select Community configuration
- Click User account settings
- Scroll to the App store account settings section to modify these settings
The dropdown beneath each app store account type will provide you with a few different options for account information collection.
Unavailable: This is the default setting, and means that the field to input their account information for this app store account type will never be presented to the tester.Optional: This setting means that the option to enter this type of app store account information will be presented to testers (both when creating a new Centercode account, or editing the account details of an existing account). It will also make this information available to be collected via "Account verification" notice (explained below). This information will not be required and will not prevent users from creating accounts if left blank.Account verification only: This settings means that this type of app store account information collection will only occur if you configure a community or project level "Account verification" notice (explained below) to force users on certain teams to be presented with these fields. It will not be shown or available to them otherwise.
Collecting app store account information via notices
Now that you have enabled app store account information you may want to force users to be presented with the opportunity to enter this information. This can be done via the use of "notices". Notices are a way to force users on certain teams to be presented with certain resources (such as content, surveys, etc) on their next login. We will now configure a community-level "Account verification" notice that will allow users to enter their app store account information.
Take the following steps to create a community level account verification targeting all members of your community:
- Navigate to the upper left Community menu
- Select Community management
- Click Notices
- Click Create a notice
- Select an available Content type to create this notice under
- In the Notice details section choose Account verification as the notice type
- Select the appropriate app store account info fields - Apple ID, Google Account, or both.
- In the Team access section select all available Member teams
- Click Submit to proceed to the Add content page
- Enter a Title for your account verification notice page (this will be visible to testers)
- In the Include section click the Rich text box option
- In the Add rich text section include some brief instructions to the testers asking that they provide valid app store account email addresses
- Verify that all the settings look correct then click Preview then publish
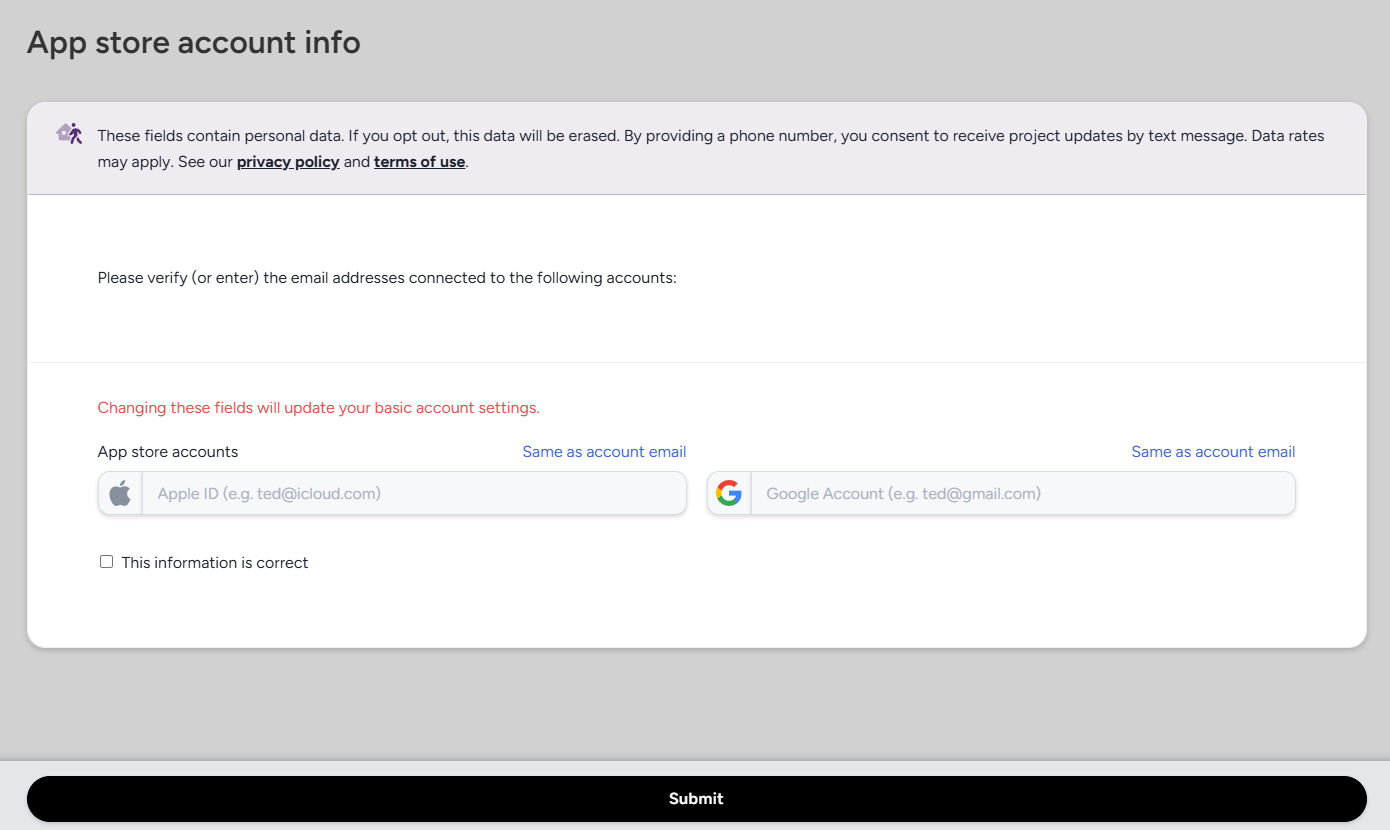
You've now completed creating a notice that will force users to view a page allowing them to enter (or verify existing) app store account information! The next time users log in they will be presented with a notice similar to this:
Segmenting Your Users
App store integrations tie directly to Centercode teams to grant access, so you'll want to make sure your users are segmented into teams based on if they have appropriate app store account information. The easiest way to do this is to set up notice macros configuring to automatically segment your users. A notice macro can be configured to check certain information about a user (in this case if they have entered a particular app store account information field), and if so automatically place them on a specific team in your community or project.
In this example we'll be setting up a project level notice macro that will check if a user has entered an Apple ID account email, and if so move them onto a team specifically for TestFlight users.
To begin, enter the project you will be testing your app in.
Next we will create a team to hold your TestFlight users- From within your project, expand the Management drop-down
- Select Users
- Click Teams
- In the upper right select Create a project team
- Enter a team name (something like TestFlight users)
- Select Participant as the user role
- Copy access from an existing Participant team you've already got set up (to ensure proper access)
Now that we've created a team to move those users onto, we will configure a notice macro to check if the users have entered an AppleID email, and if so, move them onto that team!
- From within your project, expand the Management drop-down
- Select Users
- Click Project users
- Click User automation in the upper right
- Locate the Notice macros section and click Create a notice macro
- Enter a Name (and optional description) for your notice macro (not visible to testers)
- In the Macro type drop-down select Conditional
- In the Add a filter section select the User account data set
- Select the AppleID data point
- Set the Filter condition to Answered
- Set the filter value to Yes
- Click Add to filter
- In the Assign macros section click the + button next to the True macro drop-down to create a new macro
- Enter a Name for your macro (something similar to your notice macro name)
- In Choose macro options click Adjust teams
- Click the Add to these teams box
- Select the team you created above
- Click Submit
- You will now be returned to the Create a notice macro page to complete the setup
- In Team access select the teams you would like this notice macro to apply to (in this case your main participant team)
- Verify all your notice macro info is correct
- Click Submit
Now you've got a notice macro that will automatically move users who have entered an AppleID onto a specific team. Combined with the account verification notice we created above this should automatically collect and segment your users for you!
Using the Integration within a Project
Once your integration has been fully configured on the Centercode and app store end, and your users have been segmented onto app store appropriate teams, you can leverage its new functionality, release automation, within the Releases section of your project!
Releases are a special type of resource normally used to distribute new builds to users via attached files, which can then be tied in to your feedback tickets and allow users to specify which version of your software they were using when they submitted the ticket.
Via the use of these app store integrations you will be able to automatically distribute new builds via the associated app store without having to manually upload files for users to download and install!
Configuring releases in your project
- From within your project, navigate to Management
- Click Releases
- Click Add a release type
- Fill in the basic information for your release type
The next steps will depend on if you are configuring a release type for TestFlight or Google Play.
Setting up a TestFlight release type
When configuring a TestFlight release type you will have the following options:
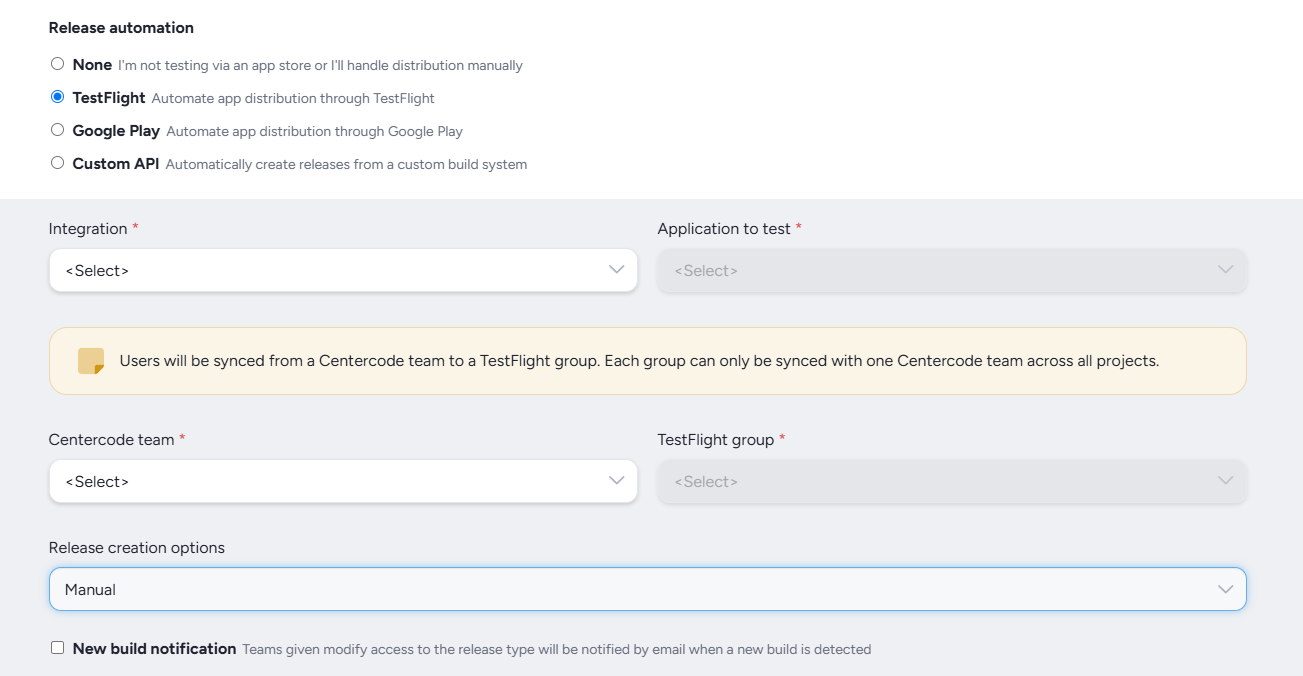
Integration: Select which Centercode TestFlight integration to use (if you have set up more than one)Application to test: Select the TestFlight application that will be distributed via this release (configured in App Store Connect)Centercode team: Select a Centercode team that will be synced to a TestFlight group (select the TestFlight team you segmented your users into)TestFlight group: Select the TestFlight group that will be updated with members from the aforementioned Centercode teamRelease creation options: Choose how releases will be created within this release typeManual: You will manually create a new release in Centercode when you would like to push a new build to your users.Automatic creation: Releases will be automatically created (but not published) when a new build is detected. You can choose when to publish and make these available to your users.Automatic publishing: Releases are fully automated, and will be created and published when a new build is detected.
New build notification: Enabling this option will email all members of teams with "Modify" access every time a new build is detected
What happens when a tester is synced with TestFlight?
Once a tester team has been synced with a TestFlight group and granted access to the release TestFlight will automatically email the testers with a link to access the application. You can re-trigger these invite emails via a release notification, or individually via a users User summary page.
Setting up a Google Play release type
When configuring a Google Play release type you will have the following options:
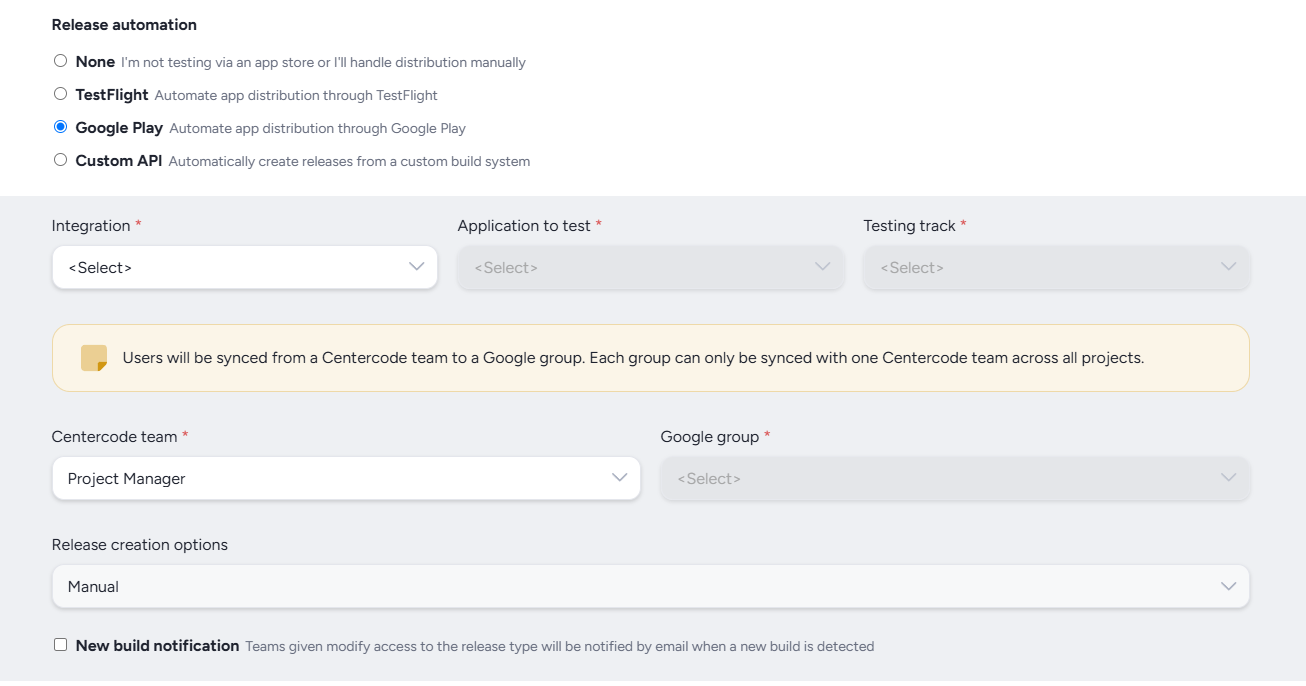
Integration: Select which Centercode Google Play integration to use (if you have set up more than one)Application to test: Select the Google Play application that will be distributed via this release (configured in Google Cloud Console)Testing track: Select the Closed Testing Track you set up for Centercode use (configured in Google Cloud Console)Centercode team: Select a Centercode team that will be synced to a Google Group (select the team you segmented your Google Play users into)Google group: Select the Google Group that will be updated with members from the aforementioned Centercode teamRelease creation options: Choose how releases will be created within this release typeManual: You will manually create a new release in Centercode when you would like to push a new build to your users.Automatic creation: Releases will be automatically created (but not published) when a new build is detected. You can choose when to publish and make these available to your users.Automatic publishing: Releases are fully automated, and will be created and published when a new build is detected.
New build notification: Enabling this option will email all members of teams with "Modify" access every time a new build is detected
What happens when a tester is synced with Google Play?
Once a tester team has been added to the Google Play external group Centercode will send an email inviting the tester to opt in to beta testing in the Google Play store. You can re-trigger these invite emails via a release notification, or individually via a users User summary page.
Adding Releases to Your Feedback Forms
Now that you've configured your app store and release linkage, you'll want to add release info to your feedback forms, so that your testers can let you know which release version the ticket applies to!
In this example we'll add a release element to our existing Issues feedback form
- From within your project, navigate to Management
- Select Project configuration
- Click Feedback types
- Click the Feedback type you'd like to add a release element to (in this case, Issues)
- In the upper right corner click Add an element
- In the Element type drop-down select Release
- Enter a Title and Description for this element (these will be visible to testers)
- If desired click Make this required to force testers to select a release in this element
- In Choose release types select the release types (and the releases they contain) you would like to make available to your testers
- In Team access give appropriate modify/view access to teams you'd like to have enter release information
- Use the Position drop-downs to select where on your feedback form you would like this element to appear (you can also adjust this via clicking and dragging after the element has been created)
- If appropriate, select either of the Allow multiple releases (lets users select more than one release) or Allow archived releases (lets users select releases you have archived, in case they are using an old version for whatever reason)
- Click Submit to create the element
Reporting Using Release as a Criteria
Now that you've set up your releases, added them to your feedback, and have got some tester submitted feedback tickets tied to specific releases, you'll probably want a way to report on these! Centercode's filter/view system makes gathering and viewing this information simple!
For detailed information on filters, views, and their uses read here!
Here's a quick example of how to build a report of an entire feedback type narrowed down by a specific release version.
- From within your project, navigate to Management
- Select Project configuration
- Click Feedback types
- Hover over the cell of the feedback type you would like to report on and select Create report
- Centercode will automatically configure a report containing all feedback tickets in that feedback type
- Scroll down to Add a filter and click the + button to create a new filter item
- Select the Feedback type data set
- Select the Release form element you created above
- Select Is equal to from the Filter condition drop-down (this is the default)
- In Filter value select the specific release (or ctrl click to select multiple) that you would like to narrow your report to
- Your report will now only include tickets where users have selected the release(s) you specified!
- Scroll to the bottom and click the box next to Save this to a report
- Select an existing report to add this element to, or select New report to put it into a new report
Now you've created a full report on that feedback type, narrowed to only show the tickets related to a specific version!
FAQs
What happens if a user updates their app store account in Centercode?
Centercode will automatically update the external system with the new account information!