![New_Centercode_Logo.png]](https://help.centercode.com/hs-fs/hubfs/New_Centercode_Logo.png?height=35&name=New_Centercode_Logo.png)
Many email issues can be investigated and resolved within the Email Management tool. Found at both community and project levels, Email Management contains all email templates separated by type, lets you create new templates, and includes a log for filtering specific sends and recipients.
Table of Contents
- Basic community and project email information
- How do I create an email template?
- How do I use Centercode's email log tool?
- What's the quickest way to email users in bulk?
- What's the quickest way to email individual users?
- How do I email more than one team at once?
- How can I get email notifications for newly submitted feedback?
- A user isn't receiving follow notification emails
- How do I email invitees who haven't joined yet?
- How do I automate emails to users?
- Why are users not receiving my emails?
- Can I add CC addresses to Centercode emails?
- Can I change the picture next to my emails?
- How do I customize the text in my email footer?
- How do I send branded email from User Management?
Basic Community and Project Email Information
Centercode uses email addresses configured at both the community and project level to control where system emails come from and go to.
Community
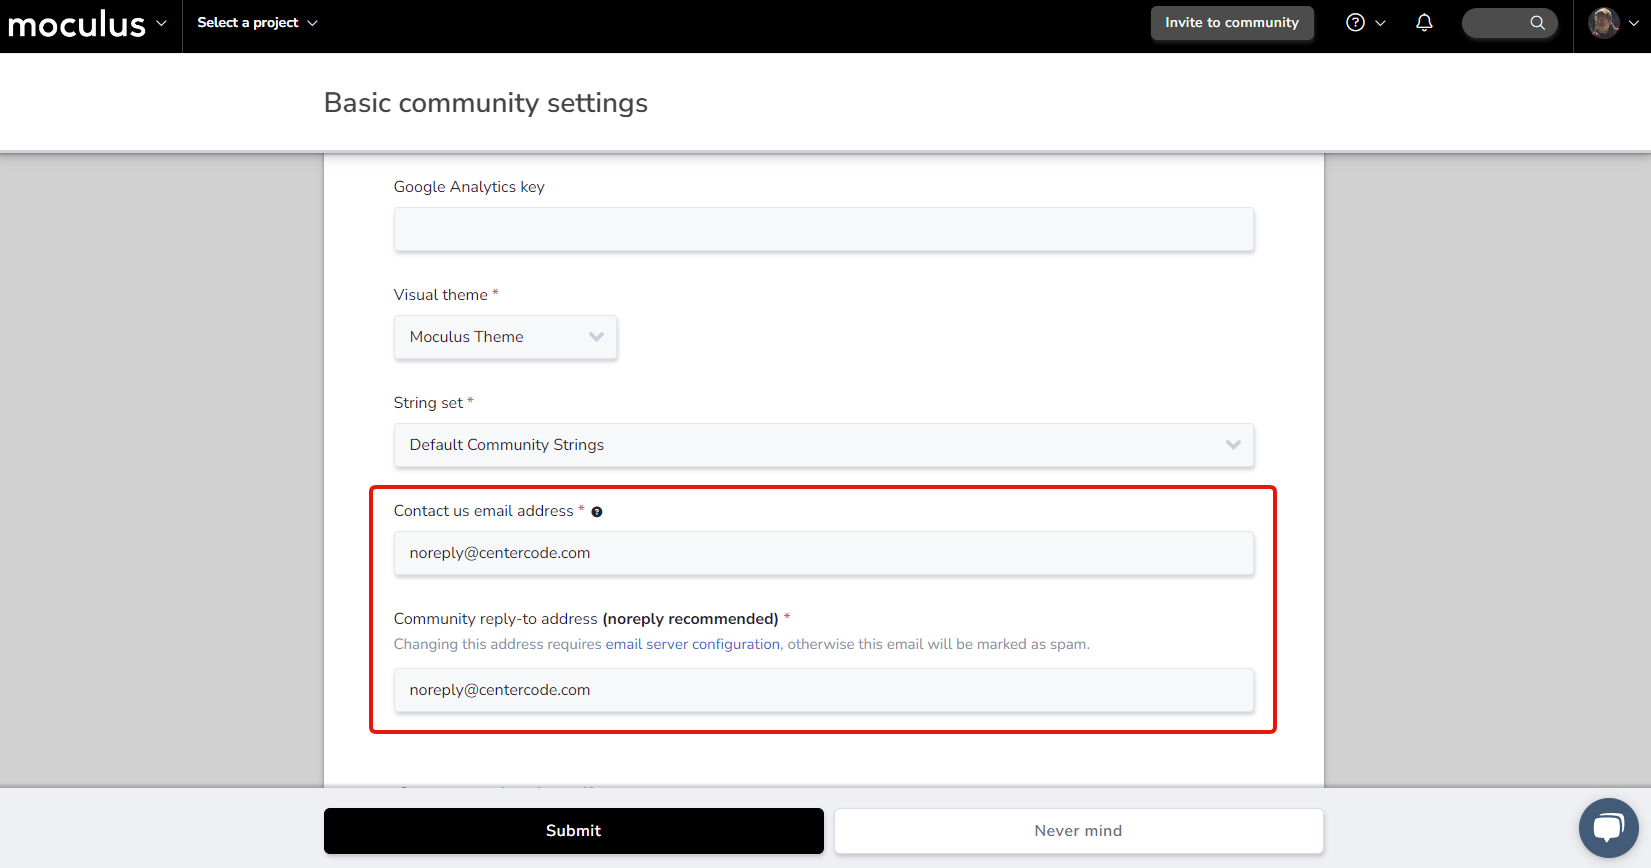
From the Community Homepage, click Community logo > Community configuration > Basic settings. Under Basic community settings, there are fields for a Contact us email address and a Community reply-to address.
The Contact us email address is used for the "Contact Us" community help email. The Community reply-to address is used for user invite emails, user action/macro emails, workflow notification emails, and project recruitment emails.
Project
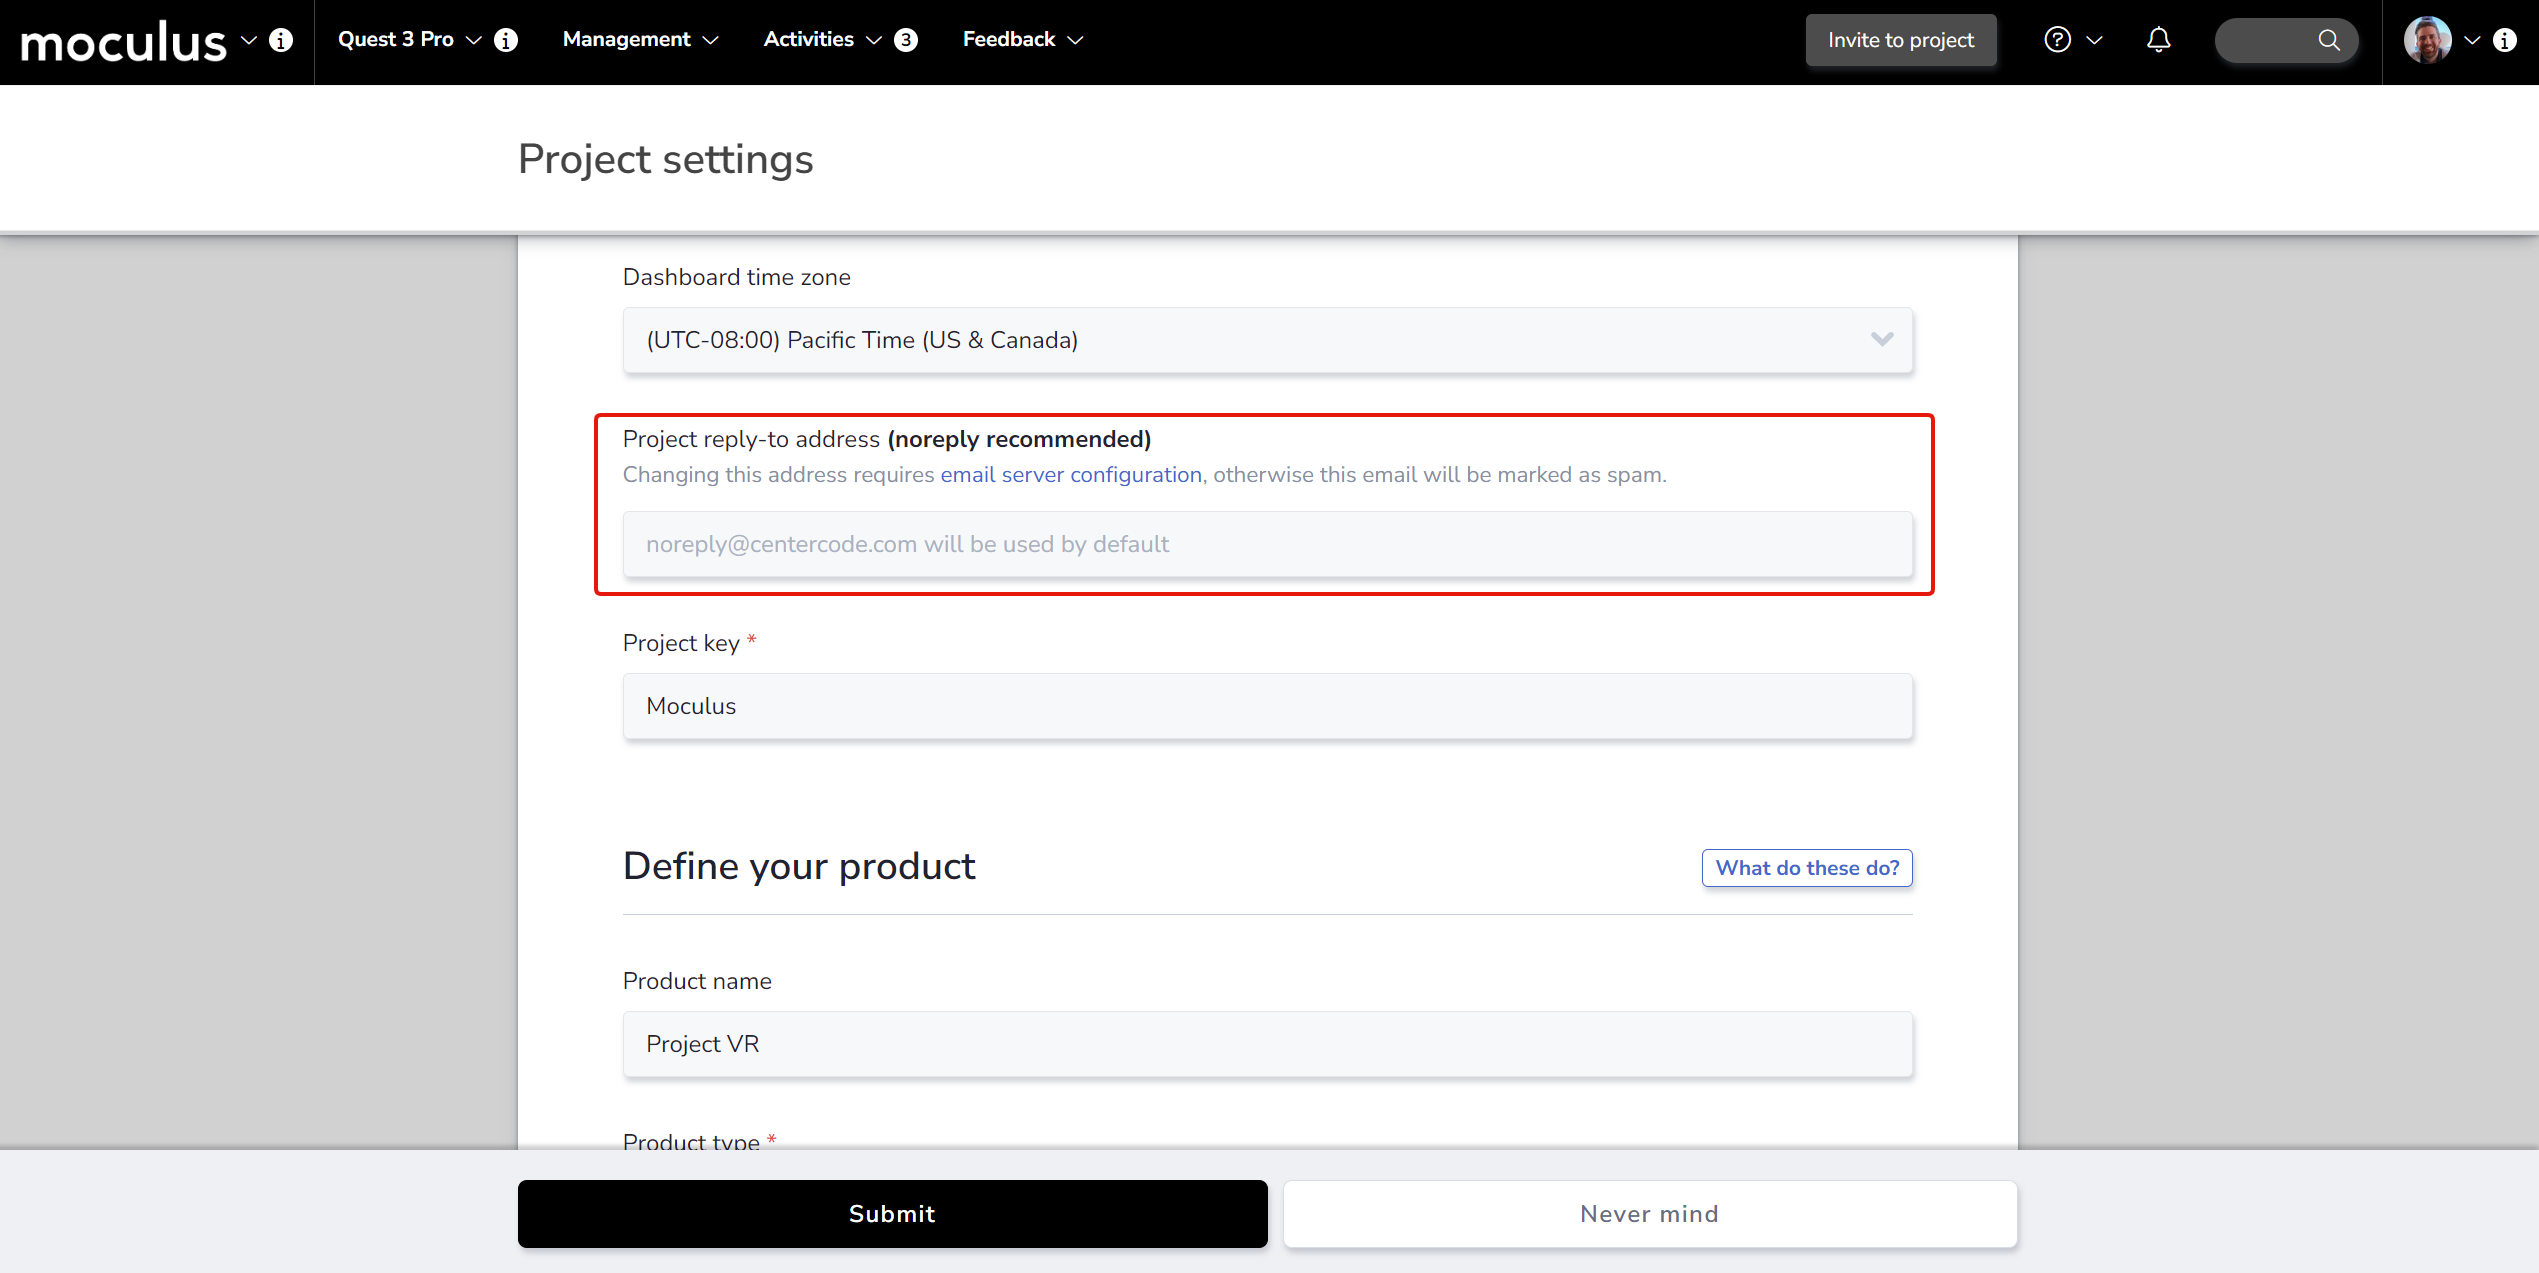
From the Project Homepage, click Management > Project configuration > Project settings. Under Fill in your project details, there is an optional email address field. Filling it in tells Centercode to use that address in place of the community reply-to for that specific project.
The following emails are sent from noreply@centercode.com by default: community support email, lost password email, personal account change email, contact an administrator email, forum subscription email, sign-up verification email, and feedback comment email.
Notes:
- Email templates have an Advanced option to insert a "From address" that overrides the above settings for that specific template.
- Any "From" address you use must follow SPF rules to avoid being marked as spam.
How Do I Create an Email Template?
For community email templates, click Community logo > Community configuration > Email templates and logs. For project email templates, click Management > Project configuration > Email templates and logs.
1. Hover over the desired email category and click New template.
2. Complete the template, including a Template name and Email subject/body.
3. Click Submit to confirm.
How Do I Use Centercode's Email Log Tool?
The email log lets you filter through previously sent emails at the community or project level. Common uses include: checking whether a verification email was sent, confirming Jira notification emails are going out, tracking a specific send, and auditing email activity for a user.
Open the email log for the level you want to search:
- Community: click the Community logo > Community configuration > Email templates and logs.
- Project: click Management > Project configuration > Email templates and logs.
Then:
- In the top right, click Create an email log filter.
- Set filter criteria based on your needs.
- Click Next to see results.
If you don't see Email templates and logs in the menu, your team doesn't have access to manage email. Ask a community administrator to check your team's role.
Notes:
- Use Date sent with After or Between to narrow results. These filters are exclusive — "After 4/21" returns results from 4/22 onward.
- Open Advanced options to adjust results per page (default is 50).
What's the quickest way to email users?
For a group, use the Email users action in User Management. Open Users from the Project or Community menu, select or filter the users you want, choose Email users in the Actions menu, then write your message (or pick a pre-written template) and send. It's the fastest way to send one message to more than one user, with no macro or notice needed.
What about emailing a specific user?
For a single person, search their name in the quick search at the top right of the page, hover their result, and click Email user. That's the quickest path when you only need to reach one user.
How do I email more than one team at once?
Just like emailing users in bulk, build a filter in User Management that includes every team you want to reach, then email the results. One send covers all of them, and you don't need a macro for a one-time message.
From the Community or Project homepage:
- Open Users from the Community or Project Management menu.
- Select or build a filter that includes the teams you want to email. A single filter can match several teams at once.
- Choose the Email users action and click Perform action.
- Pick an existing template or write your message, preview it, and send.
Everyone across the selected teams gets the message in one send.
How Can I Get Email Notifications for Newly Submitted Feedback?
Configure email notifications in the feedback type's Workflow settings.
1. Hover over the desired feedback type and click the modify (pencil) icon.
2. Click Workflow.
3. Click the pencil icon to the right of the desired status change.
4. Check Send to individual, Notify submitter, or Notify new owner as desired.
5. Click the Email template link next to the checkbox.
6. Select an existing template or click Add an email template to create one.
7. Fill out the template and click Submit.
8. Repeat steps 4 through 7 for any additional notifications.
9. Click Submit on the main Workflow page to save all changes.
A User Isn't Receiving Follow Notification Emails
Original feedback submitters don't receive follow notification emails for their own comments on their own tickets. They will receive notifications when other users leave comments.
How Do I Email Invitees Who Haven't Joined Yet?
Manage unconverted candidates in the Onboarding tool via the Moderate candidates icon on the relevant Opportunity or Invitation Type. From there you can email all candidates or filter for specific ones.
How Do I Automate Emails to Users?
Use a Centercode Macro to automatically send emails based on user actions or on a daily, weekly, or monthly schedule.
Why Are Users Not Receiving My Emails?
If users aren't receiving emails, check these areas in order:
1. Improperly configured SPF record
2. Acceptable email domains
3. Email logs (check whether the email was sent at all)
4. Possible user error
5. The recipient's spam folder
6. Email content (use a tool like BenchmarkEmail.com to review the email's contents)
7. Email size — sent emails can't exceed 20 MB, including attached files, images, text, and formatting data
Can I Add CC Addresses to Centercode Emails?
No. Centercode doesn't support CC or BCC functionality when sending emails from within the platform.
Can I change the profile picture shown next to my emails?
No. Centercode doesn't set the sender picture that recipients see. Their mail app chooses it based on the sender's email address or domain, for example from a saved contact or the picture linked to that address.
If one program shows a different picture than the others, that program is usually sending from a different address. A project can use its own address in place of the community reply-to, and an email template can set its own From address. See Basic community and project email information above to check which address each project uses.
How Do I Customize the Text in My Email Footer?
Email footer text is controlled by custom strings. The following strings control the text that appears in your email footers:
em_EssentialEmailem_UnsubscribeLinkNewem_OptOutLinkNewgw_FooterSentFromgw_FooterAddress
How do I send branded email from User Management?
Use an email template whose content source is Standard Centercode email template. Your message goes out wrapped in the same header, footer, and community branding as your Publish & Notify email, and the preview shows exactly what recipients will get.
- Open Users from the Community or Project Management menu.
- Select your filter and view, choose the Email users action, and click Perform action.
- Set up your email:
- To write a new one, select Standard Centercode email template in the Email content source drop-down, write your subject and body, and click Submit.
- To reuse a branded template you've already saved, select it and click Preview.
- Check the preview, then send it.
Notes:
- A template's content source is set when you create it and can't be changed afterward. To switch an existing template to the branded style, create a new template.
- Your community's Publish & Notify customizations, such as footer text, avatar, and colors, carry over automatically.
- The body supports text formatting and links only, with no images, buttons, tables, or colors. For those, use Custom Centercode email template.
- Add links with the editor's Link button. A web address typed as plain text isn't linked automatically. Links open in the same tab unless you check Open in new tab in the link dialog.
- A dynamic tag inside a link looks broken in the preview but works in the sent email.
- This option is only available for email sent from User Management. Macro, workflow, gateway, and notice email keep their existing options.