This article applies to All editions.
This document addresses the utilization of a technical, advanced feature in order to integrate Centercode’s Feedback Management feature with Jira (Cloud, Server, and Enterprise), a top issue tracking and project management system. If you’re unsure about leveraging this integration for your Customer Validation purposes, contact Centercode’s Support Team via in-site chat or email - help@centercode.com - and seek your Jira Administrator.
Why should I integrate with Centercode?
The culmination of any validation project is to convey the results of your testing with the appropriate stakeholders and often, time is of the essence. Leveraging a direct feedback integration to automatically transfer information between Centercode and other business-critical systems like Jira minimizes the friction of such interactions. Centercode’s dedicated Jira Integration offers all the following:
Programmatic Jira Issue Creation
Remove unwanted friction between customer feedback and your development team. Get issue data, reproduction steps, contextual submitter information, file attachments, and discussions to engineers in their own environment.
Field Mapping
Ensure that all the information you’re gathering in Centercode is easily located and tracked by your engineers in Jira by injecting data into the appropriate fields on the Jira form.
File Attachments
Files attached to the feedback form in Centercode are sent through the integration and attached to the resulting Jira ticket. Ensure your development team has everything they need, including error logs, screenshots, reproduction examples, and any other beneficial file attachments.
Direct Link to Jira
Centercode feedback is tied directly to the newly created Jira issue, allowing for seamless integration-driven updates (optional) sent from Centercode. The associated Jira issue can be quickly accessed via a link provided automatically when viewing Jira-integrated feedback within Centercode.
Event Log and Failure Notification
In the event of an error, each ticket maintains a log of integration attempts including a timestamp, the JSON payload sent, and error messaging from Jira. The system also sends a notification email to a designated email address, helping you maintain the health of your feedback integration and effectively troubleshoot any issues.
What do I need to set it up?
- Externally accessible Jira, either on the web or open to a firewall IP exception
- Jira user account credentials with access to submitting issues in the desired Jira Project - typically a service account and can not require SSO login for access
- Project Manager access within the appropriate Centercode Project (or Template)
- Complete feedback type (ex: Issues ) with all necessary form elements
- Workflow Status to trigger the integration (ex: Verified, Sent to Engineering, Logged Internally)
- Monitored email mailbox to receive any applicable failure notifications
Configuring Centercode’s Jira Integration
Centercode’s Jira Integration uses the Feedback Types’ Workflow along with External Destinations. For this configuration walkthrough, we’ll use a typical Issues Feedback Type.
I. Creating a New Jira Integration External Destination
- Access your Management > Project configuration > Feedback types
- Click Modify for the desired feedback type (Typically Issues)
- Click the External destinations tool
- Click Create an external destination
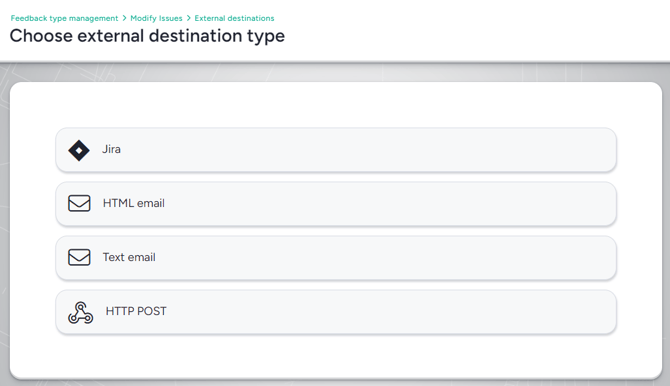
- Click the Jira External Destination type
II. Configuring the Basic Integration Settings
- Enter an internal Title for this integration (ex: Jira to Sandbox)
- Enter the Base URL of your company Jira site including HTTPS
(ex: https://example.jira.com) * - Enter the Username and API token (next step) for this integration's Jira account **
- For your API Token, please generate and use an API token here: https://id.atlassian.com/manage/api-tokens
- Click Load Jira configuration to verify the Jira account and load available fields
- If this button does not load your available fields, please try replacing your API Token with your account's password

* In order for Centercode to connect to your Jira instance, the Jira site you’re integrating with must be externally accessible, either on the web or open to a firewall IP exception.
** This integration requires accessing Jira accounts to be capable of authenticating directly to Jira. Basic authentication does not support the use of SSO-only login.
*** IMPORTANT: If the above options are not possible / allowed, then an alternative solution is to utilize Centercode's Feedback External Destination Integration tool and Jira's functionality to create Jira tickets from email.
III. Configuring the Fields Sent to Jira
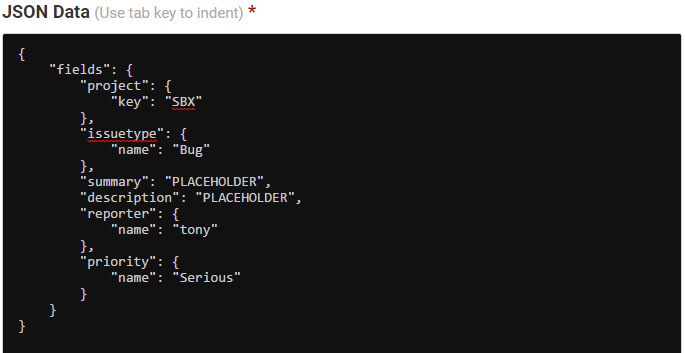
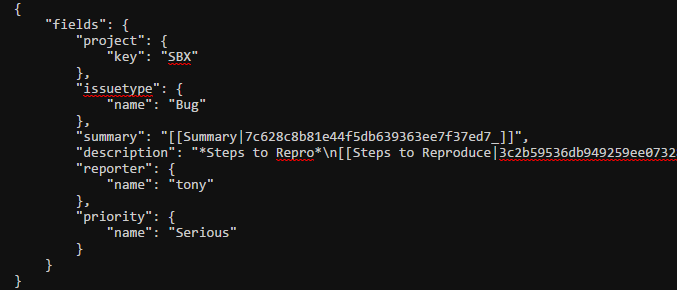
The Integration defaults with a few key placeholders - Project, Issue Type, Summary, and Description. These fields and any others will need to be updated or appended in the following steps.
- Once the Load Jira Configuration step shows results, select the appropriate Jira Project and Issue Type to load the list of fields to be used for mapping data into Jira.
- Expanding the available Fields, select the appropriate Allowed Values and click Apply to insert the value in the JSON snippet. If no Allowed Values are appropriate or you want the snippet to include dynamic information from the Centercode Issue, leave the “PLACEHOLDER” value within the snippet.
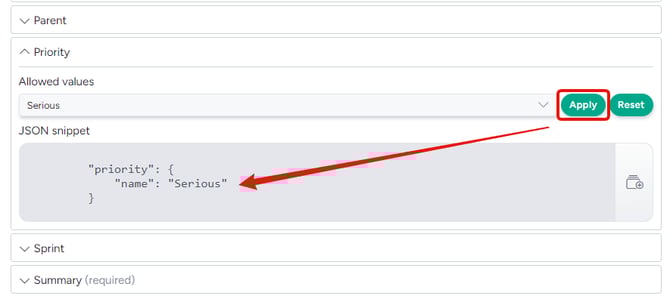
- Click the Insert button on the right of the snippet to inject the snippet into the JSON Data below.
- Repeat Steps 2 and 3 until your JSON Data contains all the fields, values, and PLACEHOLDERs you need.
- Click the Validate JSON Structure button to verify the basic structure of your JSON Data.
Feel free to refer to and include standard JSON formatting, as well as Jira's markdown formatting, in your JSON payload.
IV. Sending Dynamic Data to Jira
Many of your fields in Part III above may use static values, pulled from your Jira Project and Issue Type. However, much of the power of any Feedback Integration is properly capturing and delivering dynamic data from the source ticket. This is done by injecting Centercode’s Dynamic Tags into the JSON Data.
- Highlight or double-click the PLACEHOLDER text you want to replace with dynamic data.

- Under Dynamic Tags, select the Data Set and subsequent Item you want to inject. Commonly used fields are found under Feedback Type, Submitter User Account, and Web Services. Important Note: use any Dynamic Tags with a "Plain Text" to prevent HTML being sent over.
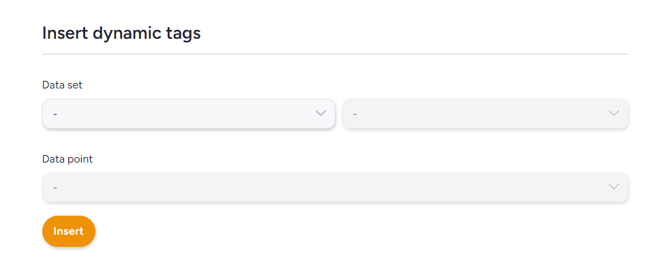
- Click Insert at Cursor to inject the Dynamic Tag into the JSON Data, overwriting the highlighted PLACEHOLDER text as shown below.

- Repeat Steps 2 and 3 until all your PLACEHOLDER text is replaced and you’ve inserted any other Dynamic Tags or custom formatting into your JSON Data.
- Click the Validate JSON Structure button to verify the basic structure of your JSON Data.
V. Configuring Additional Options
Allow Field Updates
This option determines whether triggering the integration from Centercode will overwrite the corresponding Jira ticket. If OFF (as defaulted), once the Jira ticket is created via this integration, Centercode will not send form updates but will provision file attachments. If ON, once the ticket is created via this integration, Centercode will send updates to the Jira ticket (including File Attachments), overwriting whatever is currently there.
Include Files
The Include Files option determines whether the integration includes files attached to the feedback form via a File Attachments element (note: not files attached to discussion replies). Additionally, you can set a maximum file size for each individual file sent. Jira defaults to 10MB per file, but your Jira configuration may vary.
Failure Notification Email Address
To receive notifications if your integration attempts fail for any reason, enter the appropriate email address(es) in the field provided - typically the account responsible for managing feedback in Centercode or moderating this integration. The address(es) entered here should be monitored for error messaging from Centercode.
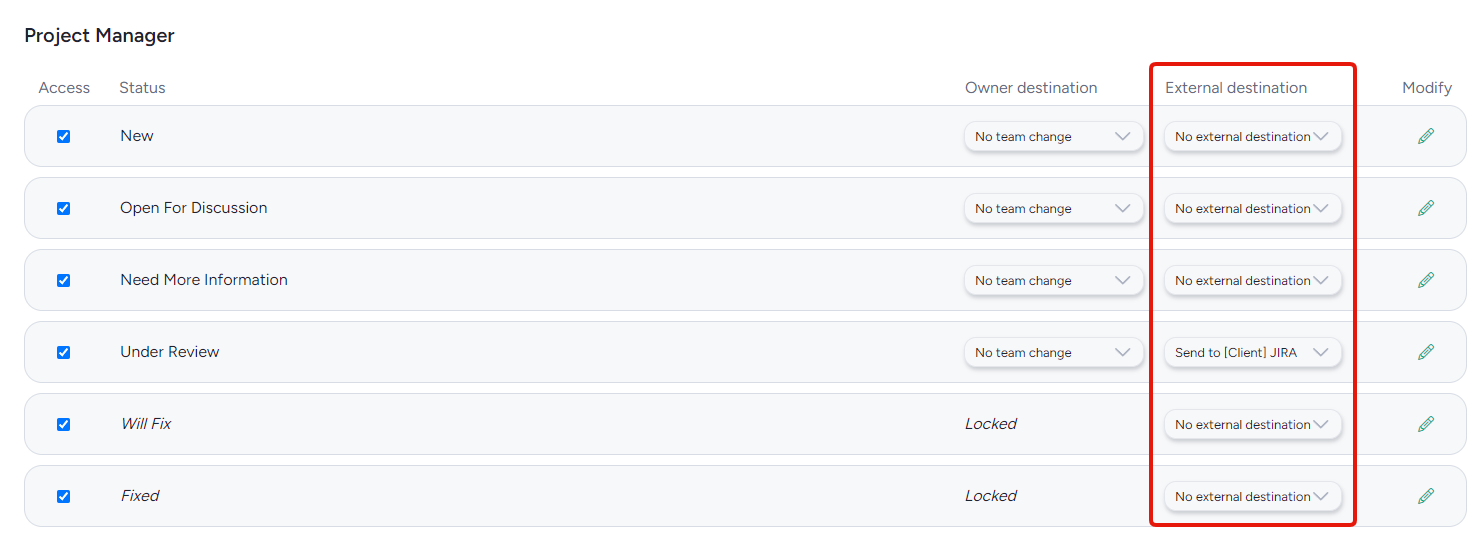
VI. Setting Your Integration Within Workflow
As with all Feedback External Destinations, your new Jira integration is triggered by submitting feedback with a chosen Workflow Status. Once you have an External Destination configured for your Feedback Type, Workflow will include a new column for choosing when to trigger your integration. Simply access your Feedback Workflow, scroll to the appropriate Team block(s), and select your new Jira integration for the desired Status.
Important Notes
- We strongly encourage the use of an integrations-specific Jira account (a “service account”) for the purposes of authentication and ticket creation (as Jira’s Reporter field). This ensures that the integration’s access to the Jira API is not interrupted due to unexpected issues with an individual account (including CAPTCHA lockouts, access changes, or account removal).
- If the above dedicated account is not feasible for your organization, it’s important to note that the account used for authentication must have access to submitting new tickets to the desired Jira projects and not require login through SSO.
- If you’re exclusively using a non-local Atlassian or Jira login (perhaps using a Google login to authenticate), you should have a Jira OnDemand password set at the time of account creation. You’ll use your external username (Gmail address) and this Jira OnDemand password to authenticate.
- We recommend the use of a dedicated Status within Workflow for this integration like Logged Internally or Sent to Engineering - Jira. You’re welcome to include your External Destination on a non-dedicated workflow status (like Closed), but this may result in over- or misusing the integration and sending unintended tickets to your Jira environment.
- If you’re so inclined, you can add formatting to text areas within Jira. Ex: new lines can be sent through JSON via “\n”. For additional formatting help, refer to Jiras Text Formatting Notation. We recommend using the formatting sparingly after you’ve successfully established your Jira Integration - adding non-essential code to the JSON payload will increase your margin for error.
- Every instance of Jira is unique and custom to the needs of the organization, and it’s important to understand what your integration needs are prior to setting up. Even so, if you find that our dedicated Jira integration method is missing something that’s important to your organization, please let us know.