Using Filters and Views to access tester data like survey results, profile information, activity, and much more.
This article applies to All editions.
Filters, Views, and Actions are key to accessing and managing users and feedback in Centercode.
- Filters: Narrow down the data by selecting specific user or feedback criteria. Use "No Filter" if you have few users or want to see all results.
- Views: Customize how filtered data is displayed. Use the Default View for general information or create a custom view for specific details.
Tip: Align your Filter and View for accurate validation of results. - Actions: Determine what happens to your filtered results. The default action is "Show User/Feedback List."
These tools work together to help you efficiently manage and analyze user and feedback data.

Create a Project User Filter:
From the Project homepage:
- Click the Management button in the navigation bar.
- Click Users > Project users
- Click the New link to the right of the Filter drop-down list.
- Select the desired Data set, Item, Default qualifier, and optionally a Default value.
- Click the Add to filter button at the bottom of the Available Filter Items section.
- Repeat steps 3 and 4 until all desired Filter criteria have been added to the Filter.
- Complete any other desired Filter options.
- Click the Create filter button at the bottom of the page.
You have successfully created a Project user filter.
Project User Views
Views work with your Filter and allow you to refine your searches to find any specific information you may be looking for. If you're looking for general user info, then the provided Default View may work for you. If there's any data you need to see in particular, please set up your View.
Best Practice Tip: Have your View and Filter mirror the same data so that you can validate your results. If you Filter for a certain demographic, you'll want a View to match that.
Create a Project User View:
From the Project homepage:
- Click the Management button in the navigation bar.
- Click Users > Project users
- Click the New link to the right of the View drop down list.
- Select the desired Data set and highlight the item in the left text field.
- Double-Click the item to move it to the right text field (adding it to your View).
- Repeat steps 3 and 4 until all desired View items have been added to the View.
- Complete any other desired Advanced options.
- Click the Create view button at the bottom of the page.
You have successfully created a Project User View.
Requirements
- Manage Users Role
- Moderate Views Role (to modify or remove)
- Create Views Role (to create)
Notes
- Beyond your Data Set selection, most filter items are dynamic and defined by your implementation. For example, choosing a Data Set of Project Notices will compile a list of your available Notices to filter off of. Other Data Sets, such as Key Dates, include more static Items.
- Viewable results within Centercode are dictated by your customizable View, which defaults to 100 results per page. You’re able to modify your View and extend that to 1000.
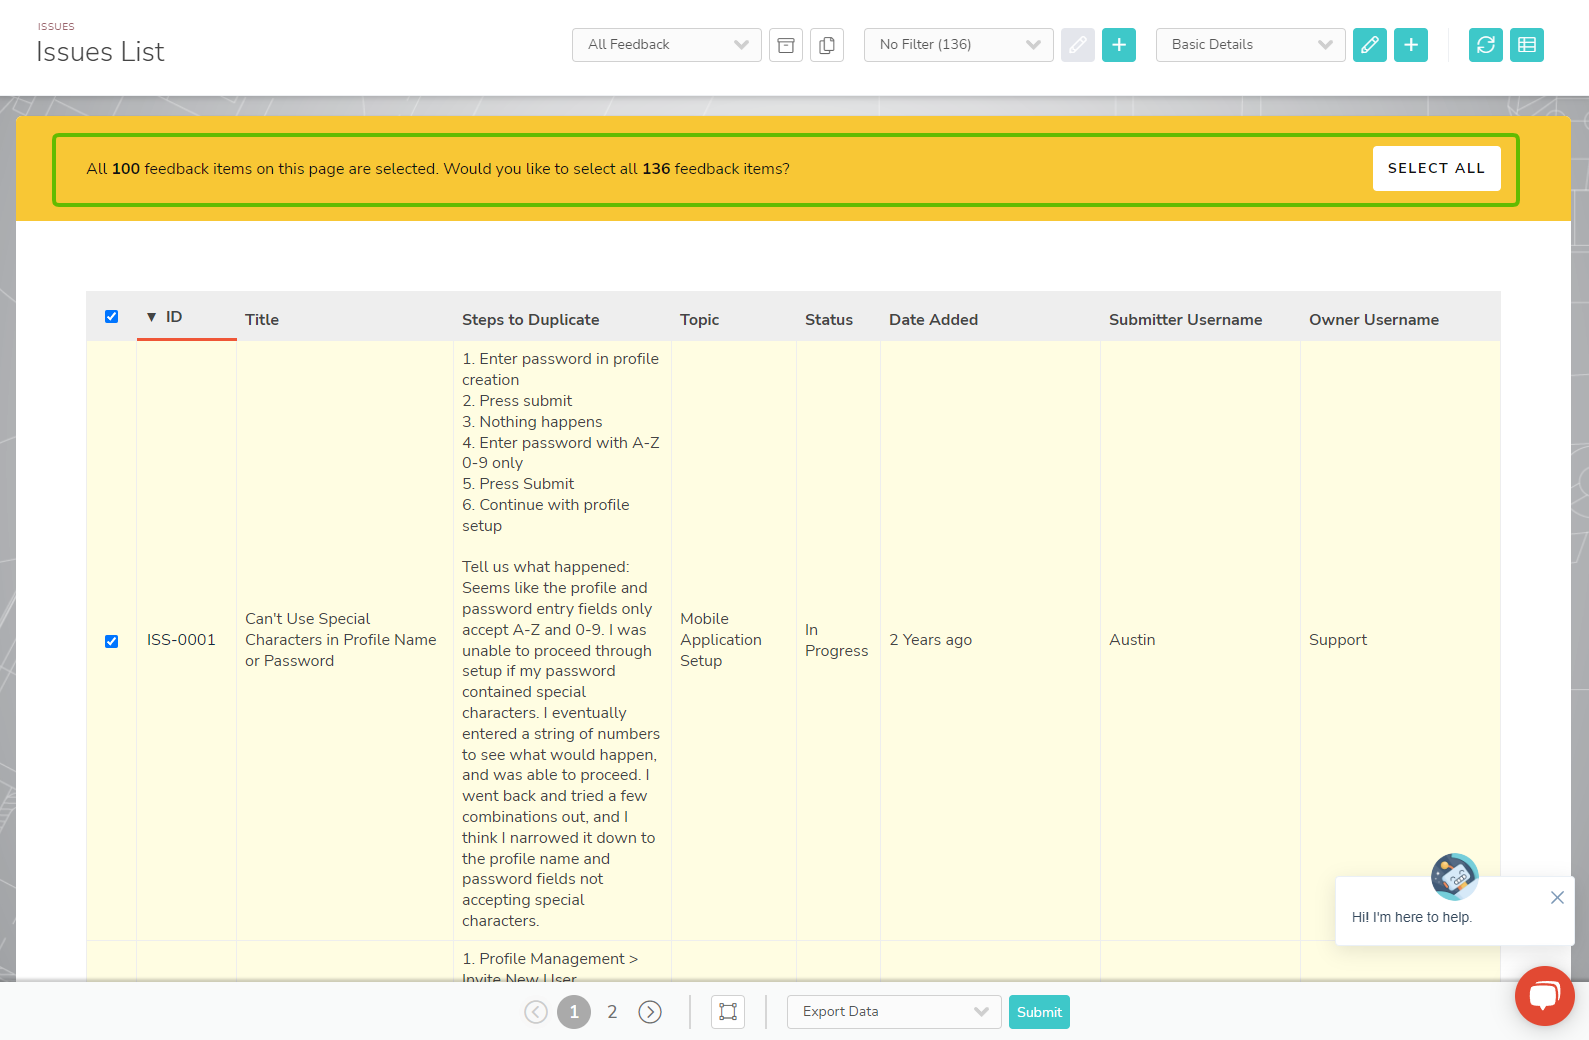
- If you need to take action on results greater than shown on the current view simply check the "Select All" box in the upper left, and you will be prompted to choose either all results on the current page or total results for the filter, as seen here: