![New_Centercode_Logo.png]](https://help.centercode.com/hs-fs/hubfs/New_Centercode_Logo.png?height=35&name=New_Centercode_Logo.png)
Recruiting is how every single user gets into your community and your projects. Whether someone clicked a public link, was pulled from a marketing email list, or was handed a key at a trade show, they arrived through a recruitment.
This guide builds one project recruitment from an empty Recruiting page through to a tester who has joined and can be verified. Along the way it explains each concept as it comes up, because most recruiting trouble is not a broken setting. It is a reasonable assumption about how the pieces connect that turns out to be slightly wrong.
If you only need to add two or three people, you probably don't want a recruitment at all. Skip to when to use Invite to project instead.
Table of contents
- How recruiting fits together
- Community and project: two layers, one path
- Before you start
- Step 1: Open Recruiting in your project
- Step 2: Create the recruitment
- Step 3: Build the landing page
- Step 4: Choose your destination teams
- Step 5: Set the community onboarding path
- Step 6: Preview the onboarding path
- Step 7: Set advanced options and visual design
- Step 8: Add an invitation type
- Step 9: Email your candidates
- Telling who has been invited and who has joined
- When to use Invite to project instead
- Best practices for recruiting
- Notes
How recruiting fits together
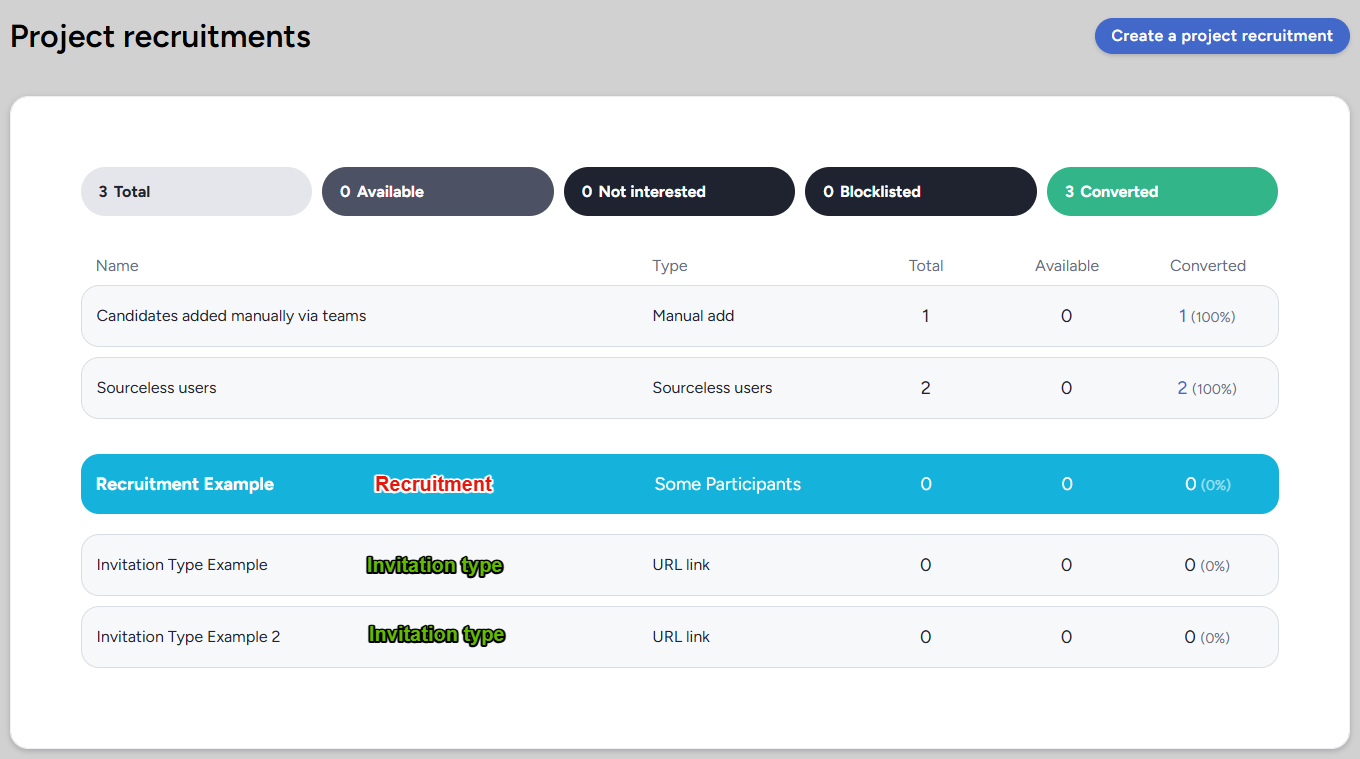
Three objects do all the work. Getting them straight now saves a lot of backtracking later.
A recruitment is the doorway. It owns the landing page people see before they decide to join, and it decides which team or teams they land on once they do. One recruitment, one landing page, one set of destination teams.
An invitation type is a path to that doorway. A shareable URL, an uploaded email list, a filter across your existing community, single-use keys, referrals, team access, or an API import. Each invitation type belongs to exactly one recruitment, and a single recruitment can have as many invitation types hanging off it as you need.
A recruitment pool is the waiting room. Each invitation type generates one, holding everyone who has been invited through that path but hasn't joined yet.
So the shape is: several invitation types feed one recruitment, each invitation type keeps its own pool of people who haven't come through yet, and the recruitment decides what they see and where they land when they do.
💡 Ted Tip: When someone tells me their recruiting isn't working, my first question is always which of the three we're talking about. "Nobody got my email" is an invitation type problem. "They got in but landed on the wrong team" is a recruitment problem. "I can't find the person I invited" is almost always a pool problem. Three different pages, three different fixes.
Community and project: two layers, one path
Recruiting exists at both the community level and the project level, and this is where most confusion starts.
- Community recruitments bring people into your community. This is where an account gets created, where community notices and profiles get presented, and where a person becomes a user of your portal at all.
- Project recruitments bring people into a specific project. Landing page, project teams, project notices.
Here is the part that surprises people: nobody can be in a project without first being in the community. There is no separate side door. When a brand new person clicks your project invitation, they don't go straight to your project. They pass through a community recruitment first, create their account there, work through whatever community notices that path presents, and only then arrive at your project's landing page.
Your project recruitment decides which community recruitment they pass through. That is what Step 5 is about, and it's worth reading even if you skim everything else.
This also explains a support case we see often. A project recruitment looks perfectly configured, but candidates report they can't get in. The blocker sits one layer up, in the community recruitment behind it, which has its own expiration date, user limit, and active/inactive toggle. A project recruitment with no limits will still turn people away if the community recruitment feeding it has expired.
Before you start
- You need Project Manager access to the project, or a role with access to the Recruiting tool. See What are Centercode's user roles and access levels?
- Your destination teams should already exist. Recruiting places people onto teams, it doesn't create them. See Guide to managing user access via Teams.
- Your notices should be configured and ordered, because the teams you pick in Step 4 determine which notices your incoming users see. See Centercode Basics: Notices.
- If you're recruiting people who are new to your portal, confirm with your Community Administrator that at least one community recruitment has a URL invitation type with Make available as project invitation enabled. Without one, you have no community path to hand new accounts to.
Step 1: Open Recruiting in your project
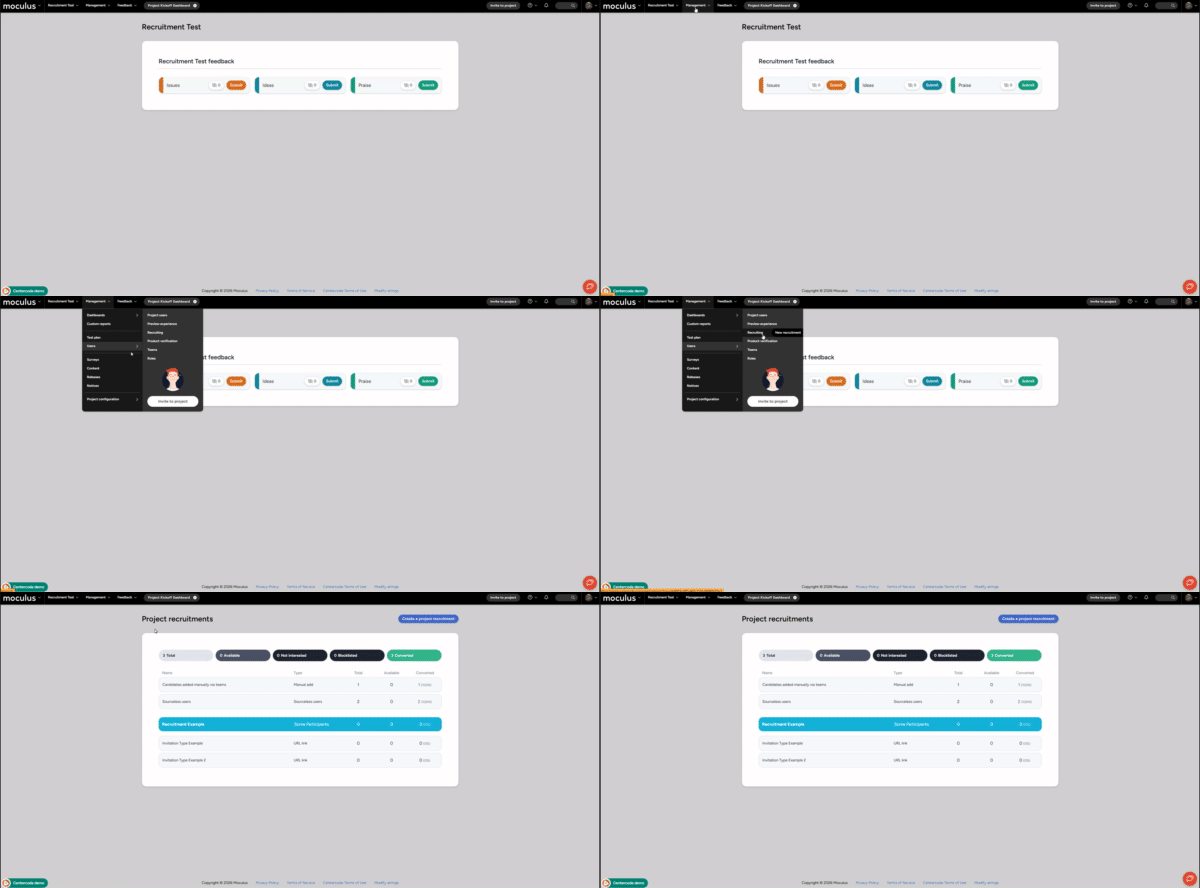
- From inside your project, click Management in the upper navigation bar
- Hover over Users
- Click Recruiting
To reach the community equivalent, click your community logo > Community management > Recruiting. You'll want that page in a second tab while you work through Step 5.
Step 2: Create the recruitment
- Click Create a project recruitment
- Enter an Internal name
The internal name is for you and your team only. Candidates never see it. Name it after the audience or the campaign rather than the project, since the project name is already obvious from context. "Q3 hardware enthusiasts" tells you something later. "Beta recruitment" does not.
Step 3: Build the landing page
This is the page a candidate sees after clicking your invitation and before they decide to accept. It is your pitch, and it is controlled entirely by the recruitment. If you want two audiences to see two different pitches, that is two recruitments, not two invitation types.
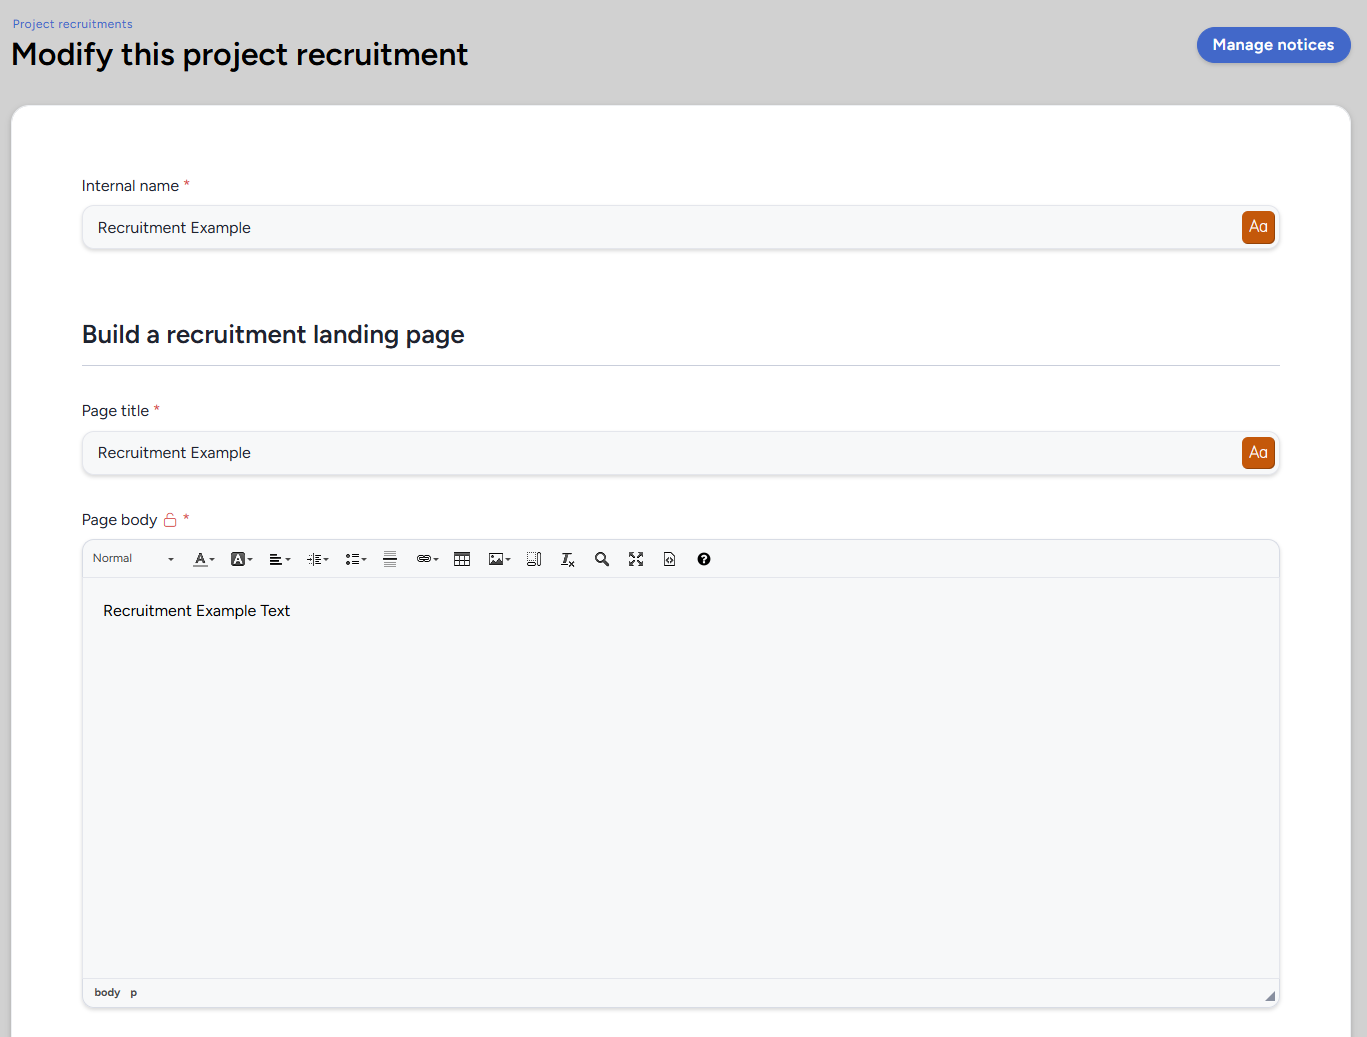
- Page title: the heading at the top of the landing page. This field does more than it looks like it does. It also becomes the name of the project everywhere the user is still an applicant, including the button on the community homepage. That's deliberate, so you can recruit for "Next-generation audio test" without revealing the product's real codename.
- Page body: a short description of the test and what participating involves. Be selective. These people haven't signed an NDA yet.
- Tester requirements list (optional): hard requirements, such as "Must live in the continental US."
- Optional tester qualification list (optional): nice-to-haves that make someone a stronger fit.
- Tester reward list (optional): incentives, rewards, or keep-the-product offers.
💡 Ted Tip: The requirements list earns its keep. Candidates who read "Must own a compatible router" and know they don't will filter themselves out before they hit your applicant team, which means less screening work for you later.
Step 4: Choose your destination teams
The Put incoming users on these teams section decides where people land when they accept. Everything about their experience follows from this one choice: which notices they see, which resources they can reach, and whether they're a candidate or a full tester.
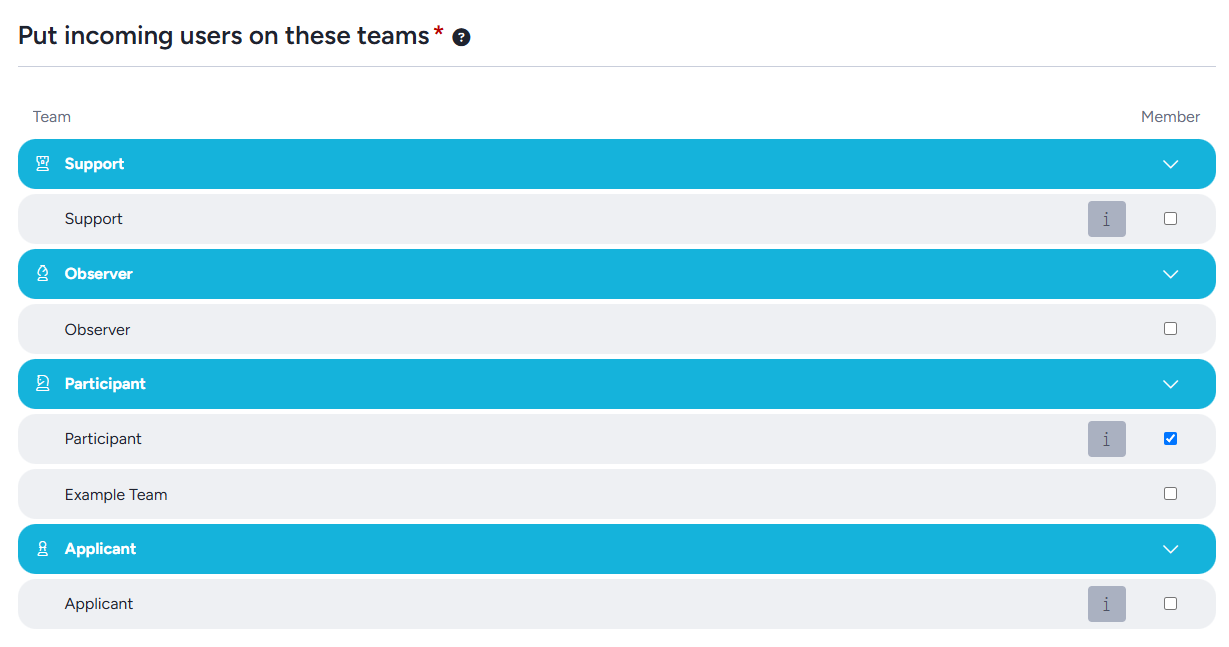
Two common patterns:
- Put them on an applicant team when you plan to screen. Applicants exist for consideration and backup. They can fill out profiles and surveys so you can qualify them, then you promote the ones you want. This is the right default for most public or broad recruiting.
- Put them directly on a participant team when they've already been screened, or when you're accepting everyone who applies. This skips qualification entirely and they arrive as testers.
For platform security reasons, a recruitment cannot place users directly onto an admin team. To get internal staff in, use Invite to project, or promote them after they've joined.
Step 5: Set the community onboarding path
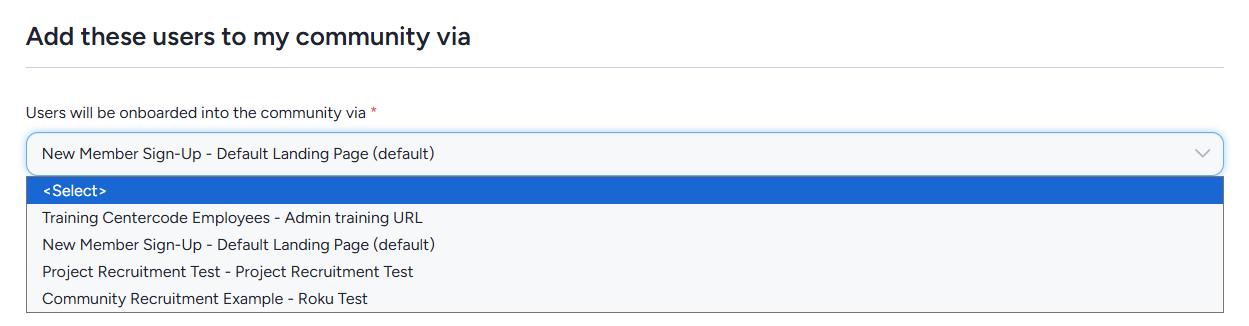
This is the setting people find hardest, and it's the one worth slowing down for. It appears as a drop-down labeled Users will be onboarded into the community via.
What it actually controls
Because every project user is a community user first, your project recruitment has to hand incoming people to some community recruitment. This drop-down is where you pick which one. It lists the community recruitments whose URL invitation type has Make available as project invitation enabled.
Whichever one you select determines, for anyone who hasn't already been through it:
- The community landing page they see
- The community team or teams their new account lands on
- Every community notice attached to those teams: profiles, agreements, content, surveys, and notice macros
All of that happens before they ever reach your project's landing page.
The three paths a candidate can take
What a given person experiences depends on their history with the community recruitment you selected.
- A completely new person. They see the community landing page, create their account, join the community teams that recruitment assigns, and work through every community notice for those teams. Then they arrive at your project landing page.
- An existing user who has never been through this particular community recruitment. They also take the community path and see its landing page, and they're added to its community teams. Any notices attached to those teams become part of their route. Notices they've already completed elsewhere are not shown again.
- An existing user who has already been through this community recruitment. They skip the community leg entirely and go straight to your project.
That third case is why testing your own recruitment link as yourself is misleading. You've already been through everything, so you see a clean two-click path and conclude it's fine, while a brand new candidate is being handed a five-notice gauntlet.
If the drop-down isn't there
It doesn't render when there's only one eligible community recruitment, because there's no choice to make. That single path is used automatically. If you need a different community experience for this project, ask your Community Administrator to create another community recruitment with a URL invitation type that has Make available as project invitation checked. It'll appear in the drop-down once it exists.
💡 Ted Tip: When a customer tells me their new testers are getting a survey or an NDA they never configured, I don't look at the project at all. I go to the community recruitment selected in this drop-down, check which community teams it assigns, then look at the notices on those teams. The surprise resource is nearly always sitting right there.
Step 6: Preview the onboarding path
The Preview onboarding section lists, in order, the notices someone will pass through when they join through this recruitment. It's built from the destination teams you chose in Step 4 and the notices those teams are subject to.
If your notice chain contains notice macros, you can preview both branches, following the true condition and the false condition separately.
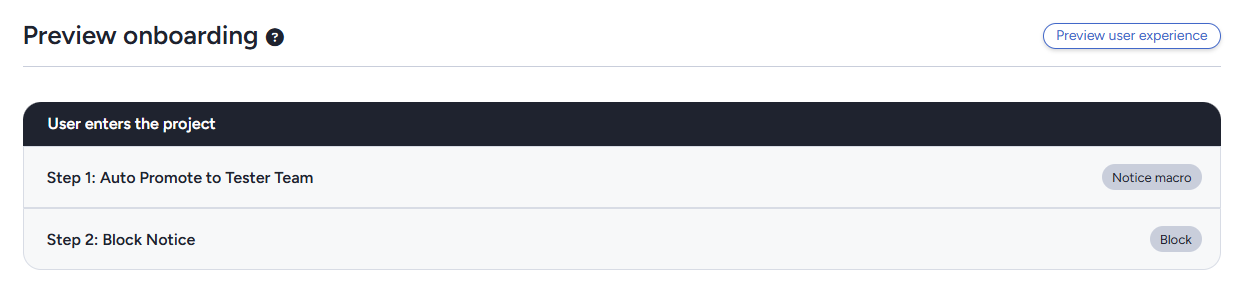
Read this list before you send a single invitation. It is the cheapest bug-catch in the whole tool. For more on ordering and previewing notices, see the Notices FAQ.
Step 7: Set advanced options and visual design
Advanced options
- Recruitment summary: the blurb shown on your community's Opportunities page, where active project recruitments with open URL invitation types are listed.
- Inactive message: what people see if they hit an invitation belonging to a recruitment you've toggled off. Worth writing. The default is not friendly.
- Expiration: an end date. Blank means it never expires, which is the default. After the date, visitors get a generic unavailable message unless you write a custom one.
- User limit: a cap on how many people can join or apply through this recruitment. Blank means unlimited, which is the default.
Visual design
These apply only to this recruitment's landing page and leave the rest of your site alone.
- Background image: overrides the community background image for this page.
- Custom CSS: styling scoped to this landing page.
- Hide page from search engines: keeps the page out of search results while leaving it reachable by direct link. Use this for anything confidential.
Save the recruitment. Now it needs a way in.
Step 8: Add an invitation type
A recruitment with no invitation type is a door with no hallway leading to it. Nobody can reach it.
- Hover over your recruitment row
- Click the + icon, or Add an invitation type
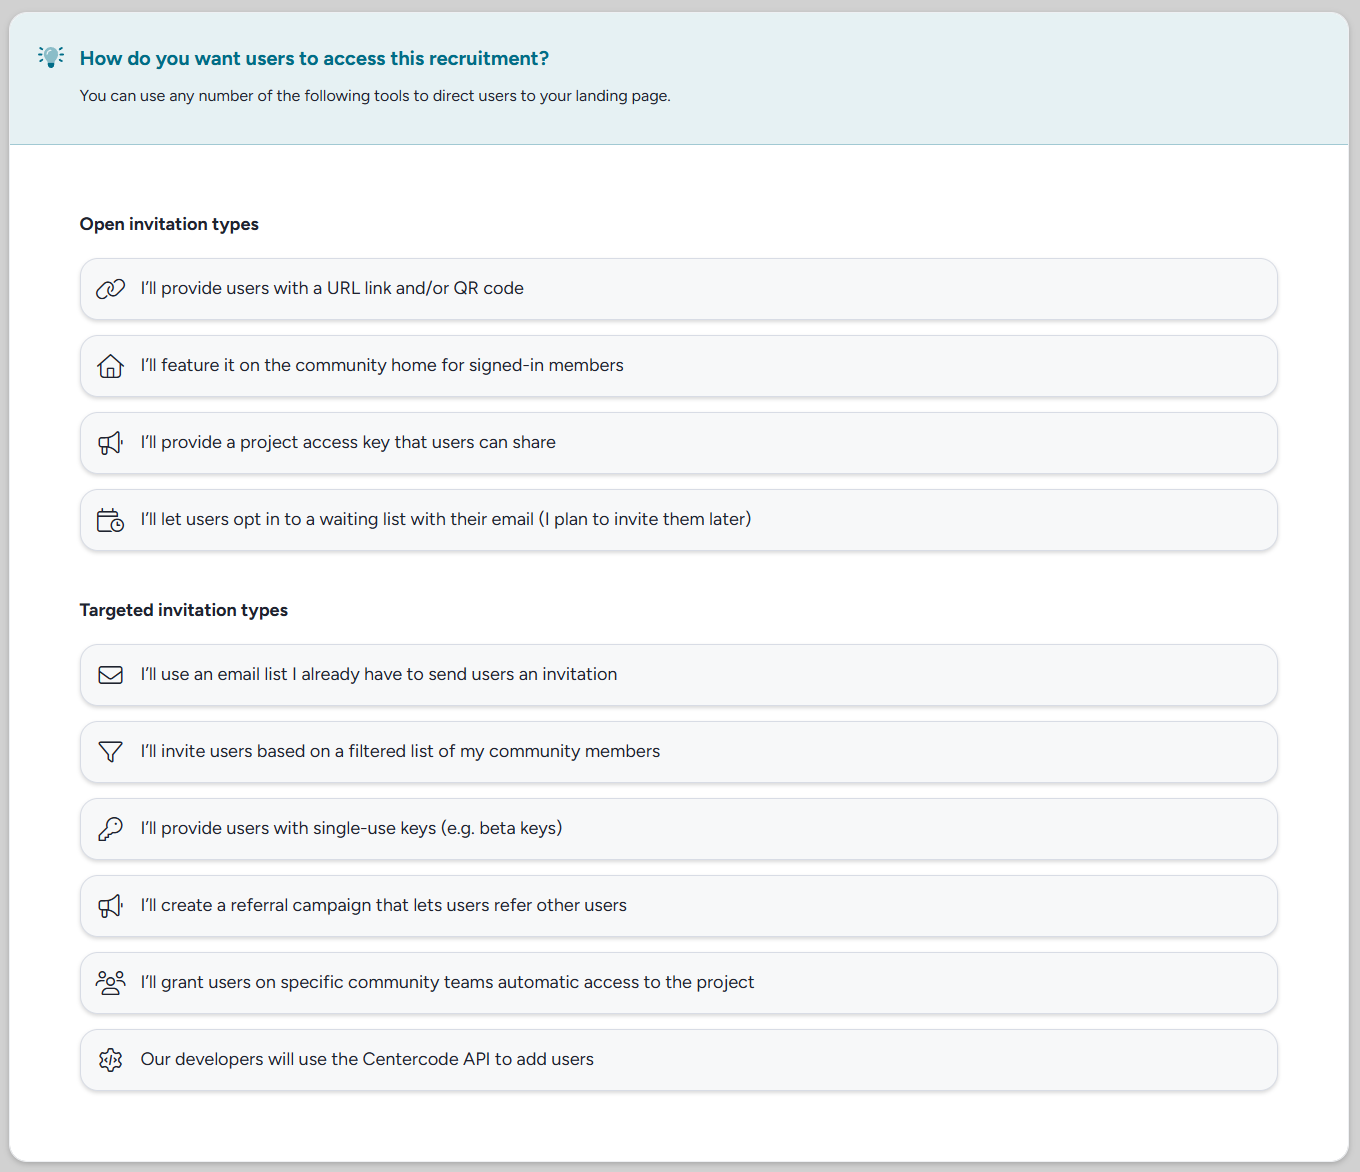
- Pick the type that matches how you're reaching people
Choosing a type
- Open invitation types: a shareable custom URL for your website, social posts, forums, or a QR code on printed material. Good for public recruiting.
- Email list: paste addresses or upload a CSV or XLSX. Good for lists handed over by marketing, or your own roster of proven testers.
- Community filter: target existing community members who match filter criteria, such as everyone in a region who owns a particular device. Good for targeted recruiting from a panel you already have.
- Consumable keys: single-use keys you hand out. Good for live events, where you want to cap the number of people joining without tying invitations to named individuals.
- User referral: let existing users invite others, with a per-user referral limit you control. Good for organic growth.
- Team access: give chosen community teams instant access. Members of those teams see a link to your recruitment on their community homepage. Good for an internal group or a standing panel.
- API import: push users in from your own app or CRM. Requires developer involvement.
Full configuration details for each are in Invitation Types Overview.
Email lists and open URLs account for most recruiting, so here is each one end to end.
Example: an email list invitation
Start here when you already know who you want.
- Select I'll use an email list I already have to send users an invitation
- Enter an Internal name
- Paste your email addresses, or attach a CSV
- Click Next
Centercode processes the list and reports back what it found: which addresses already have accounts, which are brand new, which previously marked themselves Not Interested, and which are blocked by your Recruitment Limiting Filter.
Nobody is emailed at this point. Everyone lands in a recruitment pool and waits until you deliberately send. That trips people up in both directions, so it's worth saying twice: uploading a list does not invite anyone.
Example: an open URL invitation
The other common starting point, and the opposite approach. An email list invitation starts from a set of named people. An open URL starts from a link and takes whoever arrives with it. Elsewhere in our documentation you'll see this called a dedicated URL, which is the same thing.
- Hover over your recruitment and click the + icon
- Select any of the open invitation type buttons
- Enter an Internal name
- Enter a Key
- Set the options covered below
- Click Next
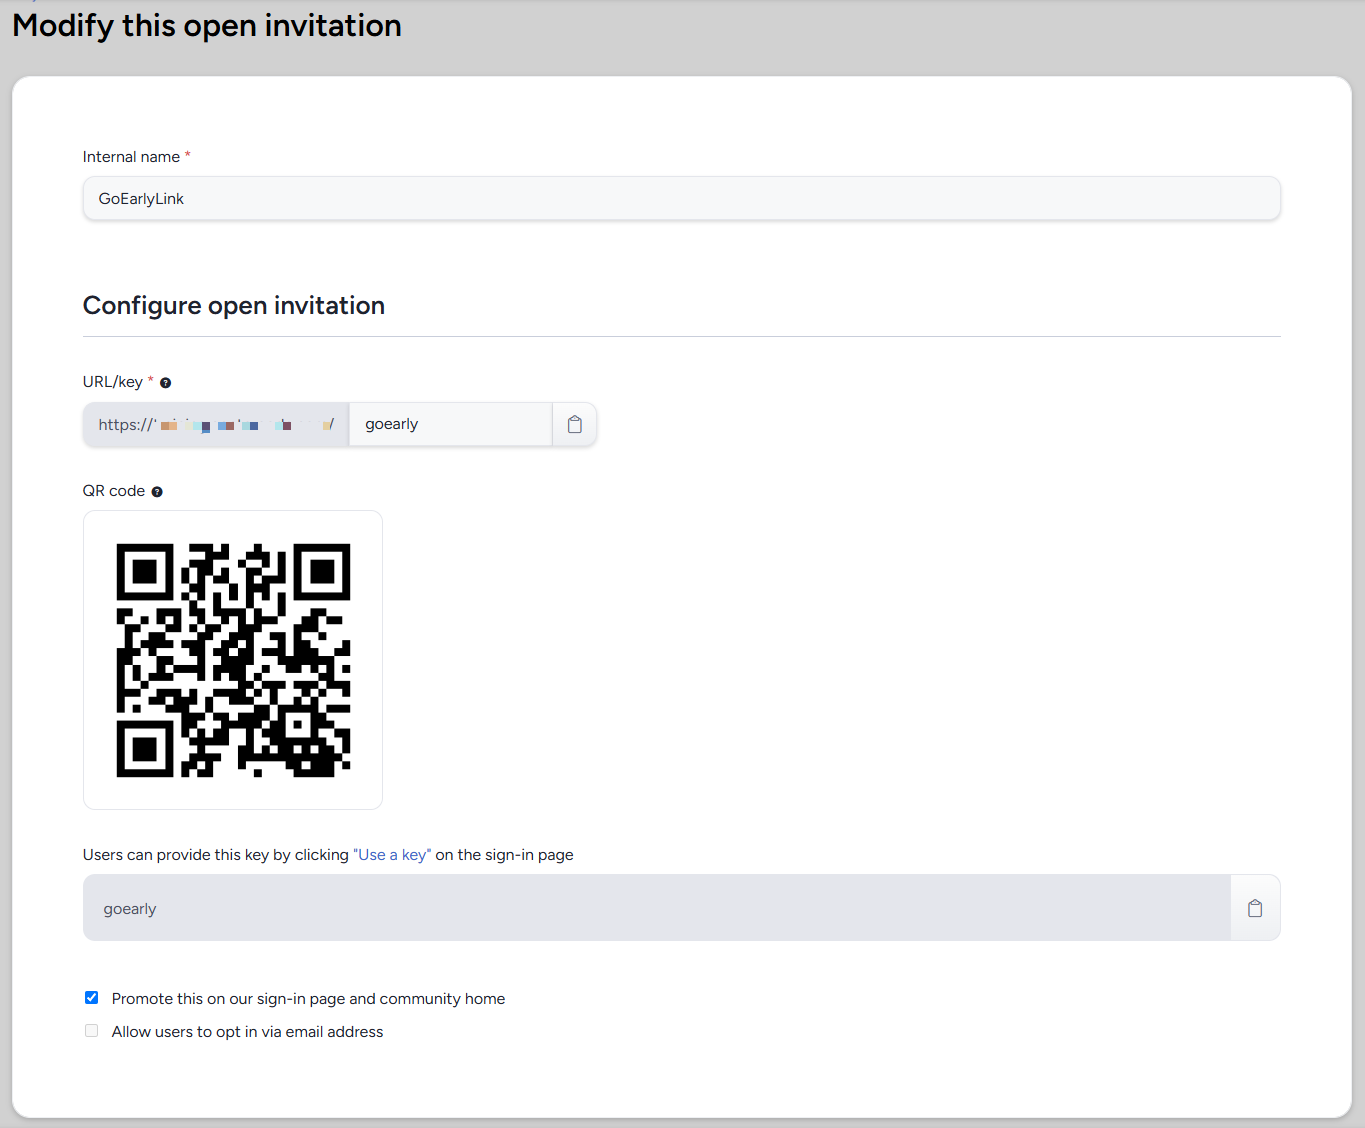
All of the open invitation type buttons land on the same Create an open invitation screen. They differ only in which options arrive pre-selected, and every one of those options can be changed, so pick whichever button is closest to what you want and adjust from there.
The Key is the part of the URL you control, so it's worth a moment's thought. It must be alphanumeric, hyphens and underscores are allowed, and any spaces you type are removed automatically. Pick something you can live with: keys are permanently unique, and a deleted key can never be reused, even by a brand new invitation type.
Centercode generates a QR code for the finished URL as well, which is what you want for event signage, printed inserts, or packaging.
One invitation, two front doors
This is the part worth understanding before you share anything. A single open URL invitation gives you two separate ways in, and they reach two different audiences.
A link that works anywhere outside Centercode. The URL is yours to put wherever your candidates already are: your product site, a support page, a social post, a forum thread, a newsletter sent from your own marketing tool, a conference slide, a QR code on a card. Centercode doesn't have to deliver it, and the link doesn't care whether the person clicking it has an account. Brand new people are routed through the community onboarding path you set in Step 5 first, then arrive at your landing page. Existing members who have already been through that path go straight to the landing page.
A button inside your community, for the members you already have. Turn on Promote this on our sign-in page and community home and the recruitment gets listed on your Community homepage, where signed-in members see it as a join button. This is how you recruit from a panel you've already built without emailing anybody. The listing carries the Page title from Step 3 and the Recruitment summary from Step 7, so those two fields are the entire pitch your members read before deciding.
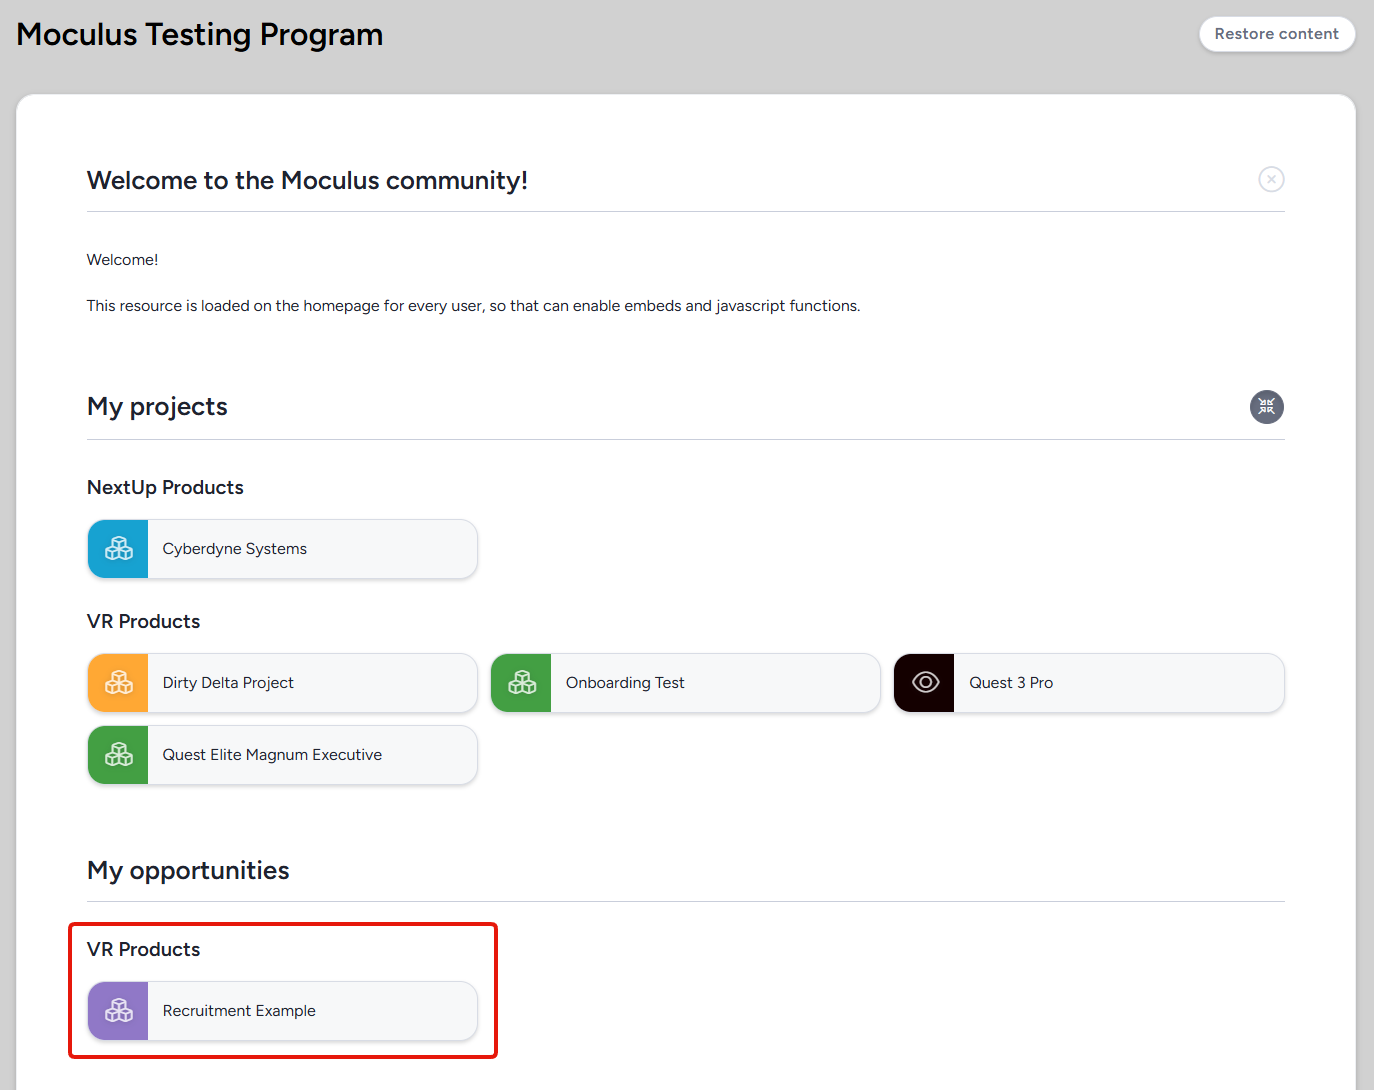
Who sees the in-platform listing
- Signed-in community members see it on the Community homepage as soon as the setting is enabled. Nothing else is required.
- Signed-out visitors see it on your community sign-in page only if Allow visitors to see open recruitments is checked under your community logo > Community configuration > Basic settings, in the Community landing page section. That's community-wide rather than per-recruitment, so a Community Administrator may need to turn it on for you.
- Anyone at all can reach your community's open recruitments page and its RSS feed. The feed lets people subscribe and be notified as you post new ones, which is worth knowing in both directions: it's useful for public recruiting, and it means nothing listed there is private.
Three behaviors surprise people, and all three are by design:
- Only one open recruitment per project is listed on the Community homepage. If a project has several, the one highest in that project's list of recruitments is the one that shows.
- The listing displays in place of a Team access invitation on the same project, if you've set one.
- Once a member joins through one of the recruitments listed there, the rest stop appearing on their homepage. They're still eligible for them, and the direct URL still works. What changed is the homepage listing, not their access.
Because an open URL is reachable by anyone holding it, revisit Hide page from search engines in Step 7 before you publish the link anywhere. It keeps the landing page out of search results while leaving the link itself working.
For more on the public listing and the sign-in page, see Guide to creating Open Recruitment opportunities.
Collecting interest instead of granting access
Allow users to opt in via email address changes what the link does. Instead of letting people join, it collects their email addresses into the invitation type's recruitment pool, and nobody gets in until you email that pool yourself from Step 9. It's useful for gauging interest or building a panel ahead of a launch, and it's a surprise if you enabled it without meaning to, because candidates will tell you the link doesn't work. Leave it off for ordinary recruiting.
💡 Ted Tip: An open URL invitation doesn't pre-load anyone, so unless you've turned on that opt-in setting, its pool sits empty no matter how well the link is performing. That's not a broken invitation. People who click an open URL convert on the spot rather than waiting in a pool, so the Converted count on the Recruiting page is where you watch it, not Moderate candidates.
Two settings that appear only on community recruitments
Both live on open URL invitation types, and neither one shows up at the project level:
- Mark as default invitation type: makes one URL the standard recruiting path for anyone who lands on your login page. Shown with a house icon.
- Make available as project invitation: makes this community recruitment selectable from a project, which is exactly the list feeding the Step 5 drop-down. If a community path you expected isn't offered at the project level, this checkbox is the reason.
Step 9: Email your candidates
Your pool is stocked. Time to actually invite people.
- From Recruiting, hover over the recruitment or the invitation type
- Click Moderate candidates
- (optional) Filter the list first if you're only emailing a subset
- Email one person with the envelope icon, or everyone matching your current filters with the Email candidates button
- Choose your Email template and click Submit
- (optional) Use Email me a preview to send yourself a copy first
- Check the recipient count, then click Submit
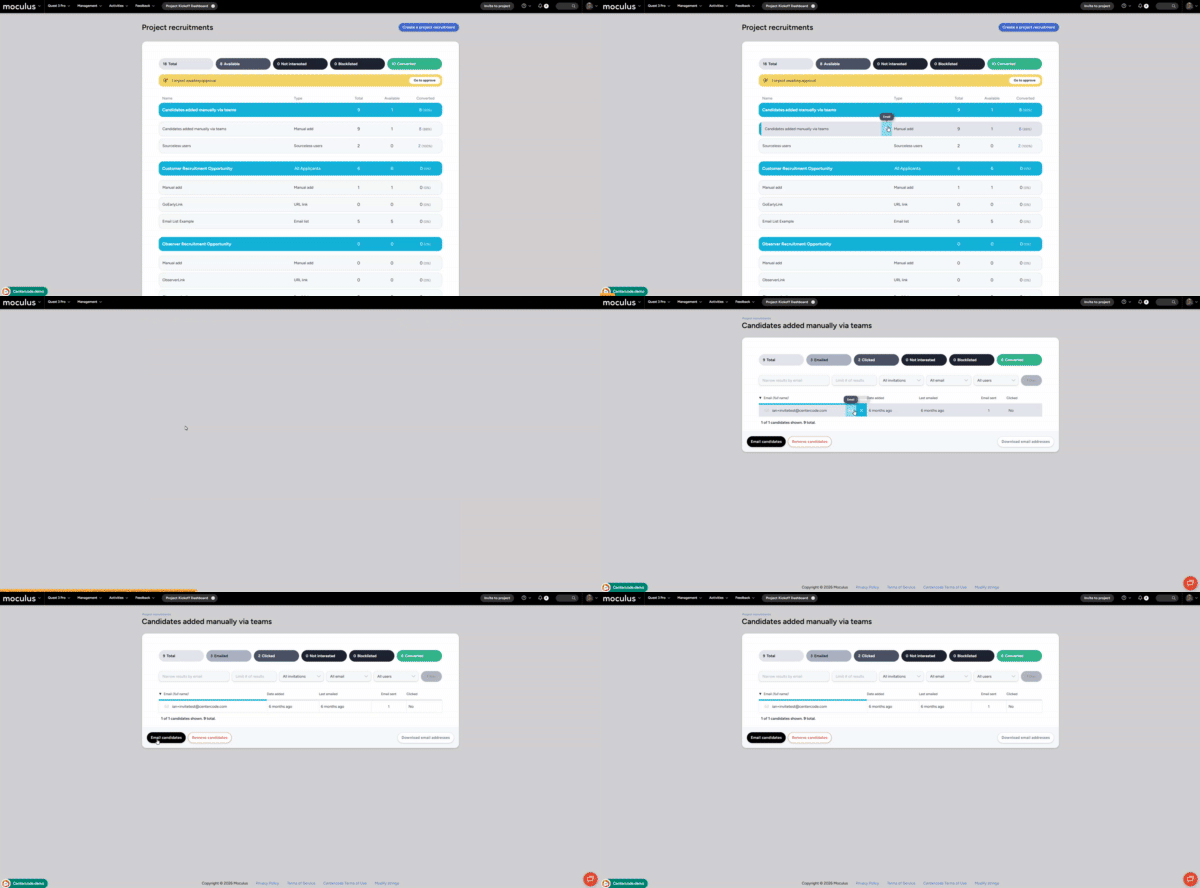
To personalize, use the recruiting dynamic tag %%Firstname|Default Value%%. Recipients who already have a Centercode account get their real first name. Everyone else gets your fallback, so make it something that reads naturally, like "there" or "friend." More in the Recruiting FAQ.
The same screen is how you send follow-ups later. Filter by Last Emailed to find candidates who've gone quiet, and send again.
Telling who has been invited and who has joined
This is the single most common question we get about recruiting, and the answer rests on one rule.
Recruitment pools only ever show people who have not converted. The moment someone joins, they leave the pool. They aren't hidden, deleted, or moved to a second tab. They graduate out of the waiting room and into your user list.
What "converted" means
A candidate is converted once they've clicked through the invitation, created or signed into their account, completed the community and project notices in their path, and landed on a destination team. At that point they stop being a candidate and start being a user.
Which means an empty pool is usually good news. It means everyone you invited came through.
The six candidate statuses
The dashboard at the top of any recruitment or invitation type breaks your candidates into six states.
- Total: everyone currently sitting in this pool.
- Emailed: candidates who have been sent an invitation for this recruitment.
- Clicked: candidates who clicked through the invitation link. These rows appear grey and italicized in the list. Opening the email doesn't count, only clicking the link does.
- Not Interested: candidates who clicked the Not Interested? link in the footer of a recruiting email. They're excluded from future invitations for this recruitment.
- Blocklisted: candidates who tried to convert and were stopped by your Recruitment Limiting Filter.
- Converted: candidates who successfully joined.
Viewing the people who actually joined
On the Recruiting page, every recruitment row and every invitation type row carries three counts: Total, Available, and Converted.
- Total is available plus converted, so everyone who ever entered this path.
- Available is what's still outstanding: unaccepted email invitations, unused keys, and so on.
- Converted is how many made it in.
Click the Converted number. It opens the list of every user who joined through that specific recruitment or invitation type. That's your answer to "who actually came in from the trade show keys versus the marketing list," and it works at both the recruitment level and the individual invitation type level.
Filtering candidates in a pool
Inside Moderate candidates, the list starts ordered alphabetically by email address and can be re-sorted by clicking any column heading. The filters across the top are:
- Narrow results by email: matches text against email addresses.
- Limit # of results: caps how many rows are shown. Numbers only.
- Invitation: narrows to a single invitation type's pool.
- Last Emailed: finds candidates contacted within a given time frame. This is how you build a follow-up list.
- Candidate Status: splits existing users, who already have a community account, from new users, who don't. It can also randomize the list, which is useful when you need a sample rather than the whole set.
From the bottom of the same page you can Email candidates, Remove candidates in bulk, or Download email addresses as an XLSX.
💡 Ted Tip: If a pool says "There are no pending candidates available" and mentions inactive and hidden users, your candidates aren't gone. The recruitment or the invitation type holding them has been toggled inactive, and inactive pools don't display their contents. Check both, because they toggle independently, and the one people overlook is the invitation type. Turn them back on and everyone reappears. The same cause produces "Your filter matched inactive results which are not shown."
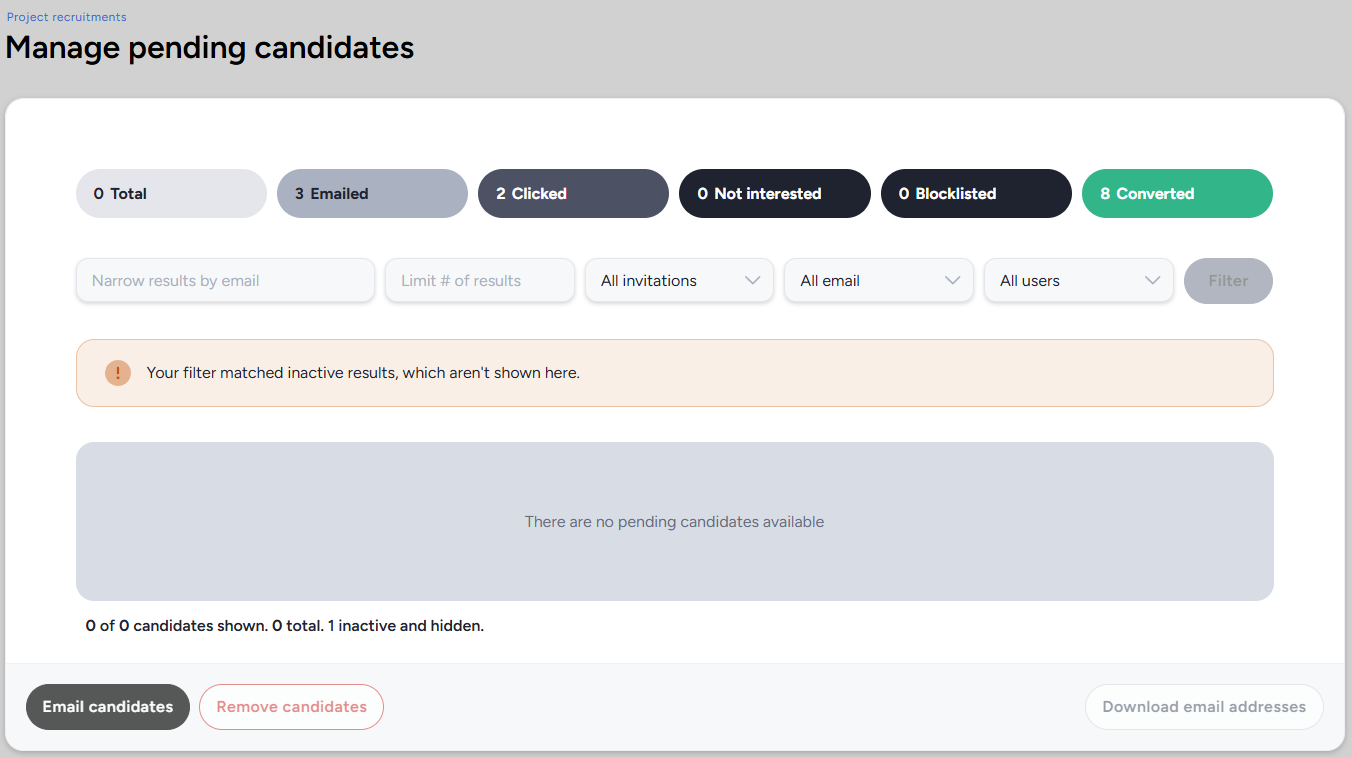
Where candidates don't appear
Candidates in a pool are not users yet, so they won't turn up in User Management searches or user filters. Until someone converts, the recruitment pool is the only place they exist.
When to use Invite to project instead
Recruitments are built for campaigns: groups of people, tracked by source, nurtured over time. For a handful of individuals they're more machinery than the job needs.
Invite to project, in the top right of your navigation, handles the small cases:
- Adding a few internal staff or support accounts
- Adding someone by name when you can't remember their email address
- Pulling an existing community user straight into the project with no email at all, using Convert existing users to project automatically
- Adding people to a pool for a hand-written email later, using Skip invitation
It uses the same underlying machinery, and it carries the same Users will be onboarded into the community via drop-down, following the same rules described in Step 5. If you want an invitee to get the full recruitment experience, choose By recruitment rather than By teams and pick the recruitment you built here.
Details in Invite Users.
Best practices for recruiting
- One recruitment per audience, not per channel: if two groups should see the same pitch and land on the same team, they belong in one recruitment with two invitation types. Split into separate recruitments only when the landing page or destination teams genuinely differ.
- Name invitation types after the source: "Newsletter list, March" and "Booth QR code, CES" let you read conversion rates straight off the Recruiting page months later. "Email list 2" tells you nothing.
- Preview the onboarding path before you send: notices, not the recruitment itself, are what stall candidates partway through.
- Send to a small slice first: email 20 candidates, confirm they land where you expect, then send to the rest. Recalling an invitation is not a thing.
- Screen with an applicant team when you're recruiting broadly: it's far easier to promote qualified applicants up than to remove unqualified participants after they've signed an NDA and seen your product.
- Check the community recruitment behind your project recruitment: its expiration date and user limit apply to your candidates too.
Notes
- A user can join a project more than once through different recruitments, landing on whichever teams each one assigns. They will not be brought through the same recruitment twice.
- Deleting a recruitment doesn't remove the users who joined through it. They're reclassified as "sourceless users" and listed under that heading at the top of the Recruiting page. You lose the attribution, not the people.
- Toggling a recruitment off preserves every setting and every invitation type inside it. Inactive recruitments show in italics with a muted background, and their pools stop displaying candidates until you toggle them back on.
- URL keys are permanently unique. Once a dedicated URL is deleted, its key can never be reused, even by a brand new invitation type.
- Email invitation links expire after roughly two weeks. Users who land on an "Enter a key" page are almost always clicking an old link. Resending the email issues a fresh one.
- "User already exists in this invitation type" means that address is already in that pool. Each address can appear only once per invitation type.
- Users who join but can't see the project on their community homepage are almost certainly missing the Access Project role. See Centercode Basics: Understanding Centercode's Access Control.
- Troubleshooting "This project recruitment is not available"? The cause is an expiration date, a user limit, an inactive toggle, or deleted destination teams. See Recruiting FAQ.
- Looking for the reference version of any single piece here? See Centercode Recruiting Overview, Create or modify a recruitment, Invitation Types Overview, and Recruitment Pools.