![New_Centercode_Logo.png]](https://help.centercode.com/hs-fs/hubfs/New_Centercode_Logo.png?height=35&name=New_Centercode_Logo.png)
This article applies to Team and Legacy editions.
Centercode's Recruiting tool is designed to make user acquisition feature-rich and flexible while staying reliable and consistent. You'll create Project Recruitments within your projects that use various Invitation Types to bring in users, and track invited candidates via Project Recruitment Pools.
Table of Contents
- What is Recruiting?
- How do I invite users to my community and project?
- Can Centercode help me find testers?
- Can I preview the invitation email before sending it?
- How do I add users to my project without their interaction?
- How can I verify a user's account information and confirm they've received the product?
- "User already exists in this invitation type"
- Where can I search for users I've invited?
- Why doesn't my Converted count match the users listed?
- How do I send follow-up email invites to users I've already invited?
- Can I add more email addresses to an invitation I've already generated?
- "This project recruitment is not available"
- "Your filter matched inactive results which are not shown"
- How do I control the community recruiting experience for new users?
- How do I change my landing page text?
- How do I set the teams users get added to when they join?
- How do I know who has been invited to join my community or project?
- How does "Not Interested?" work?
- Why can't my users see the project they've been added to?
- Why are my users getting the "page you are attempting to access is unavailable" message?
- Why can't my users see content, surveys, or other resources when signing in?
- What are "sourceless users"?
- How can I prevent certain users from joining any projects?
- How do I change the opportunity name shown on my community home?
- How do I personalize recruiting emails and invitations?
- Why are my users landing on an "Enter a key" page?
- How do I remind Email List candidates who have not accepted their invitation?
- Testers say they hit a limit message when registering. What should I check?
- Why did my other open opportunities disappear after a user joined one?
What Is Recruiting?
Recruiting is a set of connected tools that handle all the ways users join your community or project.
Recruitments are customizable landing pages that place users on selected teams. The platform includes both Community Recruitments (for new users) and Project Recruitments (to add existing community members to projects).
Invitation Types represent where your users come from. They attach to Project Recruitments and direct candidates to the recruitment's landing page via a custom URL, email list, or other method.
Recruitment Pools hold users who have been invited but haven't yet joined. They let you track and nurture candidates through to conversion.
How Do I Invite Users to My Community and Project?
Use Invitation Types to generate candidate pools, then invite candidates to your community and/or project. The Invitation Type directs candidates to a Project Recruitment, which controls the landing page, destination teams, user limits, and more. Read more about Invitation Types.
Can Centercode help me find testers?
Yes. Betabound is Centercode's testing community, and you can announce your test there to reach testers outside your own audience.
- Set up an active Recruitment with a Dedicated URL for the project. Betabound members join through that link.
- Request your announcement at betabound.com.
For help setting up the Dedicated URL, see Invitation Types Overview.
Can I see a copy of the invitation email before sending it?
Yes. When you preview an email, click Send me a test to receive a copy at your own address. It sends the real email, with dynamic tags filled in, so you see exactly what recipients will get before anyone is invited.
- Set up your invite and reach the Preview invitation step (the same Send me a test button appears anywhere you preview an email, including recruiting notifications).
- Click Send me a test and check your inbox for the rendered email.
- Adjust the message with Customize if anything needs to change, then send the invite when it looks right.
How Do I Add Users to My Project Without Their Interaction?
Quick Invite supports this. Use both checkboxes under Advanced Options to skip sending an invitation and automatically push the account into your project. This is only available if the invitee already has a community account. Read more about Quick Invite.
How Can I Verify a User's Account Information and Confirm They've Received the Product?
Use an Account Verification notice type to have users verify any account-level information collected at account creation. Read more about notice types.
To confirm users have received your product before testing begins, use the Product Verification feature in the Users section of your Management navigation bar. Read more about Product Verification.
"User Already Exists in This Invitation Type"
This message means the user has already been added to the invitation type's pool. Each user can only appear once per invitation type.
Where Can I Search for Users I've Invited?
Invited candidates remain in your Recruitment Pools until they click through the invitation and join. Read more about managing Recruitment Pools.
Why doesn't my Converted count match the users listed?
The Converted count only goes up. It records every user who joined through that recruitment or invitation type, including users who were later removed. When you click the number, Centercode builds a filter that lists the users who joined, and that list doesn't show removed users. So the count and the list drift apart over time.
A large gap usually comes from the User Experience Preview. Each preview creates a temporary user that joins through the recruitment path you pick, then removes it when you finish. The temporary user adds to Converted, and the count doesn't drop when the preview account is removed. If your team previews notice flows or onboarding often, expect Converted to run higher than your real number of joined users.
(2) Surveys FAQ. Append to the answer for "Do the drafts and completed counts on a survey add up to my participant total?"
Surveys you complete while using the User Experience Preview also add to Completed. Centercode removes the preview account and its responses afterward, but the count stays.
How Do I Send Follow-Up Email Invites to Users I've Already Invited?
Go to Community Management or Project Management, click Recruiting, then click Moderate candidates on the relevant Project Recruitment or Invitation Type. Click Email to send emails to all candidates, or filter first to target a subset.
Can I add more email addresses to an invitation I've already generated?
No. Once an invitation is set, you can't add addresses to that invitation itself. To extend the available pool for a recruitment, add a new invitation to it instead. The new invitation brings more candidates into the same recruitment while the original invitation stays as it is.
"This Project Recruitment Is Not Available"
This message appears when a recruitment is inaccessible due to one of three reasons: it has reached its expiration date or user limit, it has been toggled inactive, or its destination teams have been deleted.
For expiration and user limit issues, click into the Recruitment and scroll to Advanced options. A blank expiration means the opportunity never expires. A blank user limit means unlimited users can join. Both are blank by default.
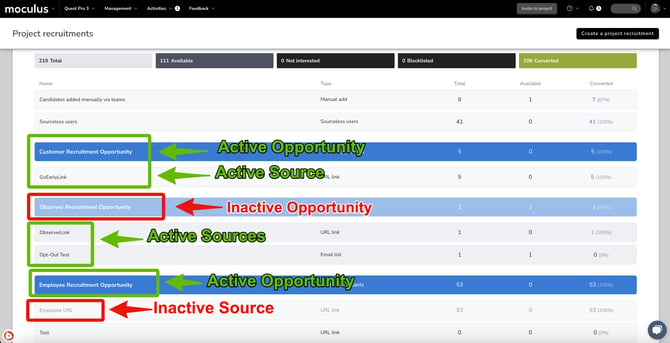
For inactive recruitments, hover over the opportunity or invitation type and click Toggle status.
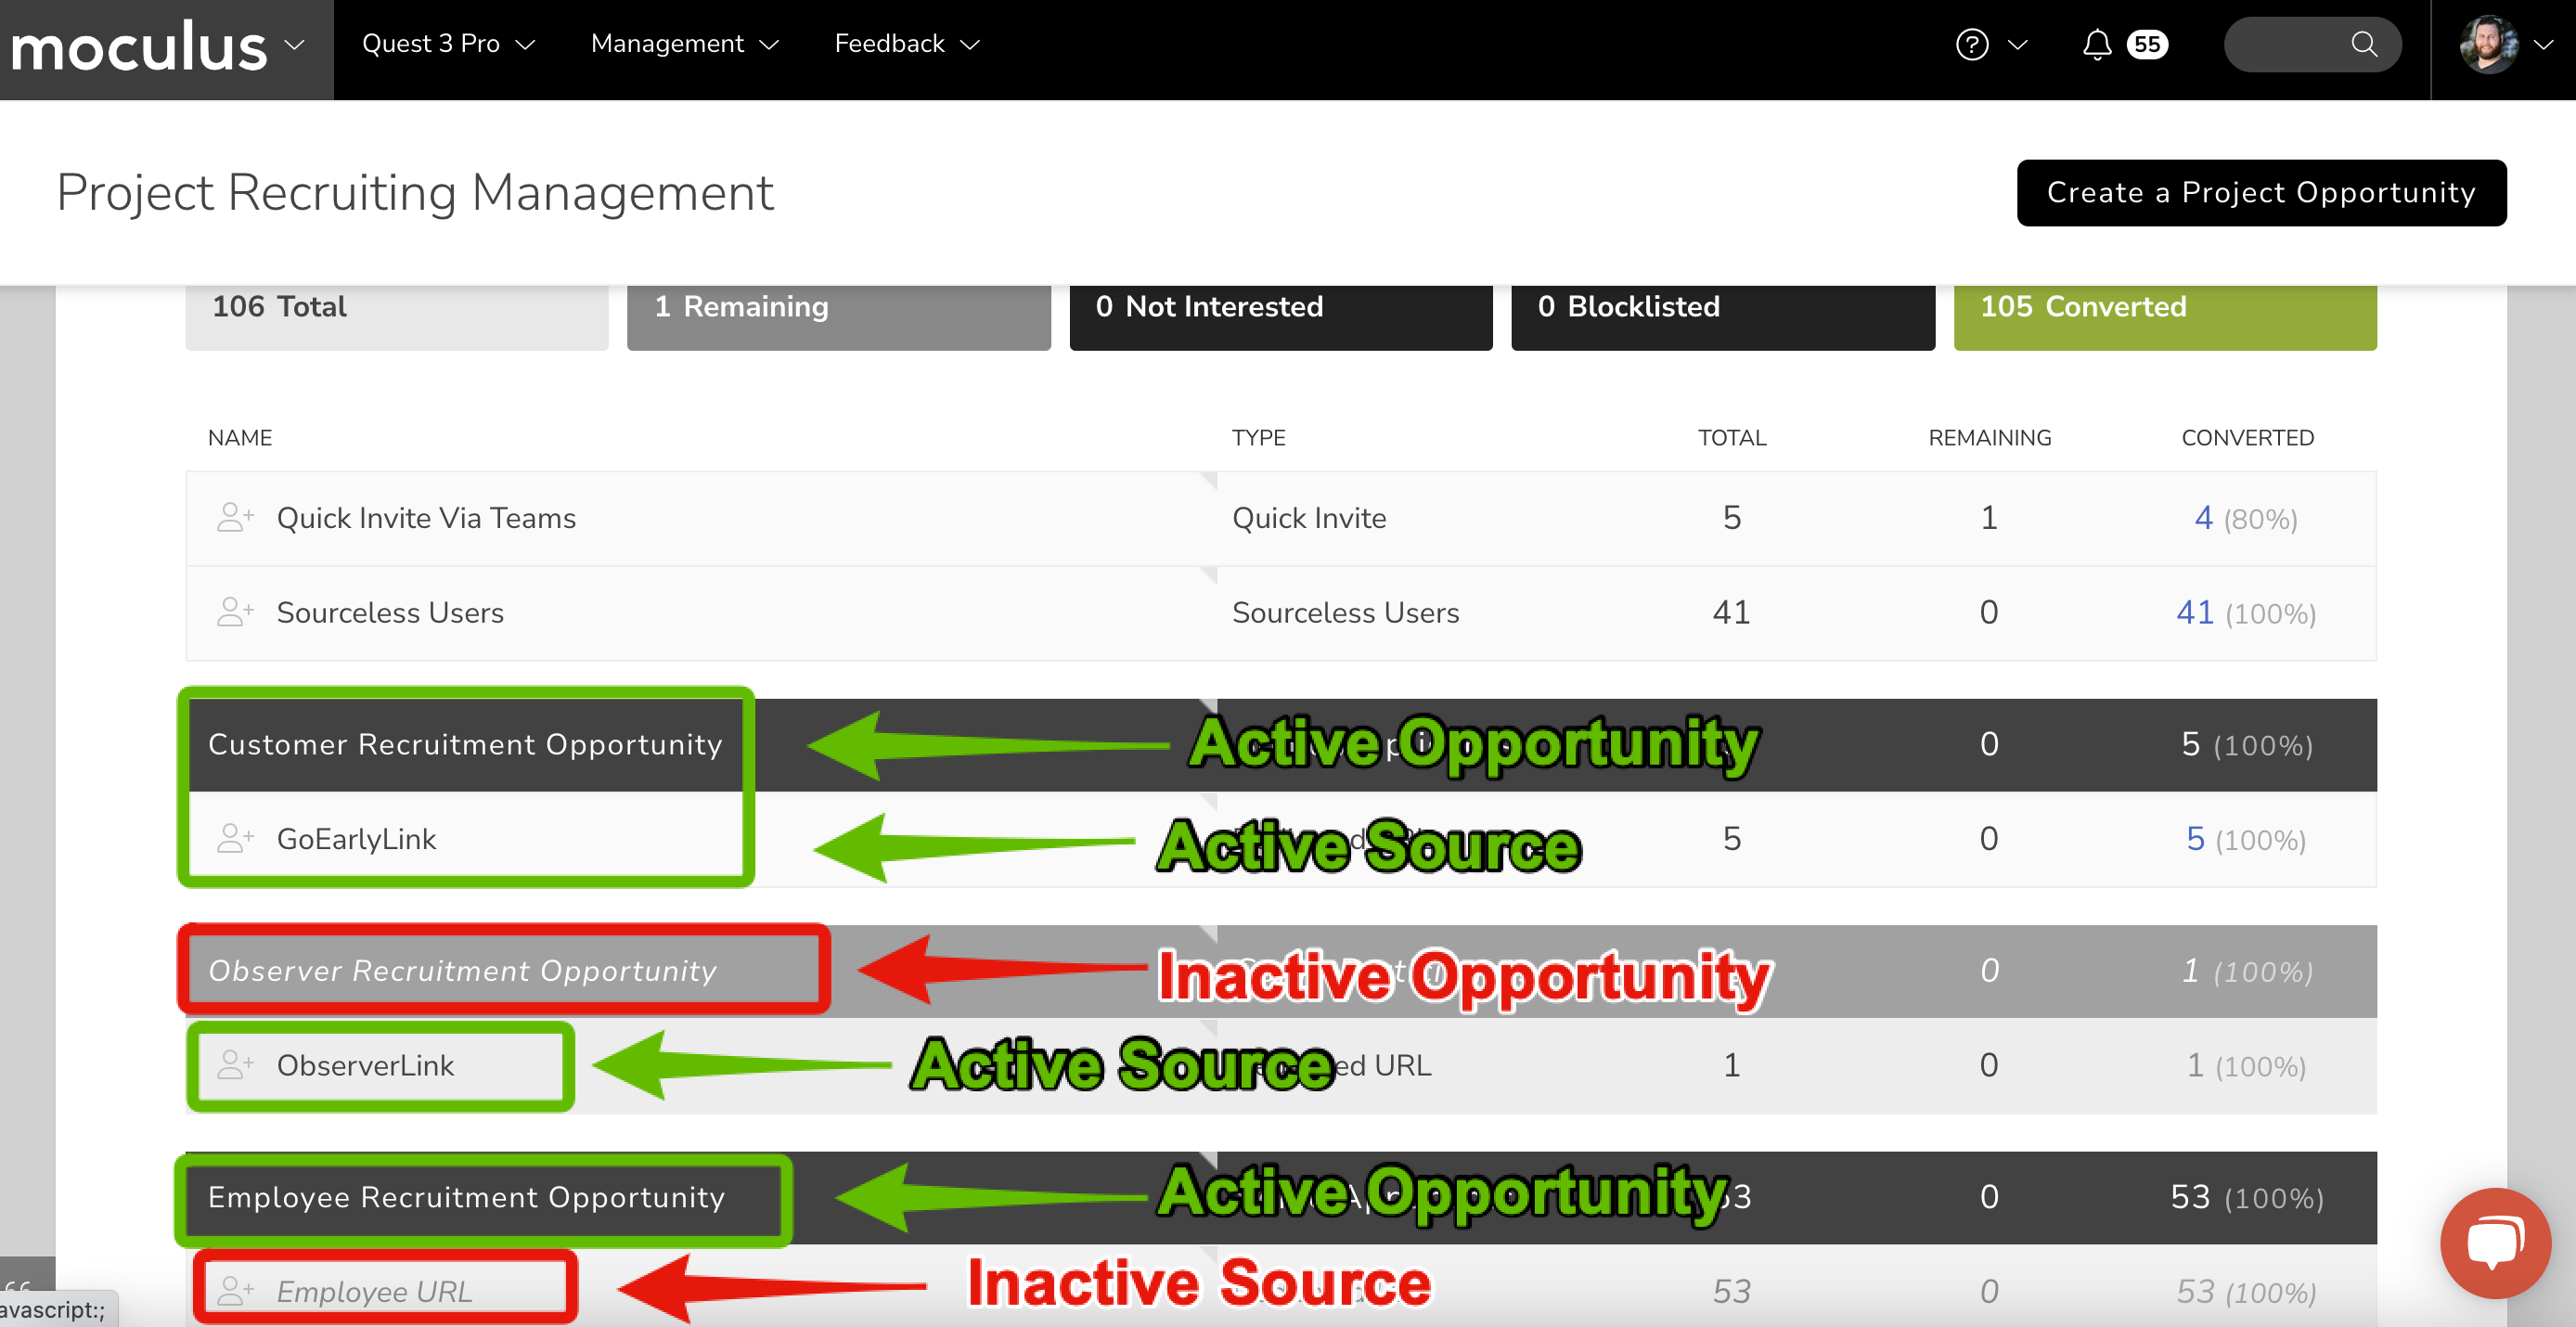
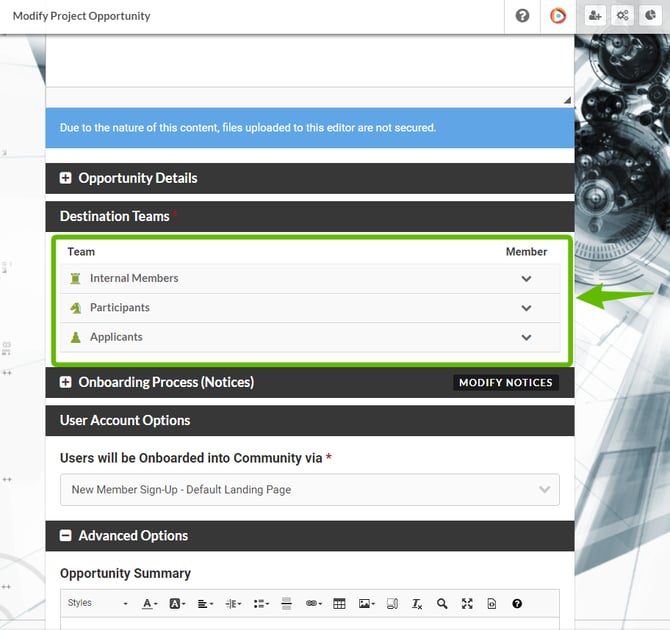
For missing destination teams, click into the affected recruitment and select new destination teams. An indicator of missing teams is that all team types are collapsed.
Note: Users who join via Project-level Recruitment must first access your Community-level Opportunity to create their accounts. If your Project Recruitment has no expiration date or user limit, check the Community Recruitment for those settings.
"Your Filter Matched Inactive Results Which Are Not Shown"
This means your opportunity or invitation type is currently inactive. Hover over it and click Toggle on/off to reactivate.
How Do I Control the Community Recruiting Experience for New Users?
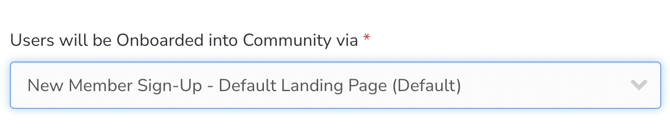
In your Project Recruitment, the Users will be recruited into community via setting references available Community Recruitments for new accounts. This controls how incoming candidates create their accounts if they don't already have one. Read more about the Recruiting tool.
How Do I Change My Landing Page Text?
Landing page copy is controlled by your Project Recruitment. Click into your Recruiting tool and modify the recruitment to update it. Read more.
How Do I Set the Teams Users Get Added to When They Join?
Your Project Recruitment controls the destination team users are added to when joining your community or project. Read more.
How Do I Know Who Has Been Invited to Join My Community or Project?
Your Project Recruitment's Pool Management dashboard shows invite statuses including how many times each candidate has been emailed. Read more about Recruitment Pools.
How Does "Not Interested?" Work?
Candidates who click "Not Interested?" in a recruiting email or on the recruitment landing page are automatically excluded from future invites for that Project Recruitment.
Why Can't My Users See the Project They've Been Added To?
If users accepted an invitation but can't see the project on their community homepage, they're likely missing the Access Project role within that project's Roles settings. Read more about access control.
Why Are My Users Getting the "Page You Are Attempting to Access Is Unavailable" Message?
This message appears when a resource is missing the appropriate Team Access in its basic settings, or has an expiration date that has passed. If users can't see their projects on the community homepage, they're likely missing the Access Project role. Read more about access control.
Why Can't My Users See Content, Surveys, or Other Resources When Signing In?
There are two areas to check. First, review the resource's Team Access and confirm the notice is enabled for the desired teams. Second, review the notice chain order.
1. Confirm the desired teams have Notice enabled in the resource's Team Access settings.
2. Click Community or Project Management > Notices.
3. Locate the resource that isn't appearing and drag it to the correct position in the notice chain.
4. Use the Preview notice chain tool to confirm the order looks correct for your teams.
What Are "Sourceless Users"?
Sourceless users are users who were added via Recruiting but whose associated Project Recruitment and/or Invitation Type was later deleted.
How Can I Prevent Certain Users from Joining Any Projects?
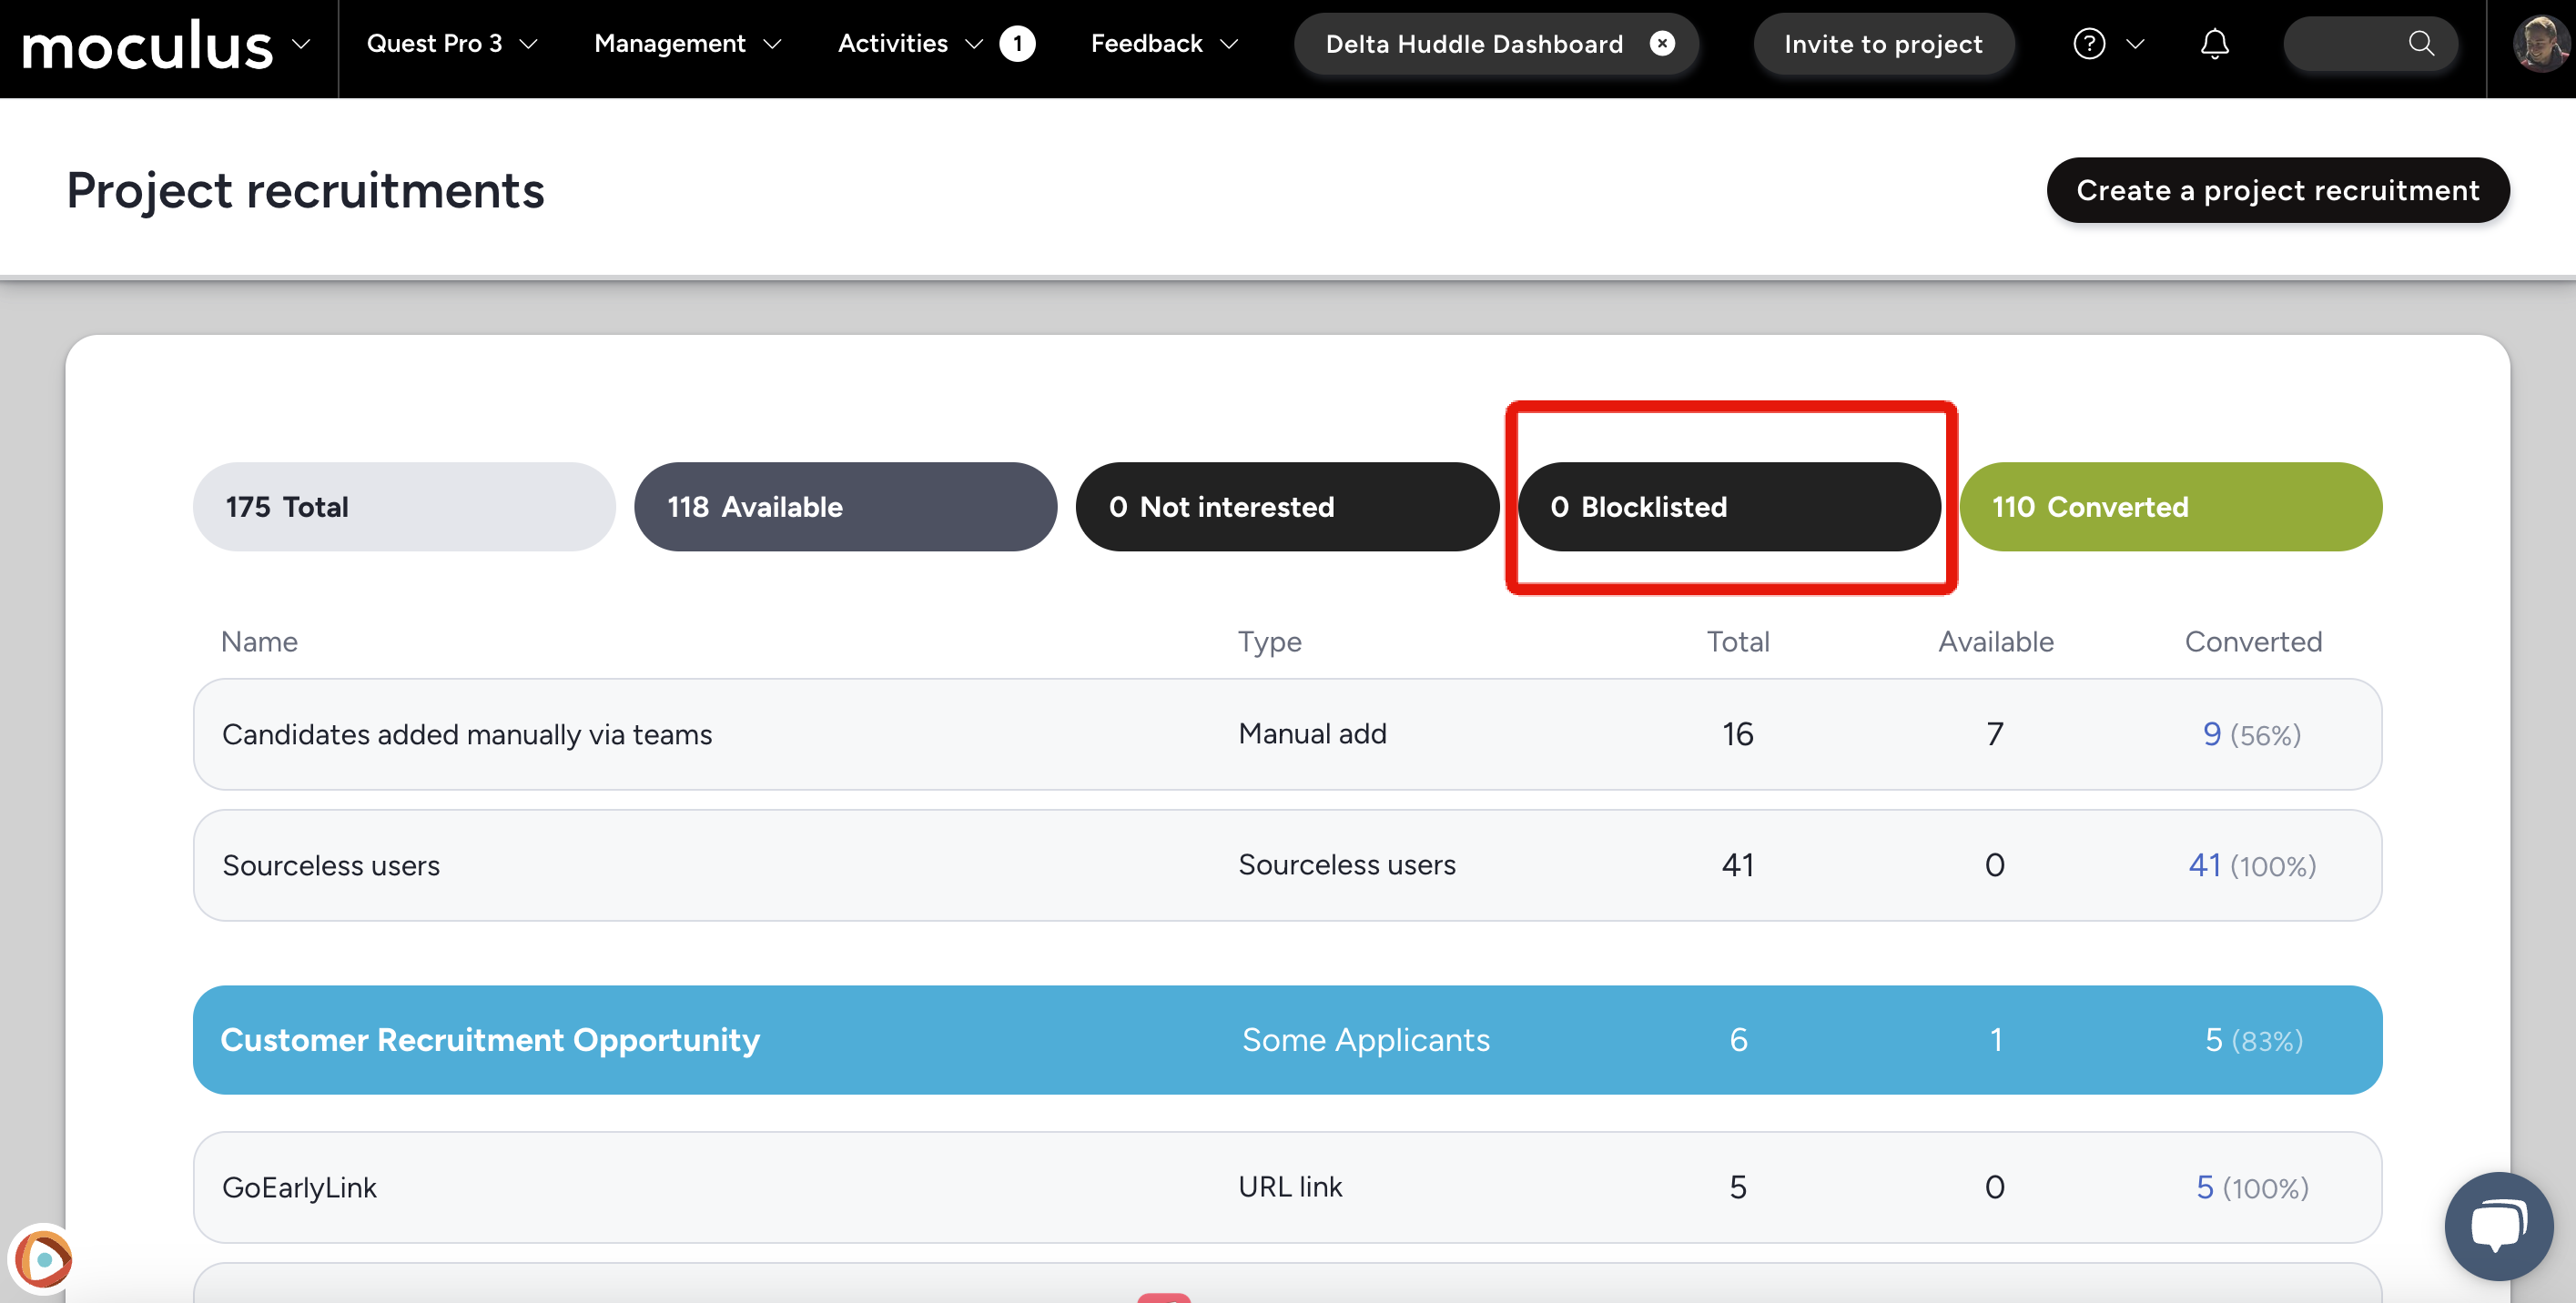
Configure a Recruitment Limiting Filter on the Program. This filter identifies specific criteria and blocks any accounts matching those criteria from joining projects in that program, adding them to a blocklist for that source.
To create a Recruitment Limiting Filter:
1. Click your Community logo > Community management > Programs and projects.
2. Click into the program.
3. Click Basic settings in the upper right.
4. Under Recruitment limiting filter, click the + icon.
5. Set your filter criteria and click Submit.
Note: the filter prevents matching users from joining through Recruiting tools. Users who meet the criteria after already joining are unaffected.
How Do I Change the Opportunity Name Shown on My Community Home?
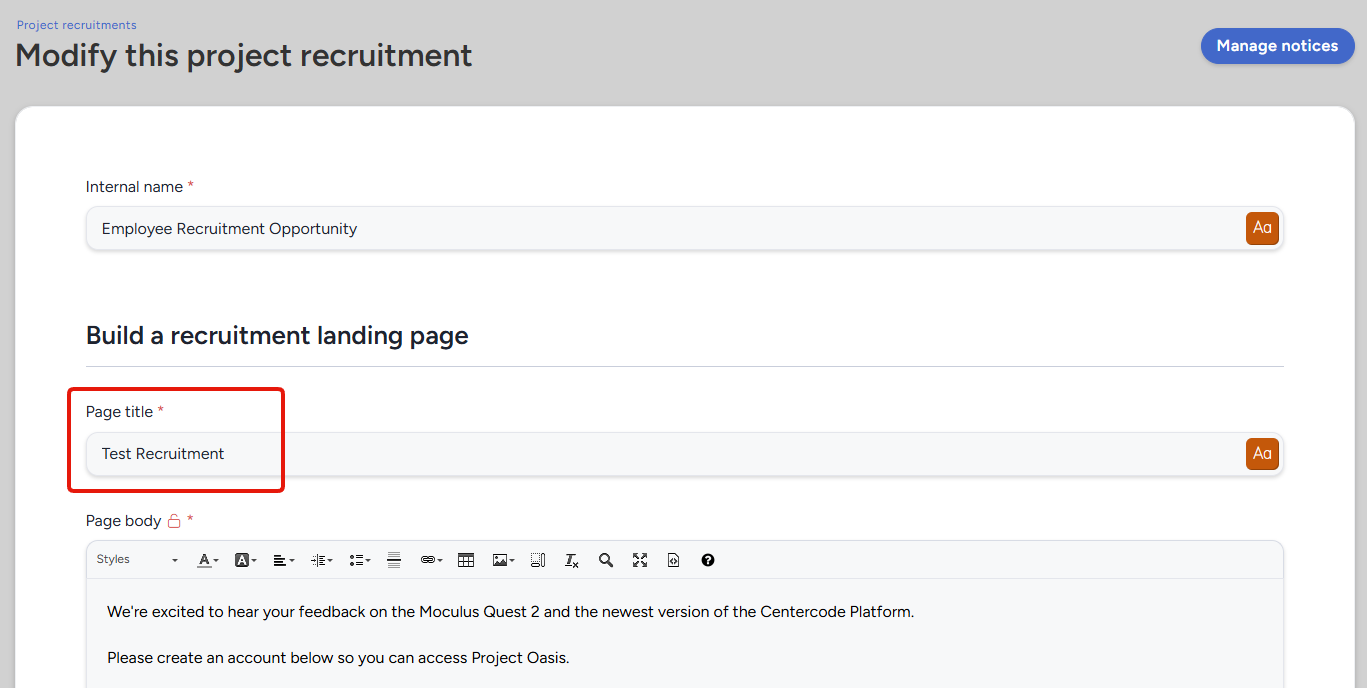
The title shown on the opportunity button on the community homepage is set by the Page title field in the related Project Recruitment. Once a user is on a member team in your project, the button simply displays the project codename.
How Do I Personalize Recruiting Emails and Invitations?
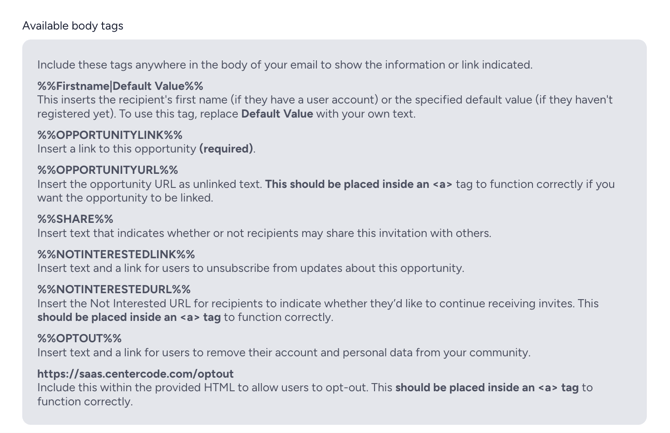
Use the special recruiting dynamic tag %%First|Default Value%% to personalize invitations. to personalize invitations. If the recipient already has a Centercode account, their first name is inserted automatically. If not, the default value is used as a fallback. Replace "Default Value" with something friendly, like "there" or "friend."
Why Are My Users Landing on an "Enter a Key" Page?
Users land on this page when the key tied to their invite link has expired. This typically means they're using an email invite link or an "Invite user" link that was sent more than two weeks prior. Resending the email will get them a fresh, usable invite link.
How do I remind Email List candidates who have not accepted their invitation?
There is no separate resend control. The reminder is an email you compose and send to the candidates you select, using Email candidates from the candidate list.
Addresses added through an Email List invitation sit in the Recruitment Pool until you contact them, and they stay there until they convert. That pool is the group you are targeting.
Sending the reminder
- Open the recruitment and go to its candidate list.
- Filter by Invitation to isolate the Email List invitation you want, then narrow further with Candidate Status if you need to.
- Select the candidates to contact, then click Email candidates.
- Edit the subject and message to ask them to accept.
- Keep the opportunity link tag in the body, either %%OPPORTUNITYLINK%% or %%OPPORTUNITYURL%%. Without it, recipients have no way to reach the invitation.
- Send.
The candidate list pages, so a large pool takes more than one send. Work through each page, or raise Limit # of results to cover the whole group at once.
Notes
- Use Last Emailed as a filter if you want to avoid contacting people who were emailed recently.
- An Open Invitation is a different tool. It generates one shareable URL for anyone to join, and it does not preserve the per recipient tracking an Email List invitation gives you. Reach for it when you want a link to post somewhere, not when you want to chase specific candidates.
Testers say they hit a limit message when registering. What should I check?
Several settings can stop someone from joining, and the message a blocked candidate sees is customizable. That means you cannot identify the cause from the wording they report, so work through the settings instead.
Check these, in this order
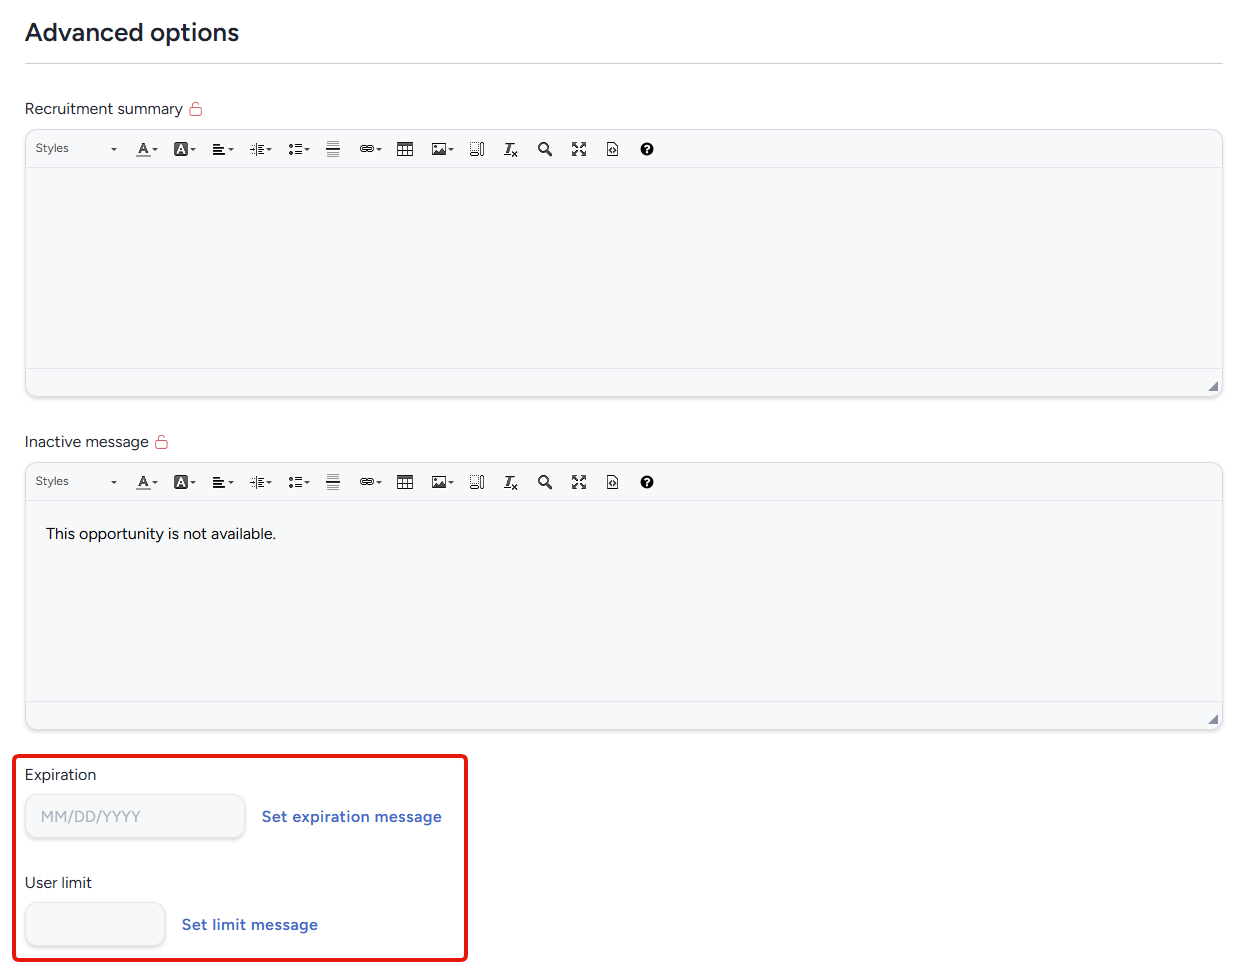
- The invitation's user limit. An invitation can cap how many people it admits. Once the cap is reached, further candidates are turned away even though the recruitment is still open. This is the most direct match for a tester describing a limit.
- The invitation's expiration date. An invitation that has passed its date stops admitting people, which testers often report the same way.
- The Recruitment Limiting Filter on the Program. Open the Program and go to Basic settings. This filter blocks candidates who match its criteria from joining through an Opportunity, so check whether the affected people match.
- The candidate pool count. Review the Opportunity's candidate or source pool. A filtered out count confirms people are being excluded and tells you roughly how many.
Why the message does not identify the cause
The text a blocked candidate sees is configurable, so two sites can show different wording for the same underlying block, and one site can show the same wording for different blocks. Ask affected testers how they were invited, whether by URL, import, referral, or key, because the invitation path narrows down which settings apply. Then check the settings above rather than reading meaning into the message.
Notes
- Ask for a screenshot of what the tester saw. Even though the wording is customizable, it confirms they reached your site rather than failing before that.
- Looking for how each invitation type admits people? See the Invitation Types Overview.
Why did my other open opportunities disappear after a user joined one?
This is expected. A user who can reach several open opportunities for the same project sees all of them listed on the Community homepage. As soon as they join through one, the remaining opportunities stop appearing there.
The opportunities are still available to them. What changes is the homepage listing, not their eligibility. They can still join any of the others through:
- a direct link to the opportunity, such as a Dedicated URL invitation
- a direct invitation sent from the project, such as Invite to project
- any other invitation type configured on that recruitment
So if you intend a tester to participate in several projects, plan to reach them with a link or an invitation for the second and later projects rather than relying on the Community homepage to keep advertising them. A user can join the same project through more than one recruitment, and they are added to the destination teams configured for each one.
For the invitation types available on a recruitment and how each one reaches users, see Invitation Types Overview.