Confirm addresses before shipping valuable test units or incentives via Shippo, UPS, USPS, FedEx, or another API-based system
This article applies to Team and Legacy editions.
Note that while Centercode’s integration features are intended to be approachable by a Customer Validation Professional, you might need to enlist help from an internal technical resource and refer to our vocabulary and troubleshooting documentation .
Webhooks enable Centercode to send data to third-party systems and optionally receive External Data responses. External Data allows you to leverage that information by storing it against Users or Feedback Tickets. This can be used anywhere via the Centercode Data Engine - as Dynamic Tags, in User & Feedback Management, Reporting, and even other integrations!
The principles included in this guide apply to triggering a Feedback or User Webhook Macro within Centercode to any API-capable endpoint and capturing return data. In this example, we’ll be sending Centercode user data to Shippo to validate shipping addresses.
In this guide, you will:
- Create an (or identify an existing) API Key in Centercode
- Create a POST Webhook Request in Centercode
- Configure External Data Fields to Capture Return Values in Centercode
In order to configure both sides of this integration, you will need:
- Access to an existing API Key or Community Manager access to create a new one
- Community or Project Manager access in the project of your choice (or your project template)
- A valid Shippo authentication token
-
Preparing to Send Data to Your External System
1. Creating an API Key
From the Centercode side, the first step in any API integration is to ensure that you have an API Key available within your Centercode Community. While this integration doesn’t use an API key, your integration features won’t be visible unless one is available.
If necessary, create a Community API Key by following steps outlined here.
-
2. Creating a Webhook Macro
Macros allow you to create a single instruction that includes a set of actions to complete a desired task. User Macros perform these actions on users relative to their accounts within Centercode. In this example, we’re creating a User Macro to send shipping data into your Shippo dashboard, then receive validation results.
From the Community or Project Homepage:
- Click Management > Users > Project users in the upper navigation bar
- Click User resources
- Create a new Macro
- Click Trigger Webhooks
- Under Web Request, select POST and enter Shippo’s API Endpoint: https://api.goshippo.com/addresses/
- Include the Shippo authorization token in the Header field (detailed below)
- Select JSON from the Content Type dropdown
- Add your JSON Body and Address Dynamic Tags (detailed below)
- Select Capture Return Values (detailed below)
- Create or select your Data Group Label
- Create a Label for address validation results
- In Parameter, type validation_results.is_valid
- Select the Boolean data Type
- Click the Add Field button
- Under Additional Options, click Show in User Management Actions
- Click Submit
You’ve just created your Webhook Macro to validate user shipping address!
-
Headers for Authentication
Shippo’s API endpoint is static and authenticates through your header token. Headers allow you to define additional static values sent with each request. Not all API calls require headers to be defined, but Shippo does. Please add the following to your header:
Authorization: <your Shippo token>
For example
Authorization: ShippoToken shippo_live_ab123c2d123ef12
-
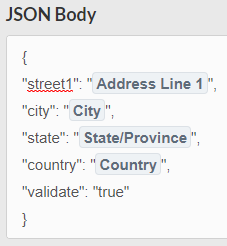
The JSON Body
JSON is a computing language that’s used to transmit data to and from systems. This field is what is going to be sent from Centercode to your third-party system. Please feel free to use this example to send dynamic user shipping addresses. Centercode’s dynamic tags correspond to a shipping survey or User Profile. The minimum requirements are below:
Capturing External Data
Note that you can find more information on the definitions of these fields and options in our Integration Terms and Troubleshooting documentation. For this integration, the italicized text is used.
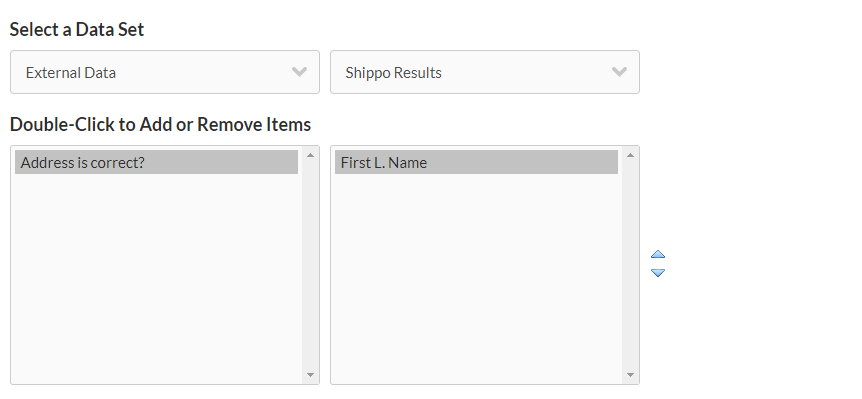
- Create a new Data Group Label or select a pre-existing group
- Label the data fields you're expected to receive and store
eg. Address is Correct? - Use Parameter to identify the data received in the response from Shippo
eg. validation_results.is_valid - For each incoming data point, set it's correct Type to properly classify it
eg. Boolean - Mark the incoming data field as a Favorite to display it on the user’s Summary or feedback ticket
-
Using Your Address Validation Webhook
Once your Webhook Macro is configured, you may use it to send user data to your external system to capture return data. In this example, we’ll send tester shipping addresses to Shippo to capture validation results.
3. Using Your Webhook
Like any User Macro within Centercode, you can trigger your Address Validation Macro manually (individually or in bulk), as a Notice (Click here), or on an automated schedule.
Bulk Manual Trigger
To trigger manually, start at the Community Homepage:
- Click the upper left Community Logo>Community Administration>Users
- Create a Filter, if desired
- Under Action, select your Webhook Macro
- Click Perform Action
You’ve just sent your data to your third-party system and captured return data!
-
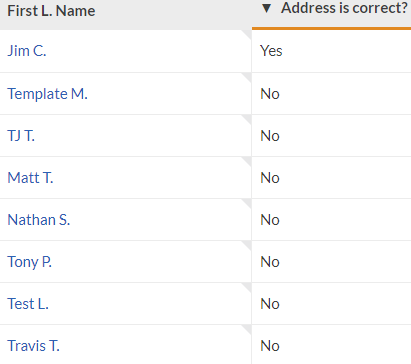
4. Review Your External Data Results
The External Data returned from your third-party system extends the reach of your Centercode Data engine. These results can be leveraged in Reporting, User or Feedback Management, and user’s summary or feedback ticket.
Creating an External Data View
Viewing External Data in User Management
Troubleshooting your Webhook
If you find that your Webhook failed or that data isn’t updated as expect, you’ll want to review the Webhook’s logs to troubleshoot any issues.
From User Management:
- Click User Resources
- Hover over your Macro and click Macro Webhook Log
- Hover over a username and click Macro Webhook Log
-
Status codes are covered in this article:
Understanding Integration Terms & Troubleshooting
Please note that when sending a Post request to your Centercode API endpoint, the JSON body must be JSON encoded.