This article applies to Pro, Team, and Legacy editions.
Simple Report Creation
If you're looking to create a report with a few clicks, Centercode offers simple methods of getting data out of your platform.
Within their respective management pages, you can create a high-level overview of your data in the form of beautiful graphs and charts via PDF with Macro Reports. You can also quickly export your raw data in spreadsheet format with Quick Form Export.
These features allow you to work with and export your data without having in-depth knowledge of the Centercode Reporting engine.
To Quick Form Export your data:
- Click into the upper left Community (for Community level information) or Management (for project level information) in the navigation bar.
- If Community level, click Community management > Survey or User profiles. If Project level, click Surveys or Project configuration > Feedback types in the main tools menu.
- Locate the form you’d like your data from and click the new Export icon.
- Review your data, parameters, and style. When satisfied, click Export to file at the top of your page
To create a Macro Report (Complete Report):
- Click into the upper left Community (for Community level information) or Management (for project level information) in the navigation bar.
- If Community level, click Community management > Survey or User profiles. If Project level, click Surveys or Project configuration > Feedback types in the navigation bar.
- Locate the form you’d like your data from and click the Build a complete report icon.
- Select your data - Add items to include in the report element. Different styles will be available based on the type and quantity of selected items.
- Add filter - Limit the report element to a specific subset of results. Continue with No Filter and the system will add a proper filter for you.
- Pick a style - Visual presentation of your report element. Available styles are determined by the data items selected.
- Click Submit to proceed to the next page.
- Name your Report
- Click Submit to save and generate your Report.
When creating a report within Centercode for data that's specific to a resource (e.g. Survey), a common mistake is that the report is missing a Filter. A filter ensures that you're seeing data for those who qualify in your report.
Troubleshooting Scenario - No Filter Reports
If you've created a custom and see many blank results, your custom report is lacking a Filter.

All you'll need to do is modify the report and add a Filter! A common Filter would be <Your Survey Complete = Yes>
To fix your Report:
- Click Modify report
- Click the Report element
- Scroll down to Add a filter
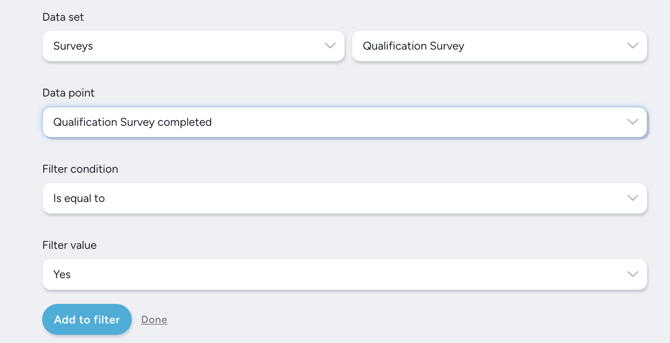
- Create your Filter
- Click Add to filter
- Click Submit and view