Survey basics and troubleshooting
This article applies to Pro, Team, and Legacy editions.
Surveys are a great way to gather information about your product via direct questions posed to your Users. It is important to keep Surveys shorter rather than longer as you want your Users to answer truthfully and not rush through them. If you're not sure what each form element can do, please refer to this article: What are the various Form Elements typically used for?
How to create a Survey:
From the Survey Management tool:
- Click the Create a Survey link at the bottom of the table.
- Choose a Template to build your survey off of or add your own Title, Menu Label, Team Access, and Advanced Options.
- Click the Next button at the bottom of the page.
- Click the Add a Form Element link at the top of the form.
- Select the desired Element Type and then fill in any necessary data.
- Click the Submit button at the bottom of the form to confirm.
- Repeat steps 4 and 5 above until you have added all desired Elements.
- Click the Return button when satisfied to complete the process of adding Elements and return to the Survey form.
- Click the Activate Survey button at the bottom of the form to make the Survey available to testers.
You have successfully created a Survey.
How to modify a Survey's submission access:
From the Survey Management tool:
- Hover over the desired Survey.
- Click the modify pencil icon
- Make desired changes to the Basic Options and Advanced Options, as well as to Team Access (Notice access is here).
- Click the Submit button at the bottom of the page to confirm.
You have successfully modified a Survey's submission access settings.
How to modify a Survey's form elements (questions):
From the Survey Management tool:
- Click on the name of the Survey
- Hover over the form element you'd like to modify
- Click the modify pencil
- Make your changes to the form element (change title, description, choices, team access, etc)
- Click the Submit button at the bottom of the page to confirm.
You have successfully modified a Survey's form element.
Archive a Survey:
From the Survey Management tool:
- Hover over the desired Survey.
- Click the Archive icon and confirm
You have successfully archived a Project Survey. You can access the Survey and activate it in the Archive section of Survey Management.
How can I make sure users complete my Survey?
The ensure that Users complete a your Survey, simply set the Survey as a Notice. Notices are content that users must view before they reach the Community or Project's homepage (depending on where your Survey is created).
To set your Survey as a Notice, refer to line #3 under the "Modify a Survey's access" section above.
How do I prompt Users to complete a Project Survey?
The quickest way to notify your Users is with the Notify/Remind feature. Click here for detailed information about how this feature works and what to expect.
The Notify/Remind feature is available as a hover-over action for appropriate resources - Surveys, Content, and Releases - enabling you to send a quick email (similar to Quick Invite’s template) to the users who have access to your resource. Only those who haven't completed the survey and have access to complete it will be included. The initiating administrator will not be included.

Emailing users your custom email template
Another common method is to email your Testers from within the system with a customized email template to let them know that there's a survey you want them to complete. This leverages User Management and is unique due to its ability to target specific teams to notify with a more customizable email. Please refer to this for User Management basics.
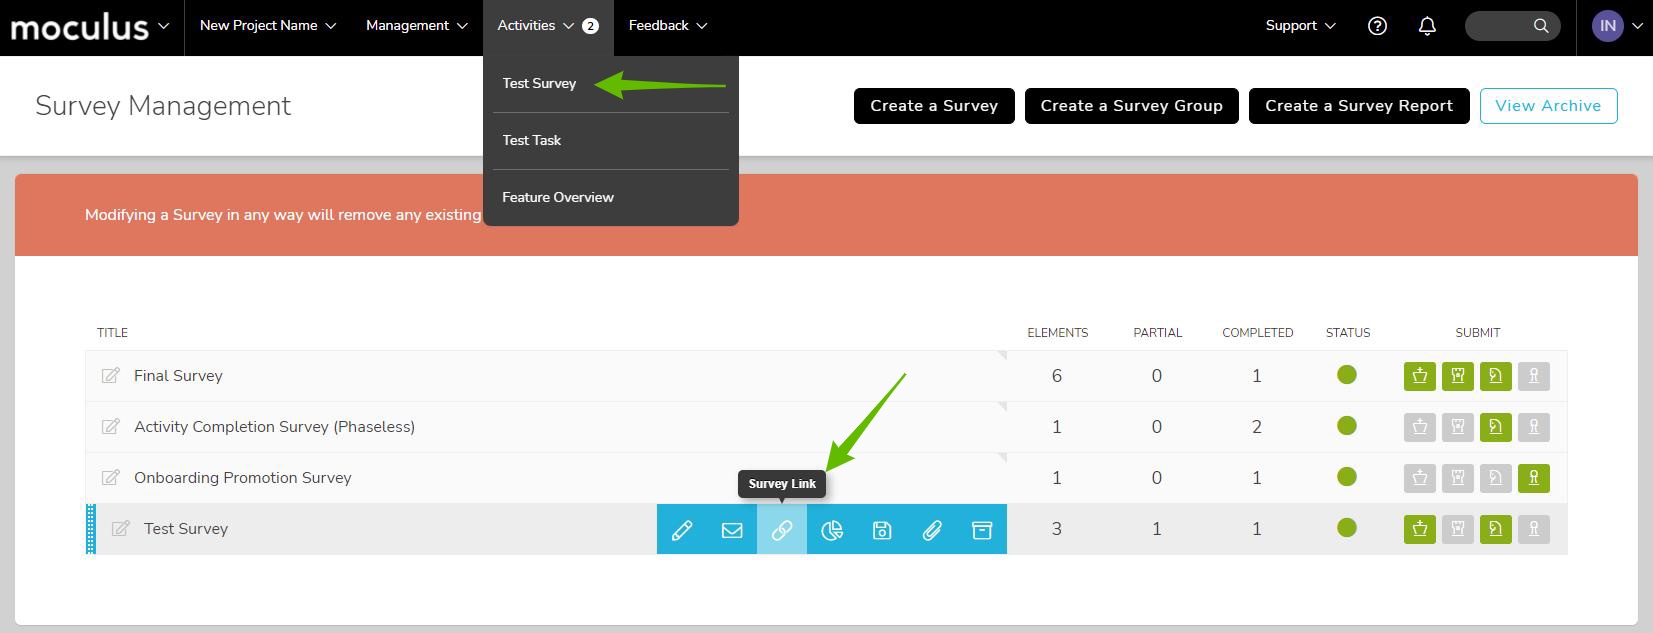
Where can I find the submission link to my Survey?
You may copy the Survey link's URL from the Activities menu in the navigation bar or click Survey Link within Survey Management to distribute a Google Shortlink.
How can I copy a Survey from one Project to another?
Please refer to this article for how to globally clone Surveys, Content, and Releases.
How can I export Survey responses? How can I create a report for my Survey? How can I view survey results in-site?
To export a Survey's responses as CSV or XLSX, please refer to this article.
For further reporting information, please refer to the Reporting section.
To view results in-site, please refer to the Filter and View article.
Survey Troubleshooting
Users are missing their drafts
This common scenario arises when testers report that their Survey draft is missing their responses.
This occurs when:
- User is filling out their Survey and gets their Survey draft saved (manually or automatically)
- User then leaves the Survey
- User returns to the Survey
- User begins filling out the Survey again, without loading their draft
- User manually saves another draft
- Load Previous Draft button only uses the most recent draft (notes below)
How can I reset a user's Survey response?
While Surveys were always intended to be one-and-done snapshots of directed tester feedback, occasions arise where correction or re-submission of a survey response is warranted or appropriate. The Survey Reset features make resetting, correcting, and resubmitting a survey incredibly easy.
To reset a survey for a specific user, follow these steps:
- Navigate into the User’s Profile for whom you’d like to reset the survey
- Click on the Profile tab
- Locate and click on the Survey you’d like to reset
- Click on the Reset Survey Response button
- Choose to either Maintain Results or Discard Results
When resetting a survey you will be provided with two different options - Maintain or Discard Results.
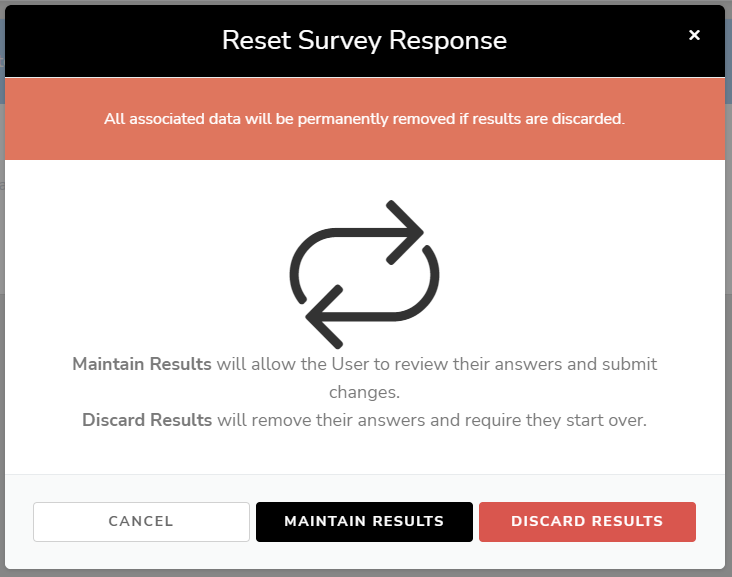
As seen in the above illustration, Maintain Results will reset the survey but keep all of the users previous answers, thus allowing them to review their previous answers and submit any adjustments needed. Discarding Results will remove all of their previous answers for that survey and require them to fill out the form from scratch.
Important Notes:
- Resetting a Survey that was originally marked as a Notice will also automatically reset the Notice for that user, requiring them to resubmit their response on their next login (team access withstanding). In this way, Resetting a Survey effectively resets the survey experience for that user.
- Clicking on a Survey link on the Summary tab of a User’s Summary won't provide the options to reset a survey - you must access the desired Survey from the Profile tab.
If I add new questions to a Survey, will users who already completed the Survey be prompted to take it again?
If a user completes a Survey and an administrator adds additional elements to the Survey, the user will not be prompted to complete the Survey again. You may reset the user's survey.
If the Survey was set as a Notice
You can reset the Notice to allow users to be presented with the Survey again upon login, even if the Survey was already completed.
From the Notice Management tool:
- Hover over your Survey
- Click the Log icon
- From here, you may click on a user and reset their Notice individually, or scroll down and click Reset This Notice For All Users

Why is my Survey empty in Survey Management?
This is an admin-only facing issue. If a Survey isn't showing your questions, it's likely because the account you're using has had its Survey results removed.

To resolve this from the Project Homepage:
- Search for your account in the Knowledge Base Search (name, email, partial)
- Click on the account
- Click the Profile tab
- Scroll down and click your Survey's name with red "Removed"
- Click Reset Access
- Confirm selection
I'm assuming a user. Why can't I see Notices? Why can't I see surveys in the menu?
Assuming a user bypasses their Notices.
A Notice is a setting in each resource type that can be toggled on or off for the team(s) of your choice via the Team Access block. When the Notice box is checked on, the team(s) selected will be presented with the resource you’ve configured.
Using the Assume function to assume a user's account shows you the user's view of your Centercode implementation and bypasses all of the user's Notices, by design.
Bypassing Notices allows you to not invalidate a user's experience, as Notices are typically set to be completed only once.
Why can't I see surveys in the Activities navigation bar menu? How do I get surveys to show on the Activities menu?
If you're finding that users aren't seeing your Survey on the Community or Project's left-hand menu:
- Ensure access is appropriate in the Project's settings
- Important: Surveys set as a Notice do not appear on the user's menu
- Ensure that the user has not already completed the Survey. This can easily be done by checking the user's summary via the search bar.
Notes
- You will need to activate a Survey before your audience can see it and fill it out. This can be done from the main Survey list page with the Activate check box, or from the Elements list page for your Survey by clicking the Activate Survey button on the bottom of the form.
- Changes made to an existing Survey via these modification steps will not be retroactive to Users who have already filled out the Survey form. This means that once a Survey is live, any modifications you make to the Elements will only be reflected for Users who fill it out after the changes have been made. Please ensure you are ready to activate your Survey before you do so, or you risk generating mixed or inconsistent data.
- When creating or modifying your survey, checking on Element Level Access under Advanced Options will allow you to set access rights for each individual Form Element on your survey depending on team type. This is useful if you have questions on your survey that only a particular team should see.
- if you need to share your survey with a stakeholder who doesn't have a Centercode account, you can use your browser to print the Survey page to a .pdf.