![New_Centercode_Logo.png]](https://help.centercode.com/hs-fs/hubfs/New_Centercode_Logo.png?height=35&name=New_Centercode_Logo.png)
The Team Management page lists every team configured in your community or project. Teams are the primary way Centercode controls which users can access which resources. By placing users on teams and assigning each team a role, you define what those users can see and do.
This page is available at both the community and project scope. The team list and available actions are identical at either level, but the user roles available differ between them. For a full breakdown of roles at each scope, see What Are Centercode's User Roles and Access Levels?
Page Actions
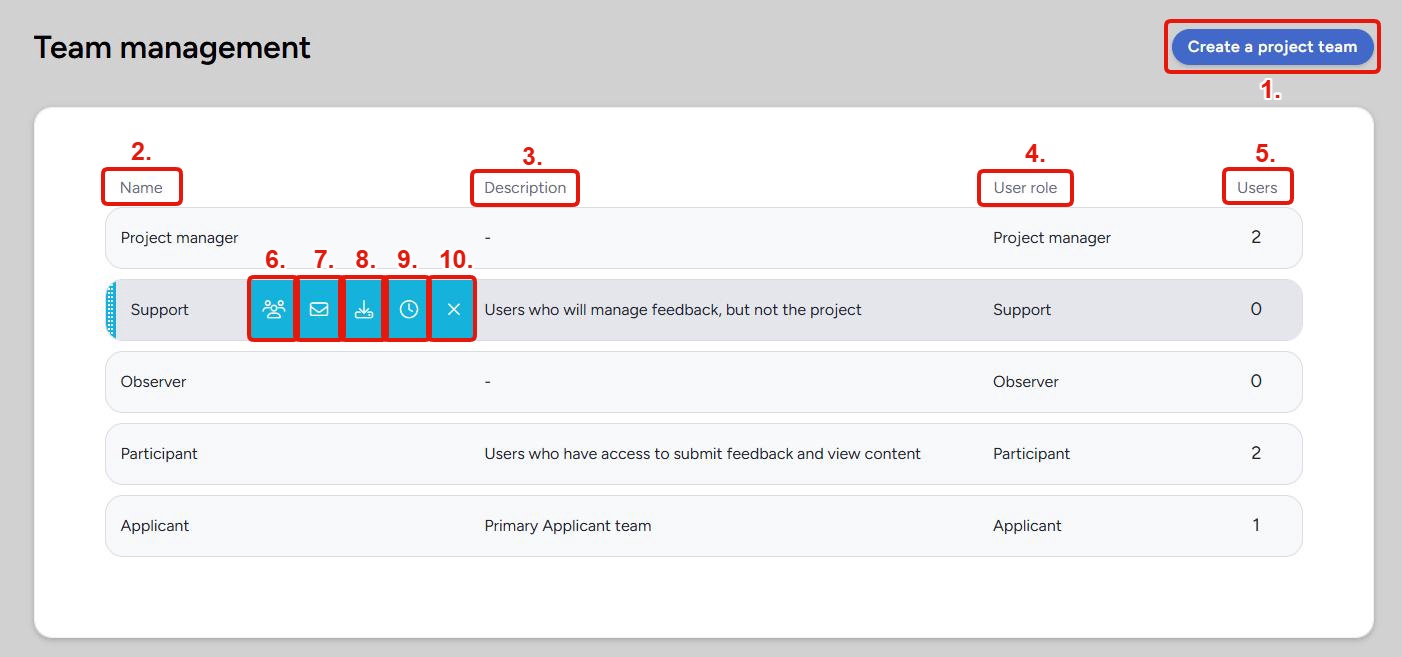
1. Create a Project Team / Create a Community Team: Opens the team creation page, where you name the team, write an optional description, and assign a user role. The button label reflects the current scope.
Team List
Each row in the table represents one team. Hover over a row to reveal the action icons.
2. Name: The name of the team as it appears throughout the platform.
3. Description: An internal-only description of the team's purpose. Descriptions are visible to admins only and are not shown to users.
4. User Role: The role assigned to this team, which determines the access level for every user on it. Available roles differ between community and project scope. See Centercode Basics: Understanding Centercode's Access Control for a full explanation of how roles and team access interact.
5. Users: The number of users currently on this team.
6. View Users (person icon): Opens a filtered view of the user list showing only members of this team. Use this to quickly review or manage the users on a specific team without leaving the page.
7. Email Users (envelope icon): Opens a bulk email composer addressed to all users on this team. Use this to send a message to every member of the team at once.
8. Import (download icon): Adds existing users to this team in bulk using a list of email addresses. Only users who already exist at the current scope are added — this action does not send invitations or create new accounts for unrecognized addresses.
9. View Log (clock icon): Opens the team activity log, which shows a timestamped record of every user addition and removal for this team, including which admin or automated process made the change.
10. Remove (X icon): Removes the team entirely. This does not remove users from the community or project, but users who are on no other teams may lose access to resources. Review team membership before removing.
💡 Ted Tip: Use Import any time you need to move a group of existing users onto a new team. Paste in a list of email addresses and Centercode handles the rest - no need to add users one at a time. Just keep in mind it only works for users who are already members at the current scope.
💡 Ted Tip: If you suspect a macro removed users from a team unintentionally, View Log is the first place to check. The log shows exactly when users were added or removed and what triggered it, so you can confirm whether an errant macro run is the culprit and identify which users need to be restored.
Notes
- Removing a team is permanent and cannot be undone. If any notices, resources, or recruiting sources reference that team, those configurations must be updated manually.
- Users can belong to more than one team. Their effective access is determined by the highest-privilege role across all their teams.
- For a step-by-step guide to adding and removing users from teams, see Guide to Managing User Access via Teams.
- For help with users who can't access a resource after a team change, see General Access Troubleshooting FAQ.
What participants can see regarding teams
Teams are an administrative structure. Participants never see them.
A tester has no view of the Teams they belong to, no list of Teams in the project, and no indication anywhere in the interface that Teams exist. They experience the results of Team membership, which is the surveys, content, releases, and activities their Teams give them access to, without seeing the mechanism that decided it.
This means you can name Teams for your own convenience. Internal shorthand, cohort numbers, vendor names, and candid segment labels are all safe, because the names stay on the administrative side of the platform.
Notes
- A Team's description is also administrative and is visible only to users with access to Team management.
- Because Team names aren't shown to participants, don't rely on a Team name to tell testers anything. Use a Notice, Content item, or email if participants need to know which group they're in.
- Looking for how Team membership controls what a participant can reach? See the Create a team overview.