Project Kickoff Dashboard
This dashboard is a starting point that serves as your step-by-step guide to setting up a Delta project. Each step contains contextual buttons that take you directly to relevant project configuration areas, along with helpful instructional videos.
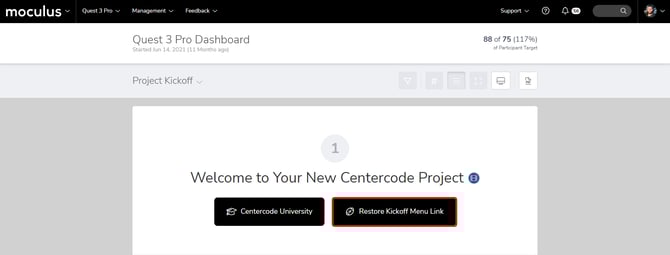
Step 1: Welcome!

The first step includes a customizable introductory message. This screenshot shows the default message, but you can update it to guide new project managers when using your project template(s). The Get started with Centercode button links to Centercode’s "Getting Started" playlist, a short series of videos to help you begin your Centercode journey.
Step 2: Configure your project teams

The second step takes you to reviewing and updating your user segmentations. This is an important early step for getting your project started since all your other recruitments, agreements, forms, etc. will base their access on these teams. Clicking the user roles presented (e.g.: Participant teams) will display the teams within that role and offer a button to create a new Participant team.
Step 3: Configure participant onboarding
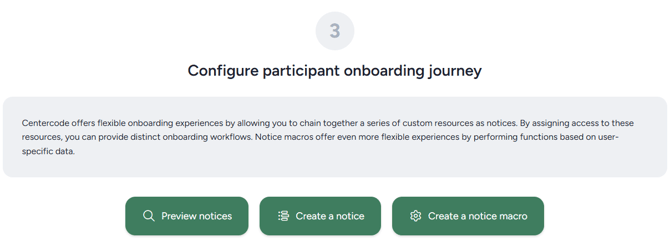
The third step guides you to reviewing, updating, and creating the steps a user will take as they join your project. If you need them to complete a qualification survey, an NDA, or even just a "thank you," this step is relevant to your setup. Use the appropriate buttons to check the current onboarding steps (Preview notices), add new steps (Create a notice), or even build automation to trigger during the onboarding process (Create a notice macro).
Step 4: Configure participant recruitments
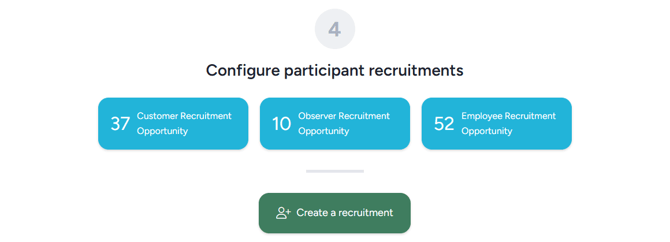
Once your onboarding process is ready to go, step 4 shows you which recruitments you currently have available, their types, and how many users have converted through them. From here, you can click the recruitment tiles to view the associated list of respondents or click the Create button to add a new recruitment path into your project. Note that the recruitment corresponds to the access and onboarding steps your candidates will take, but we're not actually inviting anyone in just yet. That comes in a later step!
Step 5: Schedule phases and features

Test planning is a critical component of delta testing, but there are a lot of different ways to use these features to accomplish your goals. The fifth step includes adding your test plan to your project including your testing phases and the features you're targeting for each. Once you've completed step 5 and your test plan is configured, you'll be ready to move on to tuning your feedback types.
Step 6: Configure your feedback types

The standard project template includes the most important feedback types for any product validation test - issues, ideas, and praise. These types cover any problems with your product experience, ways to expand on existing functions, and identifying experiences that make your product stand out (in a good way). While the majority of programs don't need to make any changes, clicking into the different types will allow you to customize the form (the questions) for each type as well as collaboration settings, workflows, and even automations. It's important to get these feedback types tuned-in before testing starts because your participants will hit the ground running, and you don't want anything getting in the way of their engagement. Once you're ready here, the next step is preparing for engagement.
Step 7: Enable engagement automation

The engagement bot is designed to observe a plethora of signals throughout your project - timeline, features, engagement levels, feedback submissions, collaboration, participant counts, and stated goals. It even looks at individual testers' habits and time zones to optimize its reminders. We highly recommend leveraging the engagement bot, and this section is one way to make sure the bot's enabled and "on the job!"
Step 8: Invite users to your project

At this point, your project is fully configured and ready to start! You've set up your test plan, prepared your onboarding, and readied yourself for feedback. Now you just need to invite your users! By default, you'll have the option shown above - "Invite users via email" - but if you've configured your Recruitment(s), your other invite mechanisms will display here, as well. If the other steps were completed already, having candidates enter your project is all you'll need to get started. Once your applicants are approved, your configuration and the Delta process will take over, automatically moving testers through your phases, encouraging and reminding them to complete activities and submit feedback in accordance with your schedule.
Step 9: Review participant feedback

Time-skip! After inviting Your candidates were invited, your testers were selected, your project's first engagement phase started, and you're collecting feedback. This panel is all about reviewing what you've collected. You should be triaging your feedback, collaborating with your testers to collect needed information and sending "whole" tickets to your product or development team. In addition to using this panel, we offer whole dashboards dedicated to your collected feedback, so make sure to check your dashboard list for a more robust breakdown.
Step 10: Survey your participants

Does your product team have questions that your participants have yet to answer? Do you need to dive deeper into specific topics, or capture specific metrics (like NPS) that the Delta method doesn't include out-of-box? This panel is a great reminder that you can create and deliver surveys whenever you want. Drum up a new custom survey to meet your data collection needs, just make sure you're not "double dipping" on feedback and creating data silos, obscuring the test's inherent clarity. Questions like "Did you experience any problems with 'feature'? What were they?" is duplicative of the Delta method and only serves to misdirect your testers' feedback.
Step 11: Discover and share insights

Now that you've collected all that data, it's time to understand and share it! Be it feedback, activity metrics, feature satisfaction ratings, or custom surveys, we've got a bunch of prepared dashboards providing out-of-box insights, and our custom reporting engine can build just about anything else you (and your stakeholders) might want. Click the panels to jump to other dashboards, or create your own custom reports and share them using our Report Distribution features.
How do I re-enable the Project Kickoff Dashboard link in the Navigation Bar?
If you dismissed the Project Kickoff Dashboard Navigation Bar button before you were ready, you can re-enable that by simply navigating to the Project Kickoff Dashboard as described above and pressing the Restore Kickoff Menu Link button located in section 1 of the dashboard.