---
title: Embedding external content in Centercode resources
description: Embedding refers to the integration of external content via embedding codes provided by the external service provider. This allows you to leverage existing content and functionalities from other serv
---
[Skip to content](https://help.centercode.com/en/guide-to-embedding-in-resources#main-content)
[![New\_Centercode\_Logo.png\]](https://help.centercode.com/hs-fs/hubfs/New_Centercode_Logo.png?height=35&name=New_Centercode_Logo.png)](https://centercode.com/)
- [Help Center Home](https://help.centercode.com/)
- [Starter & Delta Edition Help](https://learn.centercode.com/)
Open main navigation
Close main navigation
- [Help Center Home](https://help.centercode.com/)
- [Starter & Delta Edition Help](https://learn.centercode.com/)
- [Report an Issue](https://centercode.com/issue)
[Report an Issue](https://centercode.com/issue)
How can we help?
- There are no suggestions because the search field is empty.
1. [Help Center](https://help.centercode.com/en?hsLang=en)
2. [Resources & Surveys](https://help.centercode.com/en/resources-surveys?hsLang=en)
3. [Guides](https://help.centercode.com/en/resources-surveys?hsLang=en#guides)
# Embedding external content in Centercode resources
Embedding refers to the integration of external content via embedding codes provided by the external service provider. This allows you to leverage existing content and functionalities from other services in your Centercode resources, including video players, maps, social media posts, and much much more!
#### **How to embed external content**
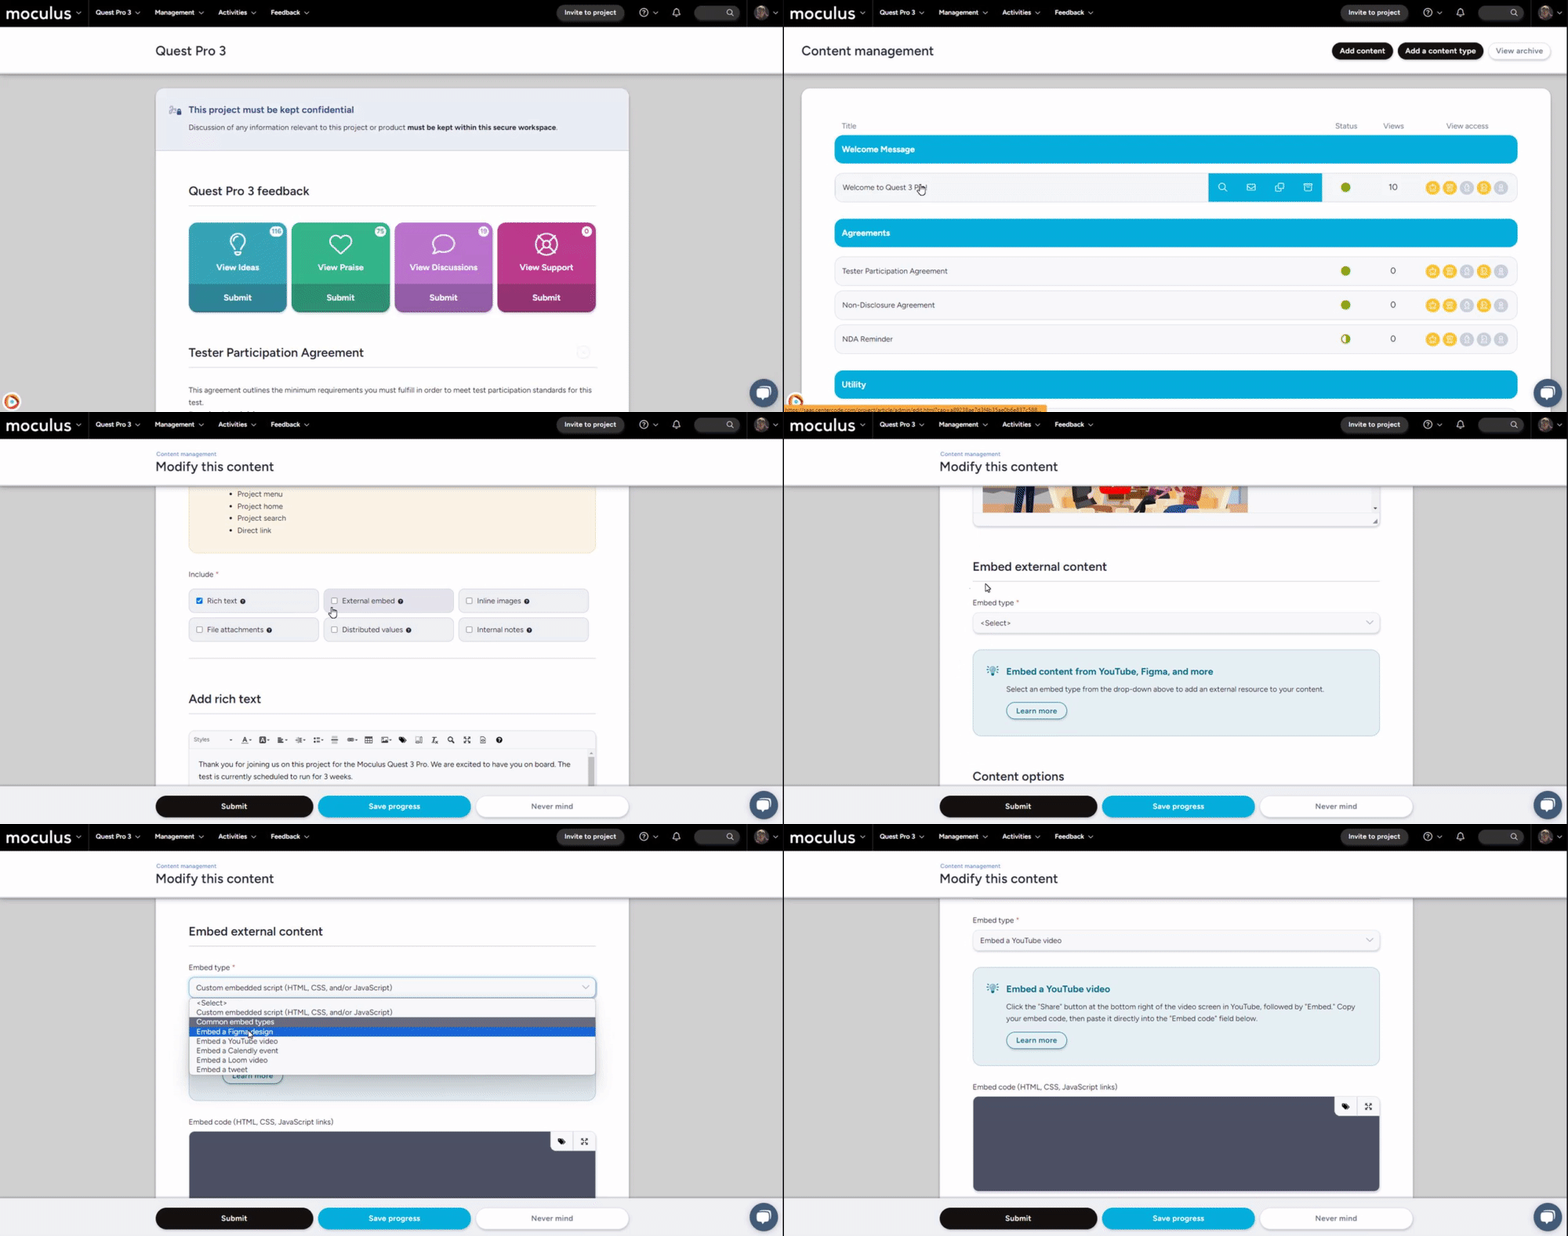
The External embed option is available for nearly all Centercode resource types. To embed external content begin by editing an existing or create a new Centercode resource of any type, and click the "External embed" option in the Include menu. (Note: External embed is not available for digital agreement or verify account detail Content types)
[](https://centercode.gyazo.com/1874ff3b9d2fdde19813a88d0b5d0786)
1. Create a new or edit an existing Centercode resource (content, release, or activity)
2. Select the **External embed** option in the Include section
3. Locate the **Embed external content** section of the page
4. Select an **Embed type** from the dropdown menu
From here you'll have a few different options to select. We've got a number of pre-built embed options, which give you a brief description of how to locate the embed code, and the appropriate Embed code window to copy/paste the embed code into. If you don't see the option you are looking for on the list, we also have a Custom embedded script option which will accommodate most embed types, detailed below.
#### **First-class "Embed types"**
[Custom embedded script](https://help.centercode.com/en/guide-to-embedding-in-resources#Custom)
[Figma](https://help.centercode.com/en/guide-to-embedding-in-resources#Figma)
[YouTube](https://help.centercode.com/en/guide-to-embedding-in-resources#YouTube)
[Calendly](https://help.centercode.com/en/guide-to-embedding-in-resources#Calendly)
[Loom](https://help.centercode.com/en/guide-to-embedding-in-resources#Loom)
[Twitter](https://help.centercode.com/en/guide-to-embedding-in-resources#Twitter)
### Custom embedded script
If you don't see the specific embed type you're looking for on the list, but you have an embed code ready to go, you'll want to use the **Custom embedded script** option. This will present you with three different options for embedding your content, and you'll need to know the correct options to use based on the embed code you are using.
**Embed code (HTML, CSS, JavaScript links)**
This is the most common embed type, and most embeds will only need this box. You'll want to scan through the embed code to see if it contains any \\ tags. If it does, you’ll want to cut that portion out and paste it in the Inline JavaScript box below. If not, simply copy/paste the embed code into this box and you should be good to go!
**Inline JavaScript (exclude \ tag)**
This is where you can directly paste JavaScript. If the content you are trying to embed contains inline JavaScript (indicated by \ tags), paste that portion of the code here (excluding the script tags).
**Linked assets**
This is where you will upload any source-based files for your embeds, such as .js or .css files. Click the "Select files" button and upload your .js or .css file. These files will NOT be visible/downloadable by users.
### Figma
To complete this integration, you’ll need:
- A Figma design that's ready to share
- Access to creating Centercode Content, Releases, or Features (in Test planning) at the intended level
**Acquiring the Figma embed code**
Figma has a great resource for acquiring the Figma embed code, [found here](https://help.figma.com/hc/en-us/articles/360039827134-Embed-files-and-prototypes).
Here are the highlights:
1. Open the Figma page and select the **top-level frame** you'd like the embed to show (optional)
2. Click **Share** in the toolbar
3. Update the **default link sharing** settings for the file. Set both the audience and the access level to determine the default access
4. To show the current selection in the embed preview, check **Link to selected frame** (optional)
5. Click **Get embed code** to open the embed code window
6. Click **Copy** to add the embed code to your clipboard
**Embedding a Figma design into Content or a Release**
The next step is to insert the embed code into the Centercode resource of your choice. Typically, this will be content or releases. In this example, we’ll insert the Figma design into Project-level Content.
From your Project Home:
1. Click the **Management** menu, then **Content** to access Content Management
2. Create new content or modify an existing one
3. Within the resource Modify page, click the **Embed a Figama design** option
4. Paste your embed code into the **Embed code** window
### YouTube
To complete this integration, you’ll need:
- A published YouTube video with embedding permissions
- Access to creating Centercode Content, Releases, or Features (in Test planning) at the intended level
**Acquiring the YouTube embed code**
Read more about retrieving the embed code on [this YouTube support page](https://support.google.com/youtube/answer/171780?hl=en-GB&sjid=6680924423324121274-NA).
Here are the highlights:
1. Go to the YouTube video you want to embed
2. Click on the **Share** button located under the video
3. Click on the **Embed** button
4. Choose the size of the video player by selecting one of the available options
5. Copy the HTML **Embed code** provided
#### Embedding a YouTube video into content or a release
The next step is to insert the embed code into the Centercode resource of your choice. Typically, this will be content or releases. In this example, we’ll insert the YouTube video into project-level content.
From your Project Home:
1. Click the **Management** menu, then **Content** to access Content Management
2. Create new content or modify an existing one
3. Within the resource Modify page, click the **Embed a YouTube video** option
4. Paste your embed code into the **Embed code** window
### Calendly
To complete this integration, you’ll need:
- A Calendly event that is ready to share
- Access to creating Centercode Content, Releases, or Features (in Test planning) at the intended level
**Acquiring the Calendly embed code**
Calendly has a great resource for acquiring their embed code, [found here](https://help.calendly.com/hc/en-us/articles/223147027-Embed-options-overview#1).
Here are the highlights:
1. Open the Event Types tab on your Calendly home page
2. Find a team or user whose landing page you'd like to share
3. Select the gear icon and select **Add to website**
4. Select the **Inline Embed** embed type
5. Copy the displayed embed code to your clipboard
**Embedding a Calendly event into content or a release**
The next step is to insert the embed code into the Centercode resource of your choice. Typically, this will be Content or Releases. In this example, we’ll insert the Loom recording into project-level content.
From your Project Home:
1. Click the **Management** menu, then **Content** to access Content Management
2. Create new content or modify an existing one
3. Within the resource Modify page, click the **Embed a Calendly event** option
4. Paste your embed code into the **Embed code** window
### Loom
To complete this integration, you’ll need:
- A recorded Loom that's ready to share
- Access to creating Centercode Content, Releases, or Features (in Test planning) at the intended level
**Acquiring the Loom embed code**
Loom has a great resource for acquiring the Loom embed code, [found here](https://support.loom.com/hc/en-us/articles/360002208317-How-to-embed-your-video-into-a-webpage-).
Here are the highlights:
1. Open the Loom you'd like to share and select **Share** above the video
2. Click on **Embed**
3. Choose between Responsive or Fixed Size HTML code
Click **Copy embed code** to add the embed code to your clipboard
**Embedding a Loom recording into content or a release**
The next step is to insert the embed code into the Centercode resource of your choice. Typically, this will be Content or Releases. In this example, we’ll insert the Loom recording into project-level content.
From your Project Home:
1. Click the **Management** menu, then **Content** to access Content Management
2. Create new content or modify an existing one
3. Within the resource Modify page, click the **Embed a Loom video** option
4. Paste your embed code into the **Embed code** window
### Twitter
To complete this integration, you’ll need:
- A Tweet that's ready to share
- Access to creating Centercode Content, Releases, or Features (in Test planning) at the intended level
**Acquiring the Twitter embed code**
Twitter has a great resource for acquiring the embed code for a Tweet, [found here](https://help.twitter.com/en/using-x/how-to-embed-a-post).
Here are the highlights:
1. Open the Tweet you'd like to share and click the "..." icon located within the post
2. Click on **Embed post**
3. Choose between a video or post embed
4. Click the **Copy Code** button
**Embedding a Tweet into content or a release**
The next step is to insert the embed code into the Centercode resource of your choice. Typically, this will be Content or Releases. In this example, we’ll insert the Loom recording into project-level content.
From your Project Home:
1. Click the **Management** menu, then **Content** to access Content Management
2. Create new content or modify an existing one
3. Within the resource Modify page, click the **Embed a tweet** option
4. Paste your embed code into the **Embed code** window
### Troubleshooting your embeds
**My embed isn't showing up**
Double-check that the embed code is the only thing in your clipboard when you paste it. Try removing the embedded code and re-pasting it from scratch, ensuring that you're pasting the correct code and that it's properly formatted.
If using a custom embed that contains inline JavaScript ensure that you have put the script portion into the appropriate box (and removed the \ tags after doing so)
**My embedded video isn't loading**
If your embedded video isn't loading properly, there are a few things to check. Make sure you have a stable internet connection and that video providers API service isn't having an outage. You can also try reloading the page or restarting your internet browser.
Most commonly, this is because the embed code is incorrect. Double-check that it's correct, then try giving it another shot from scratch.
**Facebook or Twitter embeds aren't working on the Edge browser**
Microsoft Edge has built-in tracking prevention functionality that is intended to detect and block potentially harmful trackers such as cryptomining or fingerprinting. The feature has multiple "levels" of prevention ranging from Basic to Strict. Facebook and Twitter embeds will work as expected in most cases, but Strict level tracking prevention will block them.
Unfortunately, this is something controlled on the user's end within their browser settings and not something Centercode can resolve in our code.
- [Centercode Basics](https://help.centercode.com/en/centercode-basics?hsLang=en#main-content)
- [Overviews](https://help.centercode.com/en/centercode-basics?hsLang=en#overviews)
- [Guides](https://help.centercode.com/en/centercode-basics?hsLang=en#guides)
- [FAQs](https://help.centercode.com/en/centercode-basics?hsLang=en#faqs)
- [Community Administration](https://help.centercode.com/en/community-administration?hsLang=en#main-content)
- [Community Administration](https://help.centercode.com/en/community-administration?hsLang=en#community-administration)
- [Overviews](https://help.centercode.com/en/community-administration?hsLang=en#overviews)
- [Guides](https://help.centercode.com/en/community-administration?hsLang=en#guides)
- [FAQs](https://help.centercode.com/en/community-administration?hsLang=en#faqs)
- [Project Administration](https://help.centercode.com/en/project-administration?hsLang=en#main-content)
- [Overviews](https://help.centercode.com/en/project-administration?hsLang=en#overviews)
- [Guides](https://help.centercode.com/en/project-administration?hsLang=en#guides)
- [FAQs](https://help.centercode.com/en/project-administration?hsLang=en#faqs)
- [Features & Test Planning](https://help.centercode.com/en/features-test-planning?hsLang=en#main-content)
- [Overviews](https://help.centercode.com/en/features-test-planning?hsLang=en#overviews)
- [Guides](https://help.centercode.com/en/features-test-planning?hsLang=en#guides)
- [FAQs](https://help.centercode.com/en/features-test-planning?hsLang=en#faqs)
- [Resources & Surveys](https://help.centercode.com/en/resources-surveys?hsLang=en#main-content)
- [Overviews](https://help.centercode.com/en/resources-surveys?hsLang=en#overviews)
- [Guides](https://help.centercode.com/en/resources-surveys?hsLang=en#guides)
- [FAQs](https://help.centercode.com/en/resources-surveys?hsLang=en#faqs)
- [Recruiting](https://help.centercode.com/en/recruiting?hsLang=en#main-content)
- [Overviews](https://help.centercode.com/en/recruiting?hsLang=en#overviews)
- [Guides](https://help.centercode.com/en/recruiting?hsLang=en#guides)
- [FAQs](https://help.centercode.com/en/recruiting?hsLang=en#faqs)
- [Feedback](https://help.centercode.com/en/feedback?hsLang=en#main-content)
- [Overviews](https://help.centercode.com/en/feedback?hsLang=en#overviews)
- [Guides](https://help.centercode.com/en/feedback?hsLang=en#guides)
- [FAQs](https://help.centercode.com/en/feedback?hsLang=en#faqs)
- [Dashboards & Reporting](https://help.centercode.com/en/dashboards-reporting?hsLang=en#main-content)
- [Overviews](https://help.centercode.com/en/dashboards-reporting?hsLang=en#overviews)
- [Guides](https://help.centercode.com/en/dashboards-reporting?hsLang=en#guides)
- [FAQs](https://help.centercode.com/en/dashboards-reporting?hsLang=en#faqs)
- [Integrations](https://help.centercode.com/en/integrations?hsLang=en#main-content)
- [Overviews](https://help.centercode.com/en/integrations?hsLang=en#overviews)
- [Guides](https://help.centercode.com/en/integrations?hsLang=en#guides)
- [FAQs](https://help.centercode.com/en/integrations?hsLang=en#faqs)
- [What's New?](https://whatsnew.centercode.com/)
- [System Status](https://status.centercode.com/)
- [Starter & Delta Edition Help Center](https://learn.centercode.com/)
- [Report an Issue](https://centercode.com/issue)
[](https://centercode.com)
Copyright © 2027, Centercode