![New_Centercode_Logo.png]](https://help.centercode.com/hs-fs/hubfs/New_Centercode_Logo.png?height=35&name=New_Centercode_Logo.png)
What is a centralized Jira connection?
If your community sends feedback to Jira from more than one project, you've likely had to enter the same Jira credentials over and over. A centralized Jira connection lets a community admin set up a Jira instance once, in the Integration Center, so any project in the community can use it.
Project admins still choose whether to use a shared connection or authenticate independently. Nothing about an existing project-level setup changes unless you switch it.
Common use cases
- Send feedback from multiple projects to the same Jira instance without re-entering credentials in each one
- Rotate a Jira API token in one place instead of updating every project that uses it
- Control which team members can view or edit Jira credentials, separate from who can pick a connection
- See at a glance which projects depend on a given Jira connection before editing or removing it
Before you start
You'll need:
- A Community Administrator role to add, edit, or remove community-level Jira connections. Project admins can select a connection but can't view or edit its credentials.
- A Jira account with access to submitting issues in the desired Jira project. A dedicated service account that doesn't use an SSO-only login to Jira is best, since Centercode authenticates directly using Jira-provided access tokens.
- Your Jira base URL and an API token or personal access token, depending on your authentication scheme.
Adding a Jira instance in the Integration Center
Community-level Jira connections live in the same place as your Slack integration.
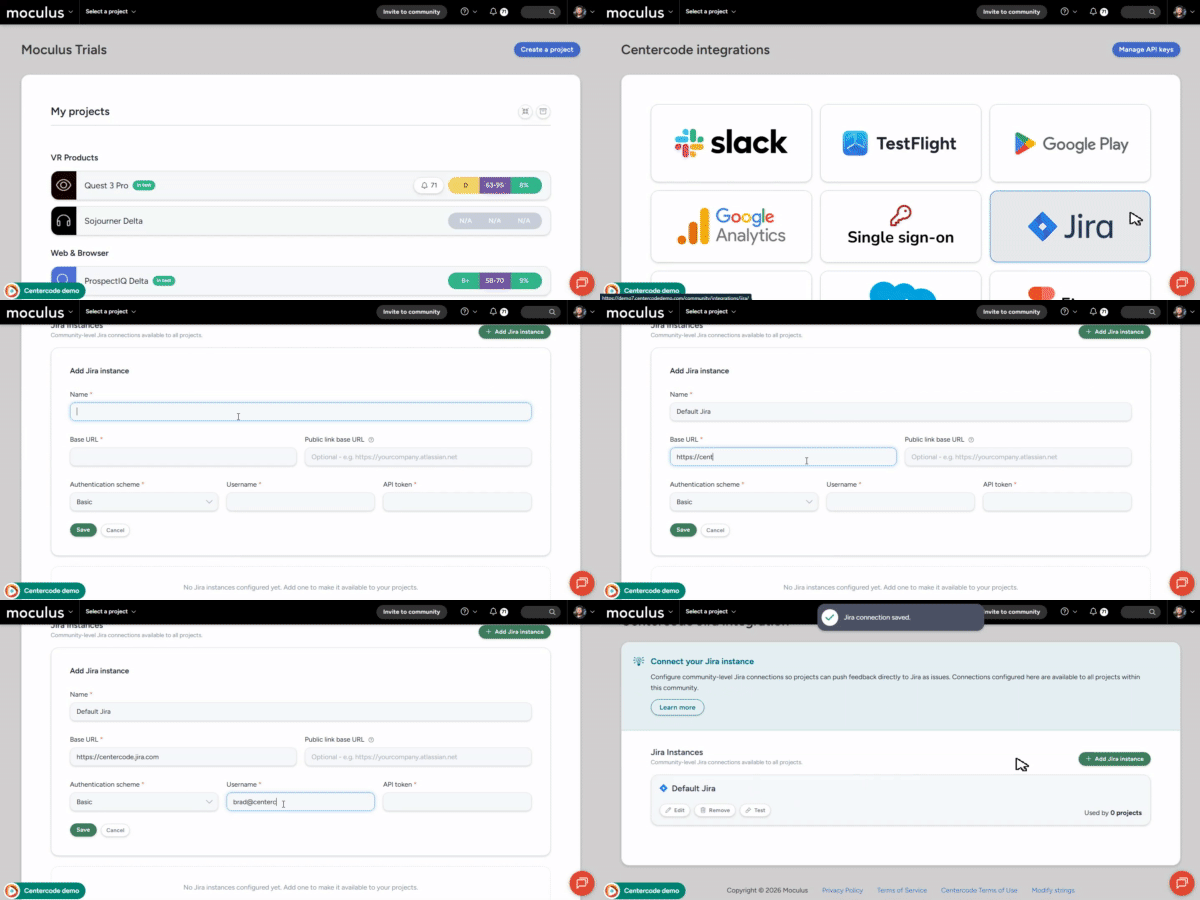
- Click Community configuration > Integration center
- Select the Jira tab
- Click Add a Jira instance
- Enter an Instance name to identify this connection (for example, "Centercode Engineering")
- Enter the Base URL of your Jira site, including https
- Choose an Authentication scheme: Basic or Bearer
- Enter the Username and API token (or personal access token, depending on scheme)
- Click Test to confirm Centercode can reach your Jira site
- Click Save
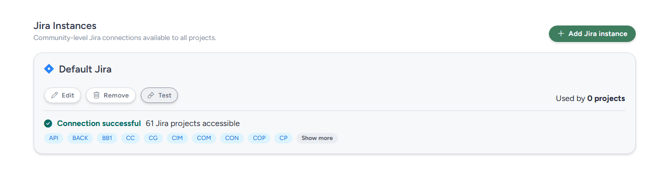 A successful test lists the Jira projects Centercode can see, so you know the connection works before any project relies on it. If the test fails, double-check that the API token is valid and has access to the project you expect.
Using a community connection in a project
Once a community connection exists, project admins see it as an option when they configure a Jira External Destination.
- From the feedback type's External destinations tool, create or edit a Jira destination
- Choose a connection from the dropdown, or select Project-specific connection to authenticate independently
Field mapping, dynamic tags, and workflow triggers work identically no matter which connection source you choose. See the Guide to Centercode & Jira Integration for those steps.
Managing existing connections
From the Integration Center, each Jira instance shows which projects currently use it.
- Edit: update the instance name, base URL, or credentials. Rotating a token here updates every project using that connection automatically, no re-entry required.
- Remove: Centercode warns you which projects rely on the connection before you confirm. Projects that revert to a project-specific connection they'd previously configured don't need to re-enter those credentials.
Notes
- Existing project-level Jira connections aren't migrated automatically. They keep working as project-specific connections until you choose to switch a project to a community connection.
- Credentials are encrypted at rest.
- The Integration Center tracks who last edited a connection and when, but doesn't keep a full change history.
- Looking for the project-level setup steps, including field mapping and dynamic tags? See the Guide to Centercode & Jira Integration.
- Running into an error? Check the Jira Integration FAQ and Troubleshooting.