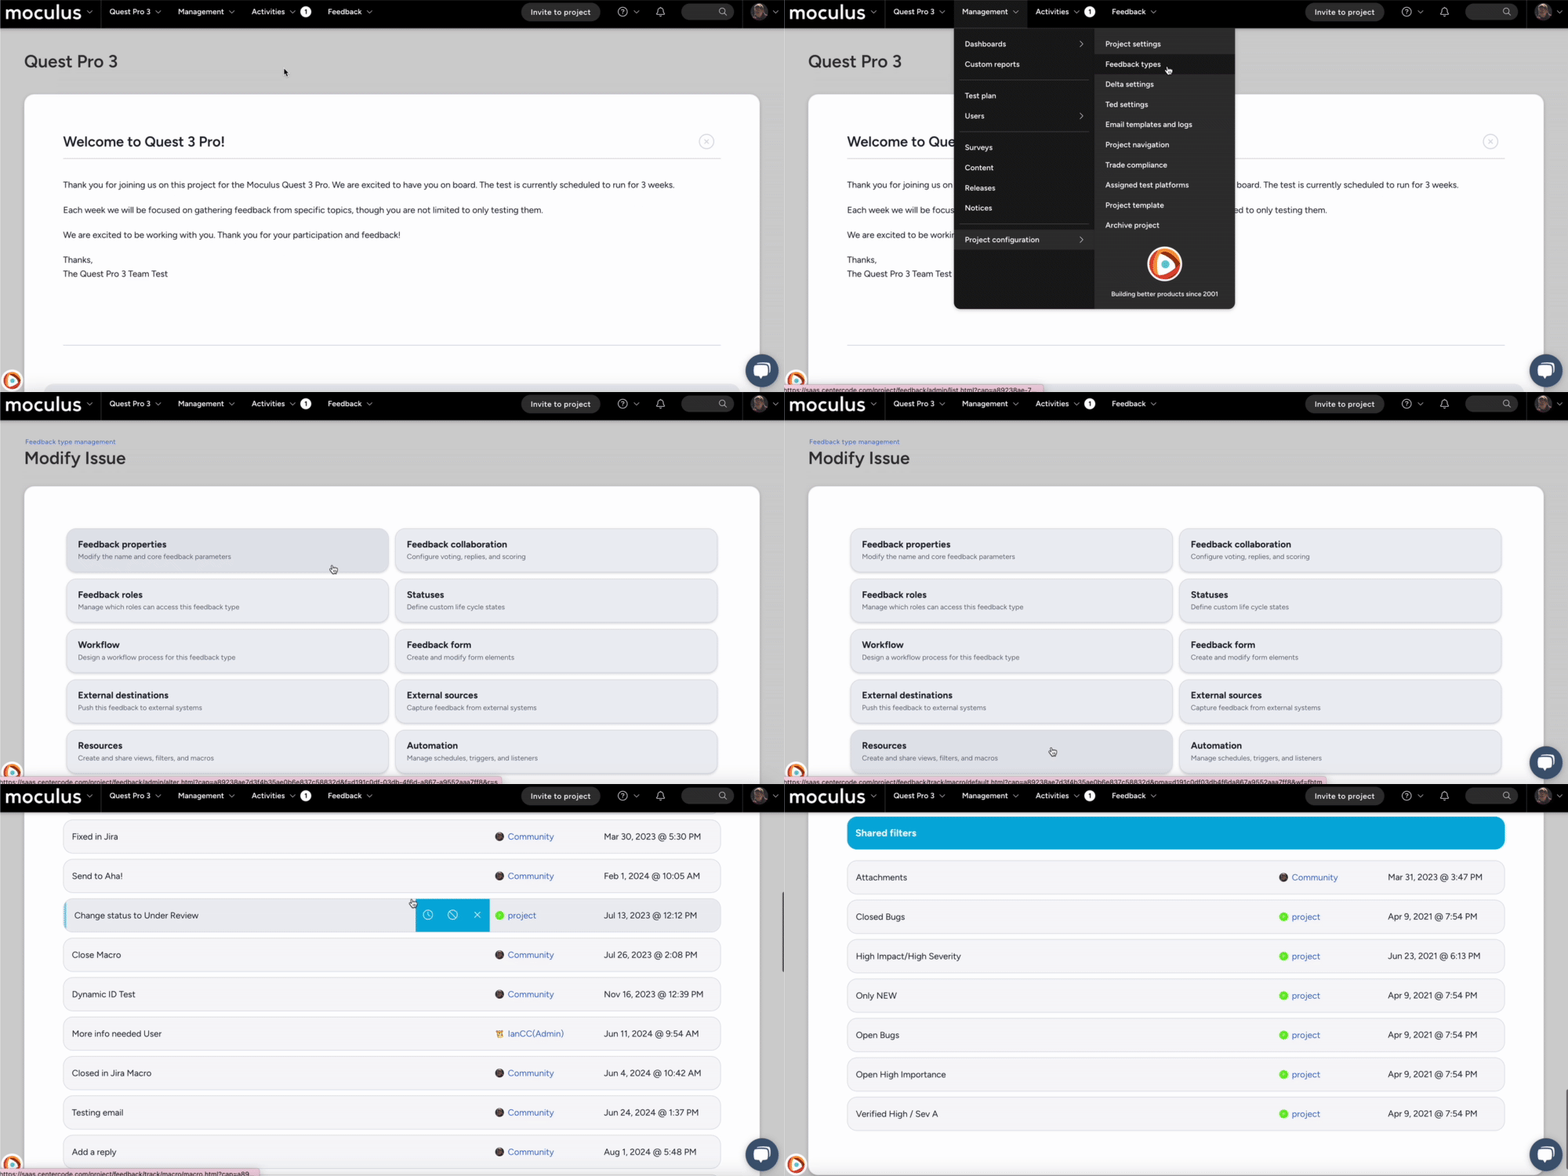
Feedback Resources
Feedback Resources in Centercode allow for managing and automating feedback workflows. These resources include Macros, Views, and Filters, allowing for efficient organization, automation, and customization of feedback data.
Accessing Feedback Resources
- From your project home, click Management
- Select Project configuration
- Click Feedback types
- Hover over your desired feedback type and click Modify (pencil icon)
- Click Resources
Feedback Macros
Feedback macros are automated actions that modify feedback fields, adjust workflows, send notifications, and manage team assignments. They can be customized to run once per feedback item, require admin confirmation, or execute automatically.
Creating a Macro
- Click Create a macro
- Enter a Name
- Add a Description to explain the purpose of the macro
- Modify feedback fields as needed:
-
-
Summary: Brief description of the feedback -
Steps to Reproduce: Detailed steps to replicate the issue -
Severity: The impact level of the feedback item -
Closure Reason: The justification for closing the feedback -
Internal Tracking ID: Unique identifier for internal tracking -
Text Entry Title: Title of the feedback item -
Text Entry Title Paragraph: Additional descriptive text -
Modify Access with No View: Restrict access without visibility -
Feature: The product feature affected -
Adjust Blocking State: Mark feedback as blocking further actions -
Adjust Workflow: Change the feedback workflow stage -
Add Reply to Feedback: Insert an automated reply response
-
-
Choose macro options:
-
Trigger Webhook: Sends data to an external system -
Send Email: Notifies users via email -
Adjust Exposure: Alters visibility settings -
Add Rank to Submitter: Assigns ranking points to the submitter -
Add Note to Submitter: Sends a note to the submitter -
Add Rank to Owner: Assigns ranking points to the feedback owner -
Add Note to Owner: Sends a note to the feedback owner -
Adjust Teams for Original Submitter Only: Updates team assignments for the feedback Submitter. -
Adjust Teams for All Submitters (Original, Duplicates, Votes): Updates teams for all involved users. -
Remove Feedback: Deletes the feedback item.
-
-
Customize execution settings:
-
Show as Feedback Action: Displays the macro as an action -
Only Run Once Per Feedback Item: Ensures single execution -
Skip Admin Confirmation: Runs automatically without confirmation
-
Once the macro is created, it can be attached to feedback automation to trigger actions based on specific conditions. Learn more
Feedback Views
Views allow admins to customize how feedback is displayed. They can be private (personalized for an individual user) or shared (accessible to admin/support teams).
Creating a Feedback View
-
Click Create a view.
-
Configure display settings, filters, and sorting options.
-
Save the view for future use.
Feedback Filters
Filters help refine and categorize feedback based on specific conditions.
Creating a Feedback Filter
-
Click Create a Filter.
-
Define filter conditions (e.g., severity, status, submitter, tags).
-
Apply the filter to streamline feedback management.
Related Articles
*Placeholder for new article URL when published
